 World Traveller 73

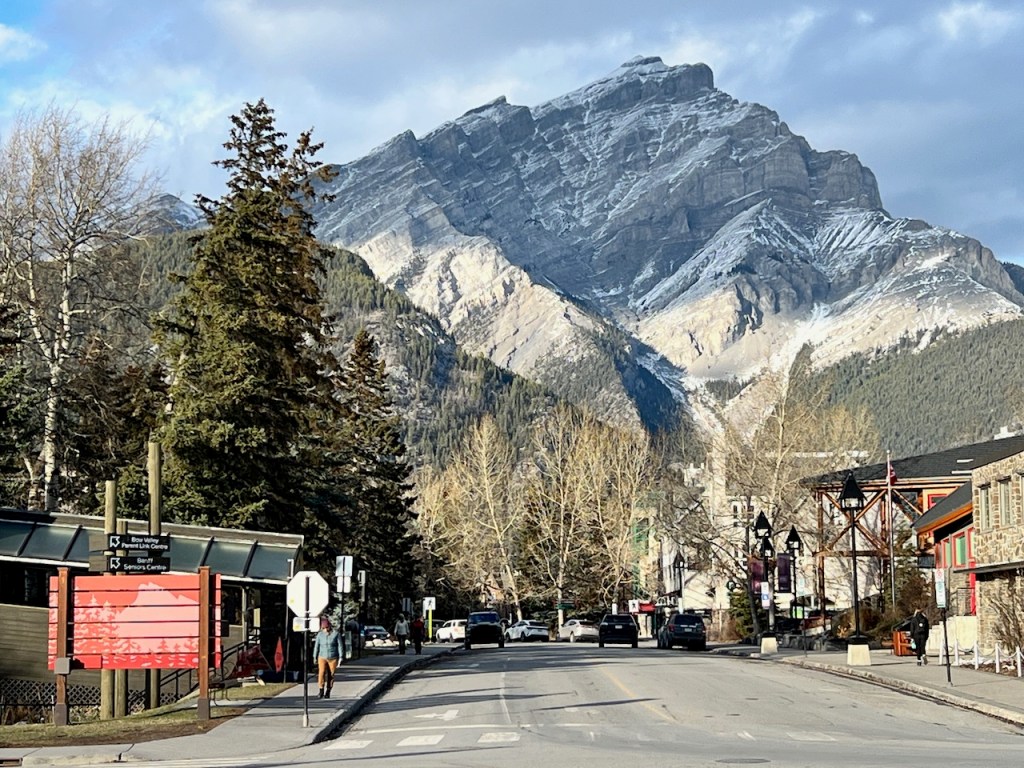
We had a day visit through Banff, after spending the weekend hiking in the Lake Louise area. After a wonderful stay at the Fairmont Lake Louise, today’s objective was taking MrsWT73 on her first visit to Banff, Alberta, Canada. Since no visit to Banff would be complete without a walk through the Bow River Trail, we set out on this mission immediately upon our arrival in Banff.
If you enjoyed this post, please follow us here or on social media through Facebook, Twitter “X” or Instagram for more travel tips and hacks on how to “Upgrade Your Travels”.
Walking the Bow Falls River Trail, Banff National Park, Alberta, Canada
After visiting the Fairmont Château Lake Louise, an completing a number of walks in the area that included the Lake Louise Lake Shore Trail, and the Fairview Lookout Trail, we had our sights set on a day visit to Banff and the Bow Falls River Trail.
About the Bow Falls River Trail:
The Bow Falls River Trail is among the most popular and easily accessible trails within the town of Banff, Alberta. Visitors to the Bow Falls River Trail will be rewarded with a relaxing view of the Bow River along a mostly level path.
The Bow River Trail is quite popular as a result of it’s proximity to Banff. If you only have time to complete one trail walk within the town of Banff, the Bow River Trail will likely be towards the top of your list.
Getting to the Bow Falls River Trail:
The Bow Falls River Trail is located within Banff National Park. To enter (and park your vehicle) in the park, you’ll need a daily park pass from the Banff National Park entry gates.
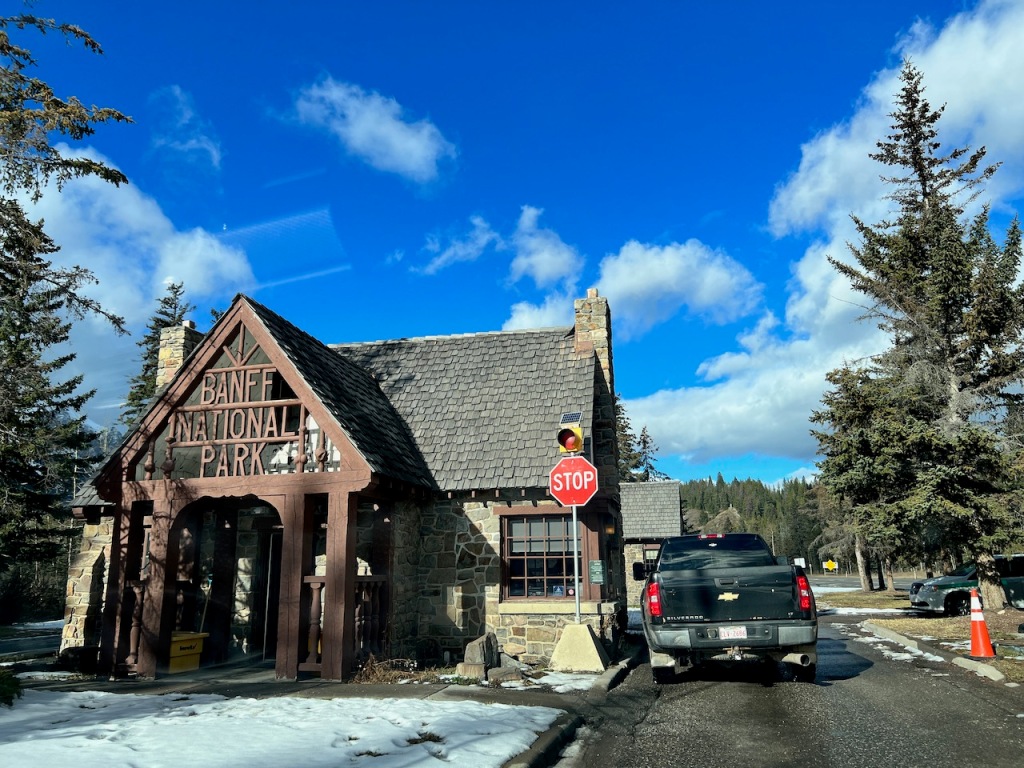
During the time of our visit, the admission fees were $10.50 CAD per person per day. In our case, we passed through the park gates at around noon, and were given a twenty eight hour pass lasting until 4 PM the next day. If you are a regular visitor, or are staying a longer period of time, an annual pass may be a more economical version for you at $72.25 CAD for a single person or $145.25 CAD for a family.
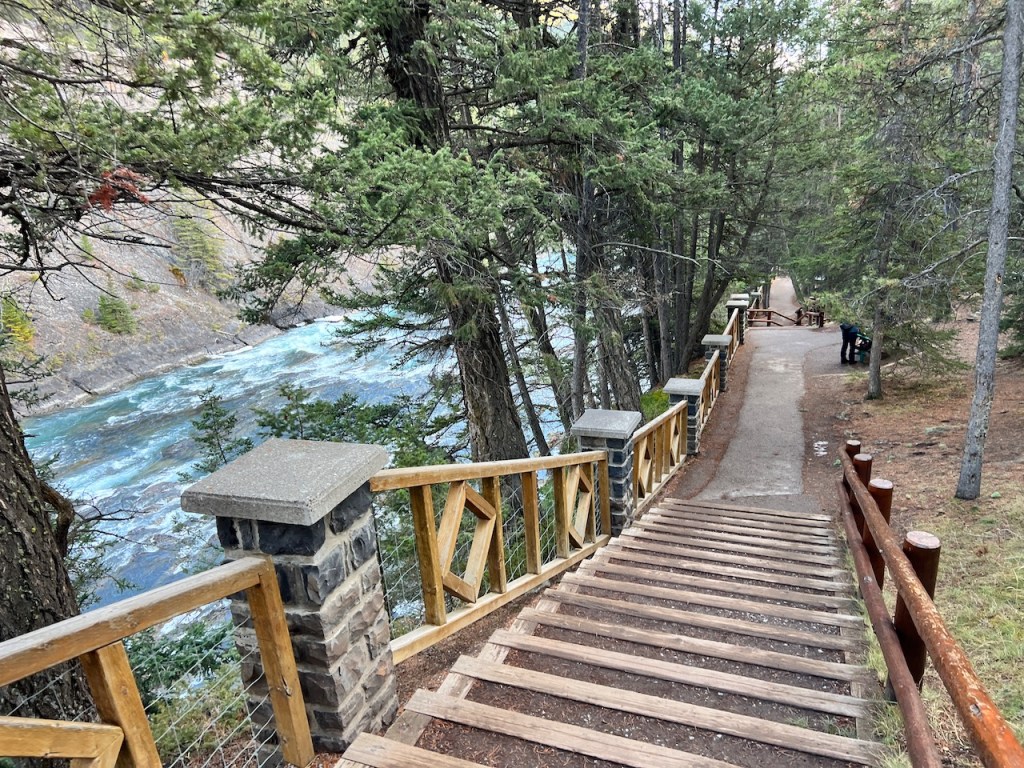
The Bow Falls River Trail is an short 1.2 kilometre trail that runs up along the eastern side of the Lake Louise lake. The trail is mostly flat, with the exception of the area near Bow Falls which has about ten minutes of elevation gain based on the use of stairs.
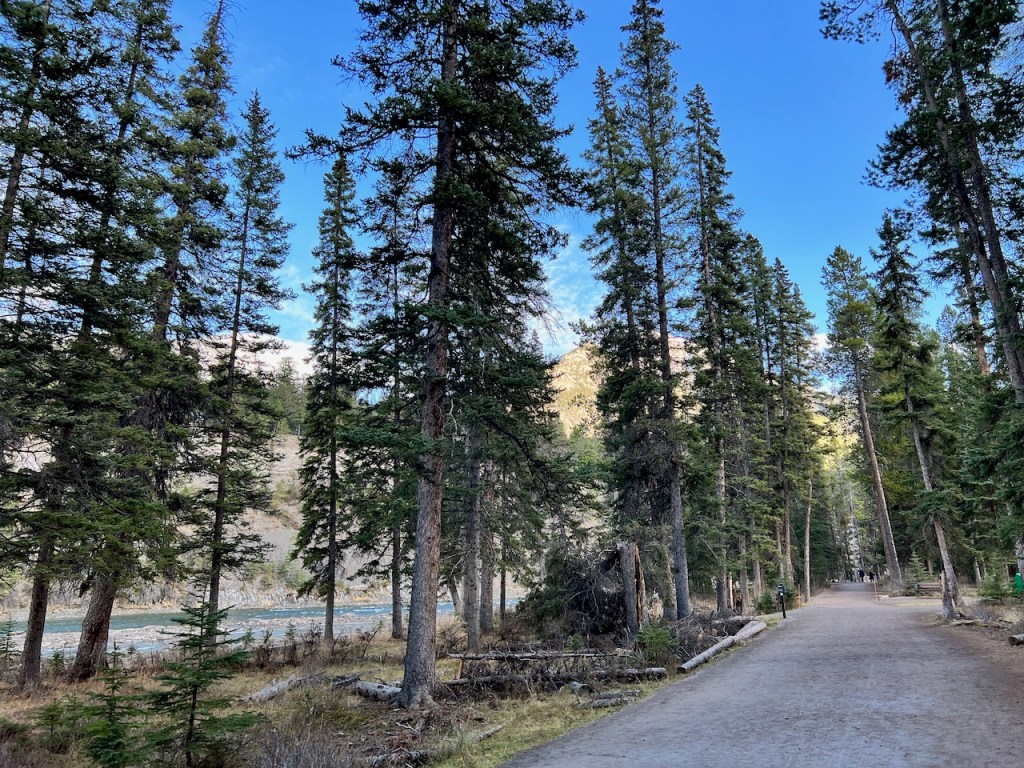
Since the town of Banff has mostly paid parking within the commercial area, we elected to park for free at the train station. With a short walk through town. we opted for a walk along Bow Avenue where we’d take in the Bow River on our walk out outwards the Bow Falls.
The trail and walking took us about 45 minutes to get from the train station out towards the Bow Falls.
Starting at Bow Valley River:
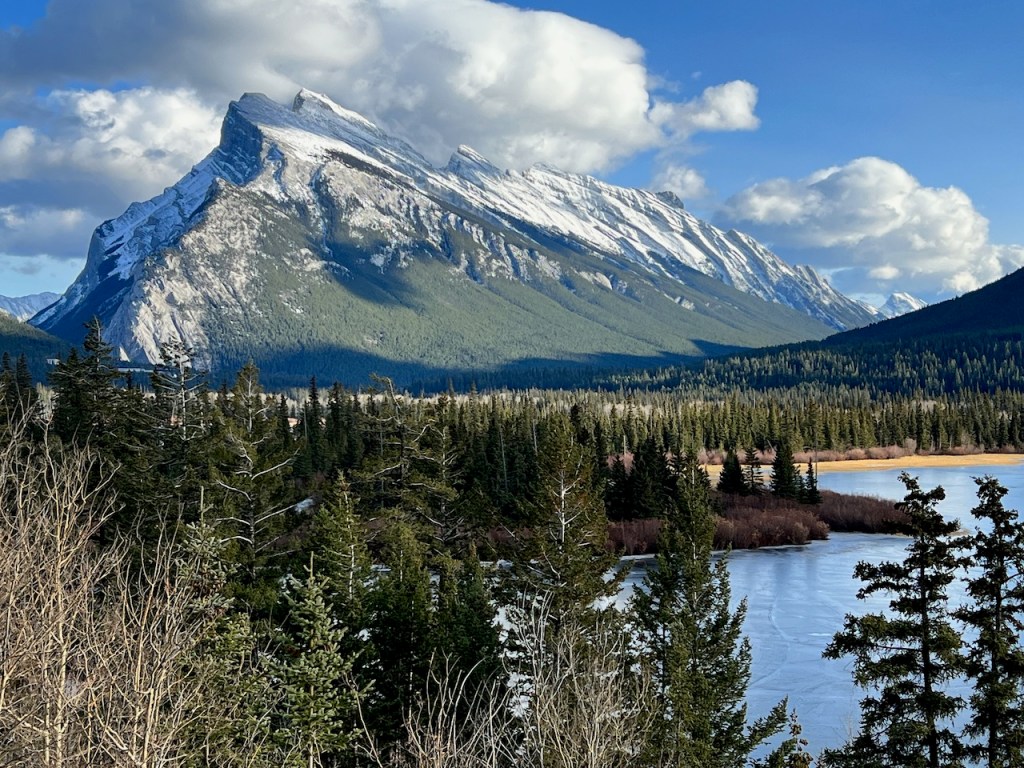
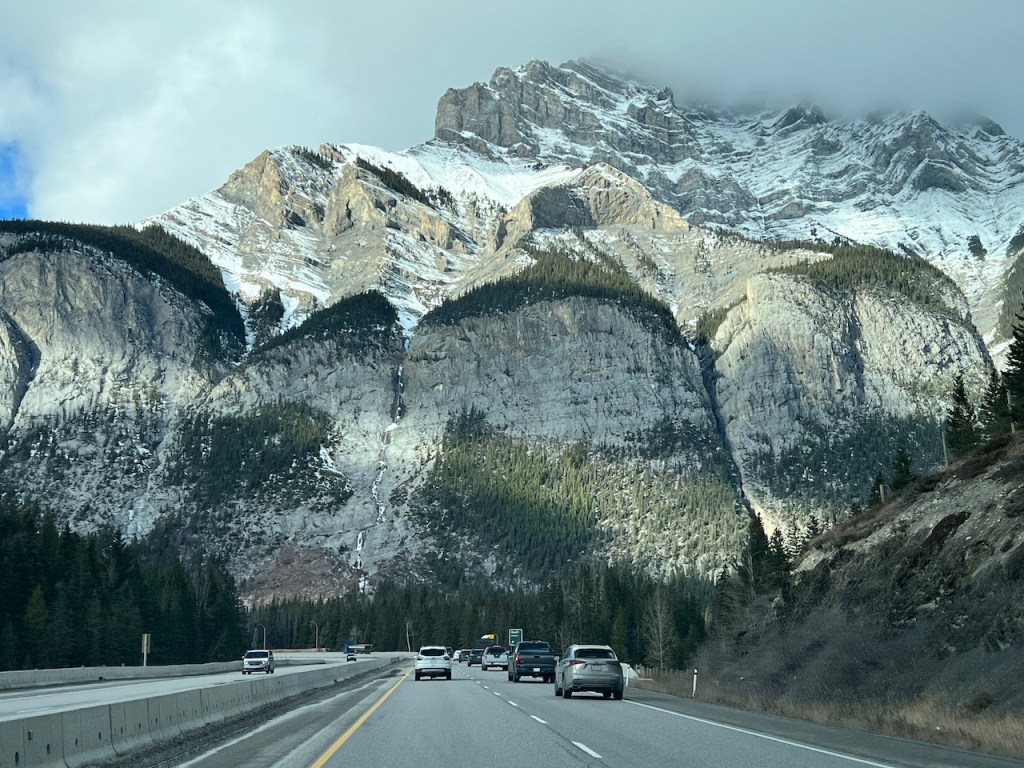
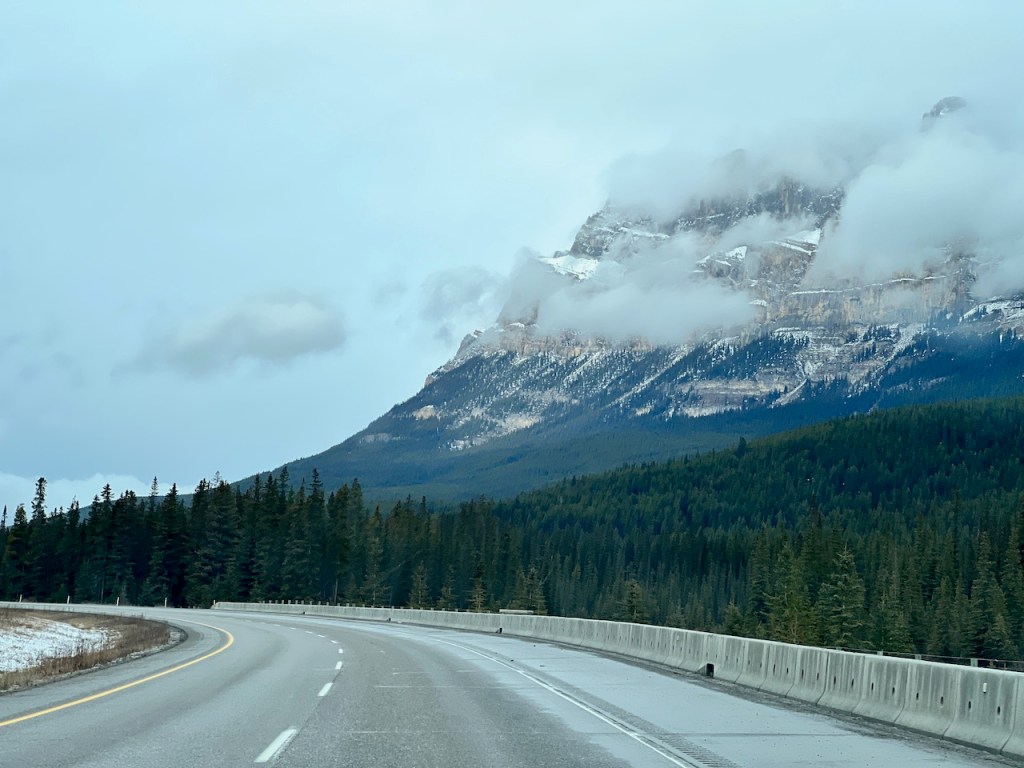
After departing the Fairmont Château Lake Louise we drove over to the town of Banff, Alberta. We had some spectacular views of Mount Rundle from the Trans Canada Highway from the Vermillion Lake lookout.


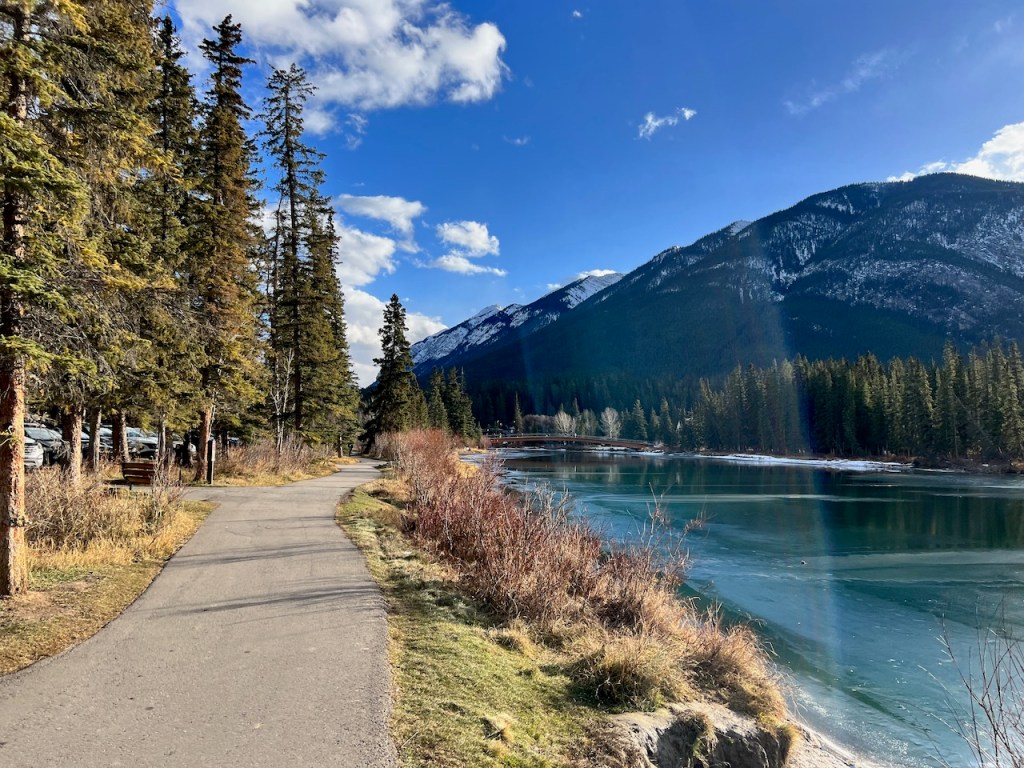
We parked at the free Banff Train Station parking lot. From the train parking lot, we set along the Bow Valley walkway which ran on the east side of the Bow Valley River.
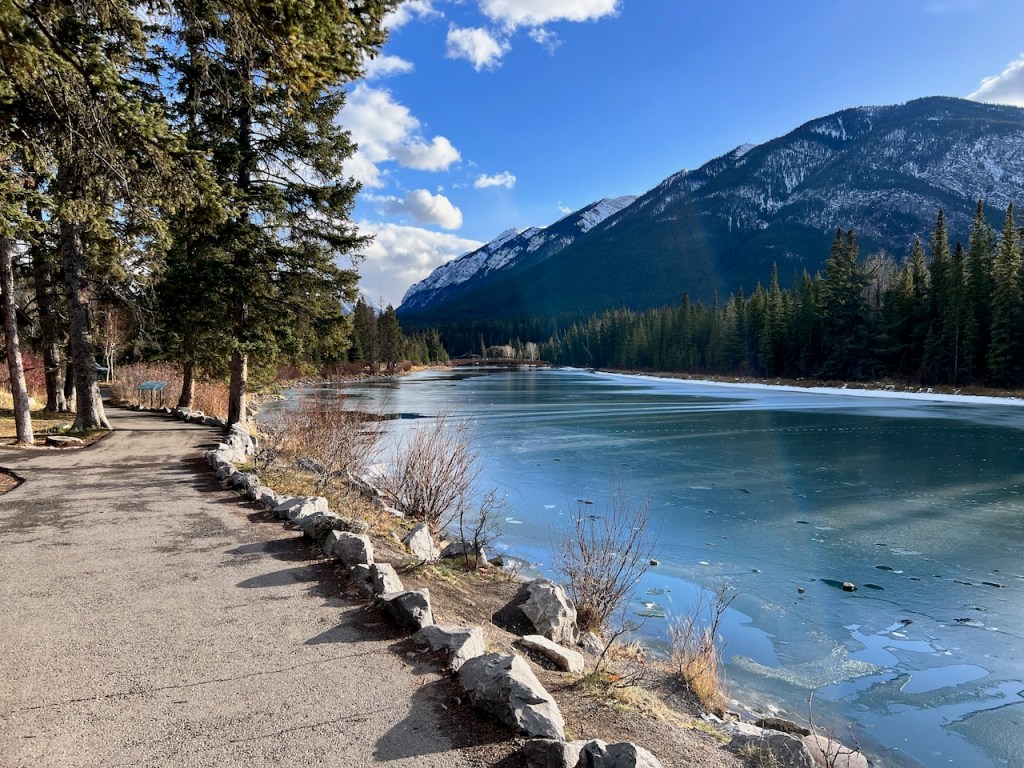
We were treated to spectacular fall views. Firstly, it was amazing to see that the town of Banff is in a completely different climate zone than neighbouring Lake Louise. With fall like temperatures, as compared to Lake Louises’ winter climates, we were treated to a much milder fall walk.
It’s these types of mountain and river views that Canada is famous for, and the Bow Valley trail is no exception to this expectation. With a partial fall freeze on some elements of the river, the crispness of the images came through with a full sun West facing exposure on this portion of the trail.

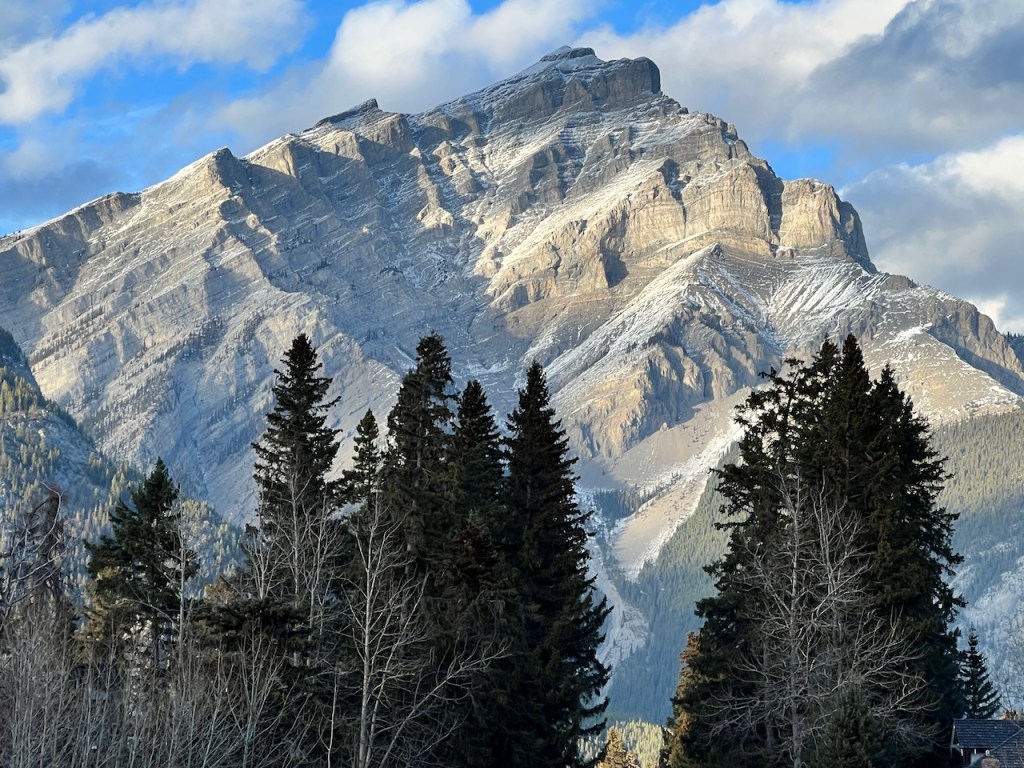
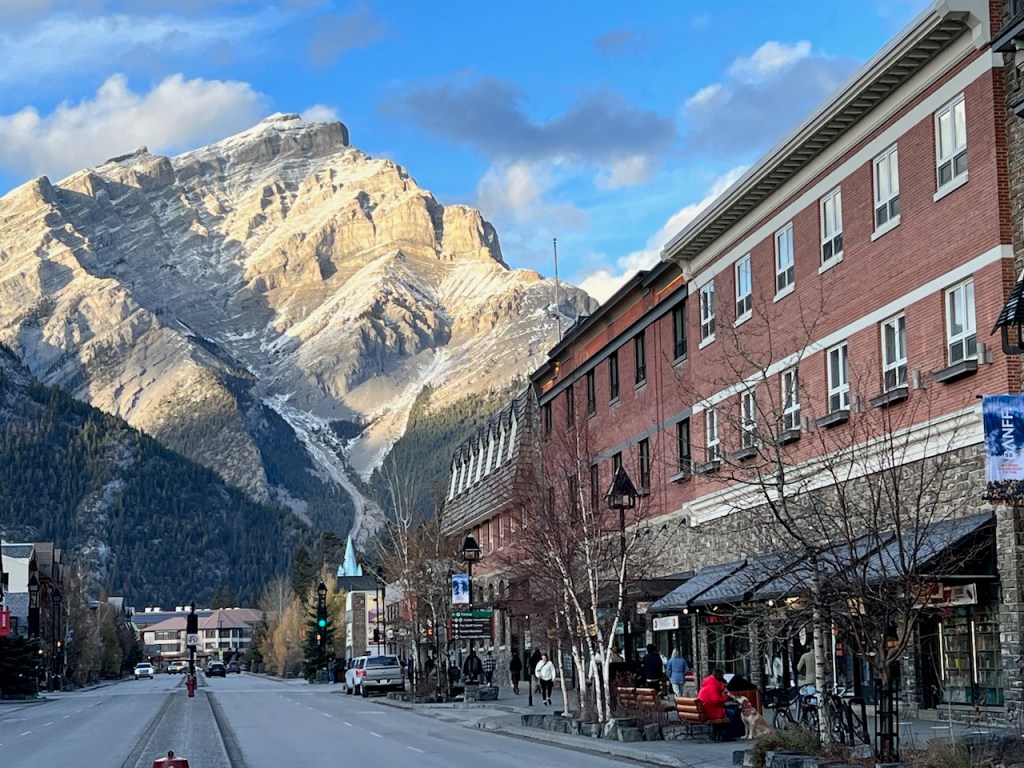
The Bow Valley Trail led us towards the top of Banff Avenue. We had sight lines towards Cascade Mountain which dominates Banff Avenue.
After crossing the Bow Ridge Bridge on Banff Trail, we crossed into the more known part of the Bow River Falls trail.
Walking the Bow River Trail:
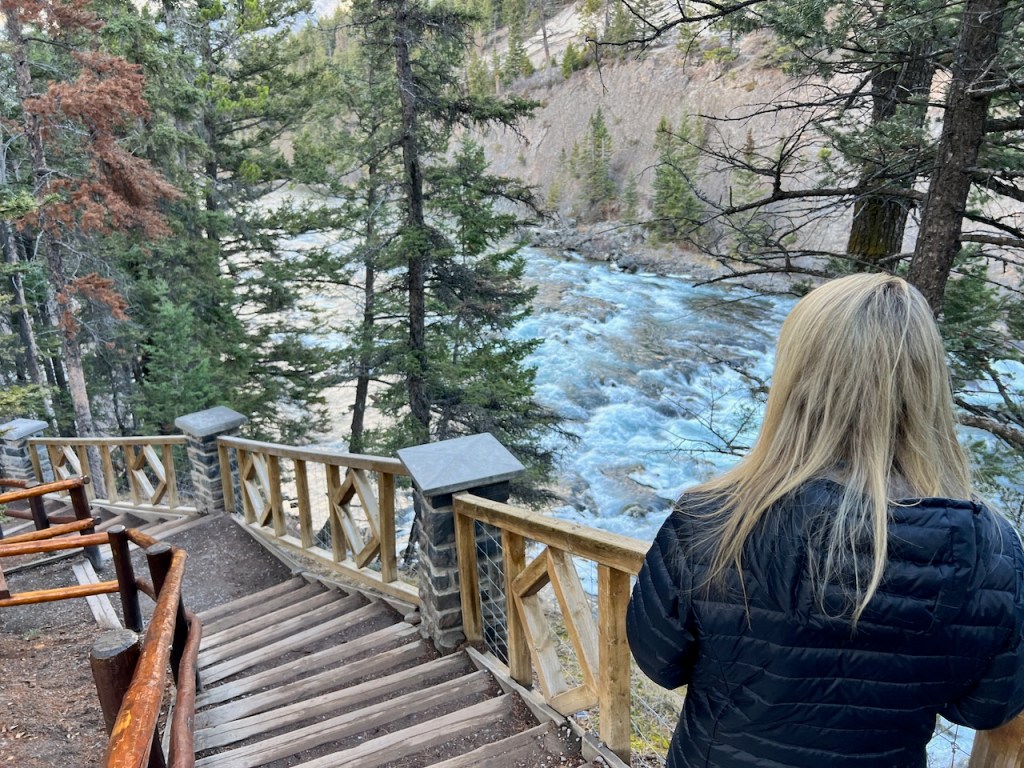
When we crossed the bridge over to the Bow River Trail, we ended up in a shady trail walkway. During our fall walk, the surfaces of the trail were damp; likely a a result of this area getting very limited sun exposure due to it’s eastern facing orientation.
We eventually had some stairs to navigate down (and up) as we eventually made our way to the famous Bow Falls.

Viewing the Bow Falls:
The Bow Falls themselves are a smaller rapid type of waterfall. They will never be as large as some of the larger Canadian waterfalls that I’m used to seeing on the West Coast, or the other dramatic waterfalls like Niagara Falls in eastern Canada.
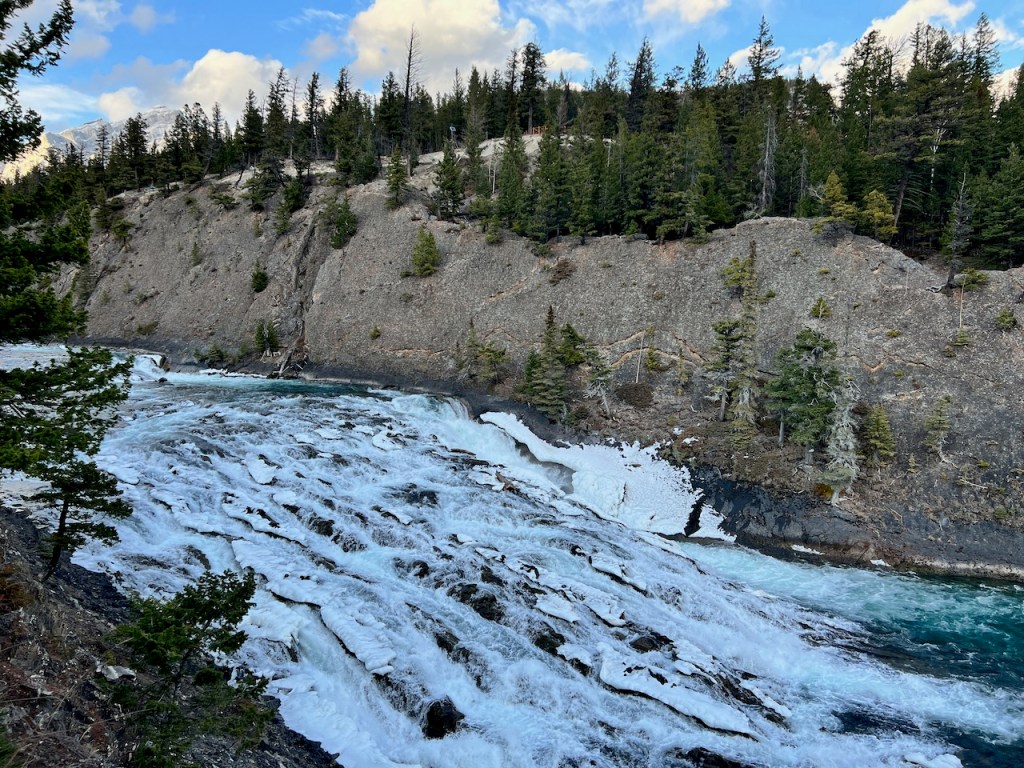

Despite this, the Bow Falls are among the most popular natural tourist attractions in Banff. Our November visit had a bit of ice forming at the edges of the water falls, making this experience look like a very wintery one.

From the Bow River Falls trail, we were also able to spot peek – a – boo views of the Banff Springs hotel. The Fairmont Banff Springs was peeking out through the forest of trees. We didn’t take the time to explore the hotel, and ended up just returning towards Banff after viewing the falls.
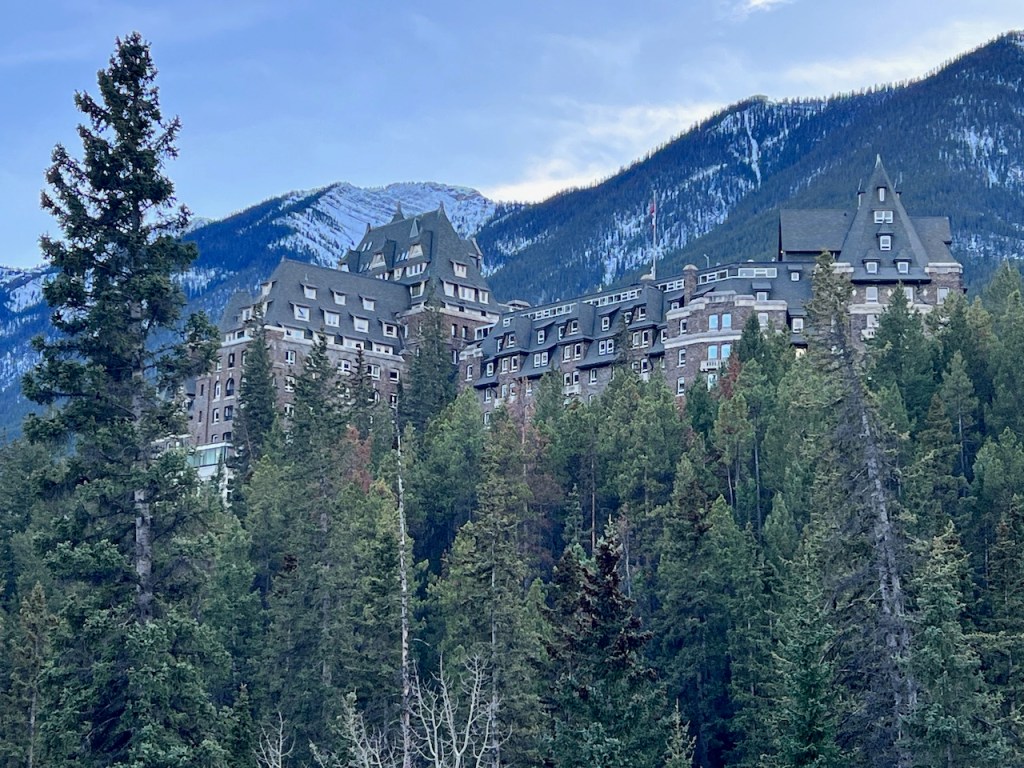
The Fairmont Banff Springs hotel appeared majestic, but also reminded me of the Overlook hotel from the horror movie “The Shining”. I can’t be the first person to make that comparison, even if the exterior of the hotel looks a little different.
Returning to Banff Avenue:
After viewing at the falls, we returned to Banff on the same Bow River Trail that we took out to Bow Falls. We navigated back down (and up) the stairs, with great river views.
We eventually came across the Banff Pedestrian Bridge, which was really pretty. We were able to take a few photographs of this neat viewpoint area.


Eventually, we returned back to town getting the very last winter light of the day as it lit Cascade Mountain. The views up Banff avenue are amazingly iconic.
After the hike, we returned to our car, and headed onwards for a week’s stay at the Four Points by Sheraton Hotel & Suites Calgary West.
My Thoughts on Walking the Bow Valley River Trail:
The Bow Valley River Trail was a warmer climate walk than our Lake Louise winter hiking experiences. Despite being only one hour apart, the two areas were in completely different climate zones.
The Bow Valley River Trail has always remained a favorite of mine when visiting Banff. It’s a great nearby escape from the town of Banff.
If you’ve visit Banff, is the Bow Valley River Trail part of your visit schedule?

In the second part of local hikes within the Lake Louise area, we took in the more energetic Fairview Lookout trail from the Fairmont Château Lake Louise. Complimenting our experience on the Lakeshore trail, the Fairview trail offered those spectacular crystal blue lake views of Lake Louise that were missing from the ground level lakeshore view points. The trail was a little more energetic that I expected, although it was well worth the climb.
If you enjoyed this post, please follow us here or on social media through Facebook, Twitter “X” or Instagram for more travel tips and hacks on how to “Upgrade Your Travels”.
Winter Hiking the Lake Louise Fairview Lookout Trail, Banff National Park, Alberta, Canada
The Lake Louise region of Banff National Park is full of hikes and trails. Two of the most popular are the Fairview Lookout trail, the Agnes Teahouse Trail and the Lake Louise Lake Shore Trail as described here.
About the Lake Louise Fairview Lookout Trail:
The Lake Louise Fairview Trail is located within Banff National Park. To enter (and park your vehicle) in the park, you’ll need a daily park pass from the Banff National Park entry gates.
During the time of our visit, the admission fees were $10.50 CAD per person per day. In our case, we passed through the park gates at around noon, and were given a twenty eight hour pass lasting until 4 PM the next day. If you are a regular visitor, or are staying a longer period of time, an annual pass may be a more economical version for you at $72.25 CAD for a single person or $145.25 CAD for a family.
The Lake Louise Fairview Lookout Trail is an short one kilometre trail that runs up along the eastern side of the Lake Louise lake. Unlike the Lakeshore trail, there is about 100 meters of elevation gain on this trail, and it is a fairly steady climb upwards.
The trail is rated to be approximately 45 minutes round trip between trail head and the look out. In our experience, we completed in with a leisurely one hour and twenty minutes with a leisurely fifteen minute stop at the lookout.
The trail head is located immediately behind the Fairmont Château Lake Louise hotel, between the lake and the hotel itself on the left hand (east side) of the boardwalk.
Preparing for Winter Hiking:
On the day of our walk, we arrived into town and checked ourselves into the Fairmont Château Lake Louise. It was not recommended by Banff National Parks administration (Parks Canada) to walk many trails in the winter for reasons of slipperiness, avalanche debris and other hazards. I was interested to see how easy this experience would be in our early winter weather.
After touching down and getting dressed for the weather, The Fairmont Château Lake Louise Concierge was able to loan us some winter crampons for the trail. We were recommended not to use them within the hotel to avoid breakage against the hard floors of the hotel.


The crampons were really easy to put on and off. We were also loaned a precautionary can of bear spray. Although there were a fair amount of people on the trail and with winter setting in, most bears were probably nearing or into hibernation states of deep sleep.
Unlike our Lakeshore trail experience which was completely flat and level, the winter crampons were a life saver on the ascending Fairview Lookout trail. The spikes on the crampons made the trail a lot less slippery and easier to manage with a lot less effort.
Starting at Fairmont Château Lake Louise:
We started off from Fairmont Château Lake Louise trailhead. After exiting the hotel doors, we took left to head towards the Lake Louise Lakeview Trail.


Lake Louise was looking a little clearer compared to yesterday. We would get to experience Lake Louise in picturesque simple beauty, set across a light winter backdrop.


Getting to see Lake Louise in good weather is a wonderful experience. It represents everyyhing you’d imagine about Canada and it’s natural beauty.
Locating the Fairview Lookout Trailhead:
The Fairview Lookout trailhead was located immediately to the left of the Fairmont Château Lake Louise. Like our Lake Louise Lakeshore trail, the train condition was packed snow during our early November visit.


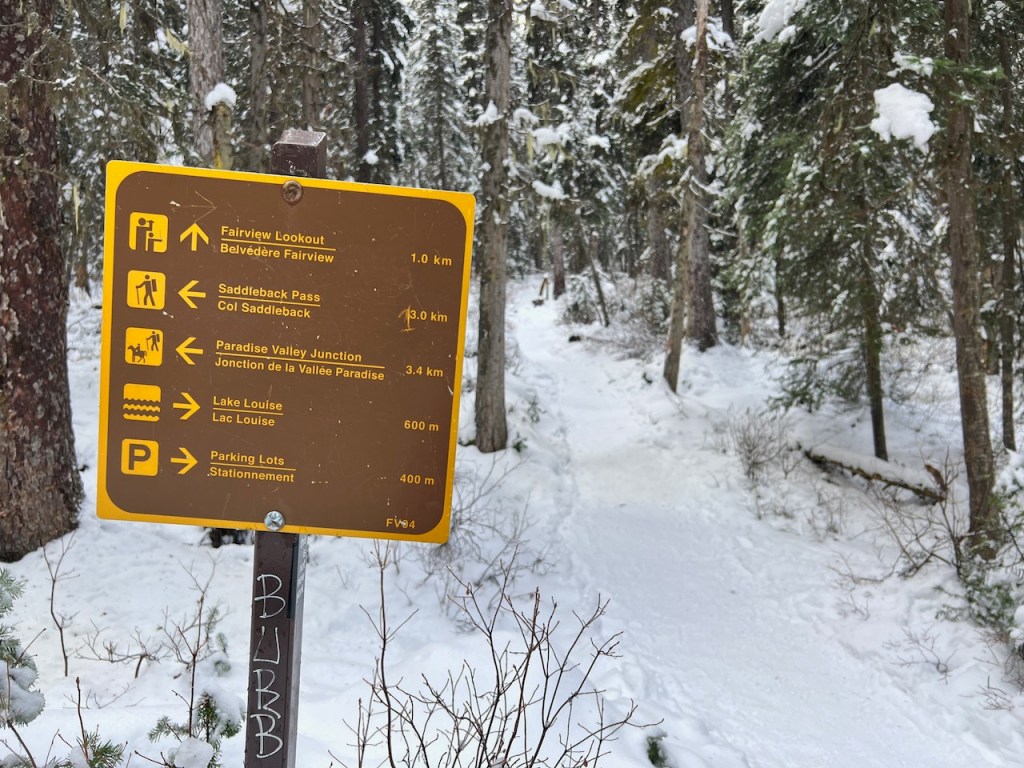
We eventually arrived to the intersection and trail head that split the walking trail towards the Fairview Lookout, the Saddleback Pass, the Paradise Valley Junction and the overflow parking lots. While the area was signed a little bit, I wouldn’t call the area heavily signed.
The Ascent:
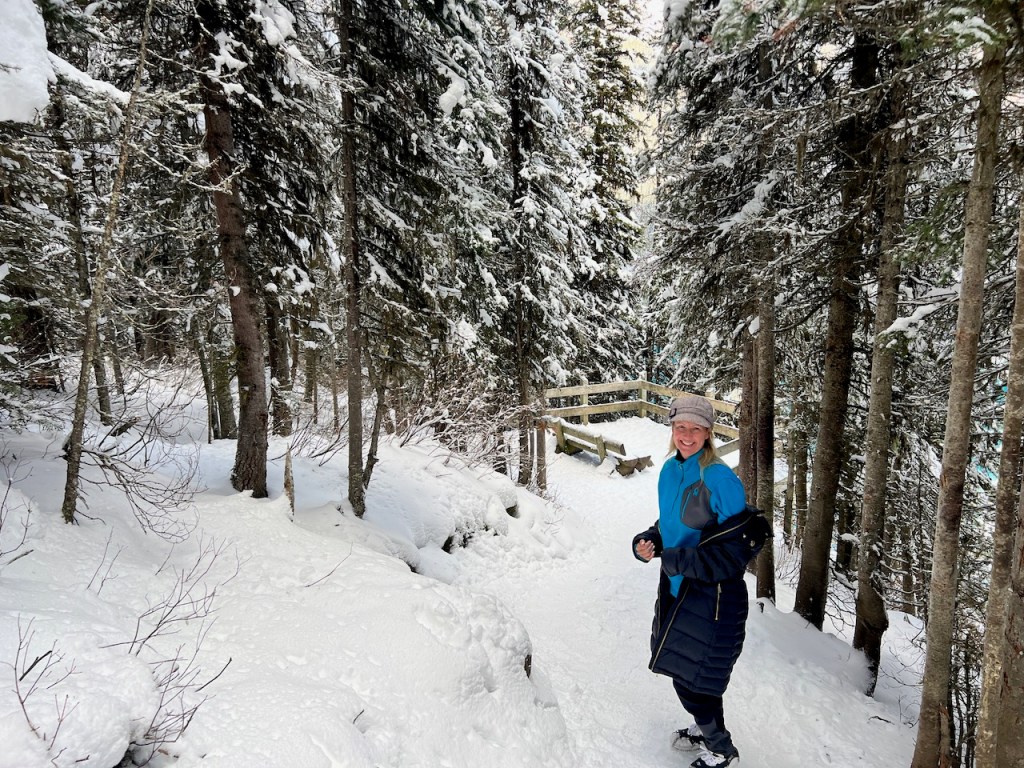
Although the trail only marked about 100 meters of actual elevation ascent, my exercise skills have been lacking lately with many long days and nights on the road. It’s fair to say that I’ve missed a few gym workouts lately as I found the climb to be more tiring that it would have been when I was in my younger years.

We climbed up through a wonderfully wintery alpine forecast. We had a solid forty five minute climb upwards. With all the winter clothes, and the temperatures just below freezing at about -3 Celsius, I had a sweaty hiking experience.


The climb itself was completely forested and didn’t offer any views along the journey. As a result, we just appreciated the forest and it’s silence, in the winter solitude.
Arriving to the Lakeview Lookout:
After the climb, we rounded the corner to what my eyes first thought was a blue construction tarp. In actuality, it was the beautiful blue color of the Lake Louise lake.

There is nothing like the joy of seeing the end of your destination after a substantial climb. In this case, it was in the form of a snow covered lookout that was completely empty and without other travellers.

The Fairview Lookout:
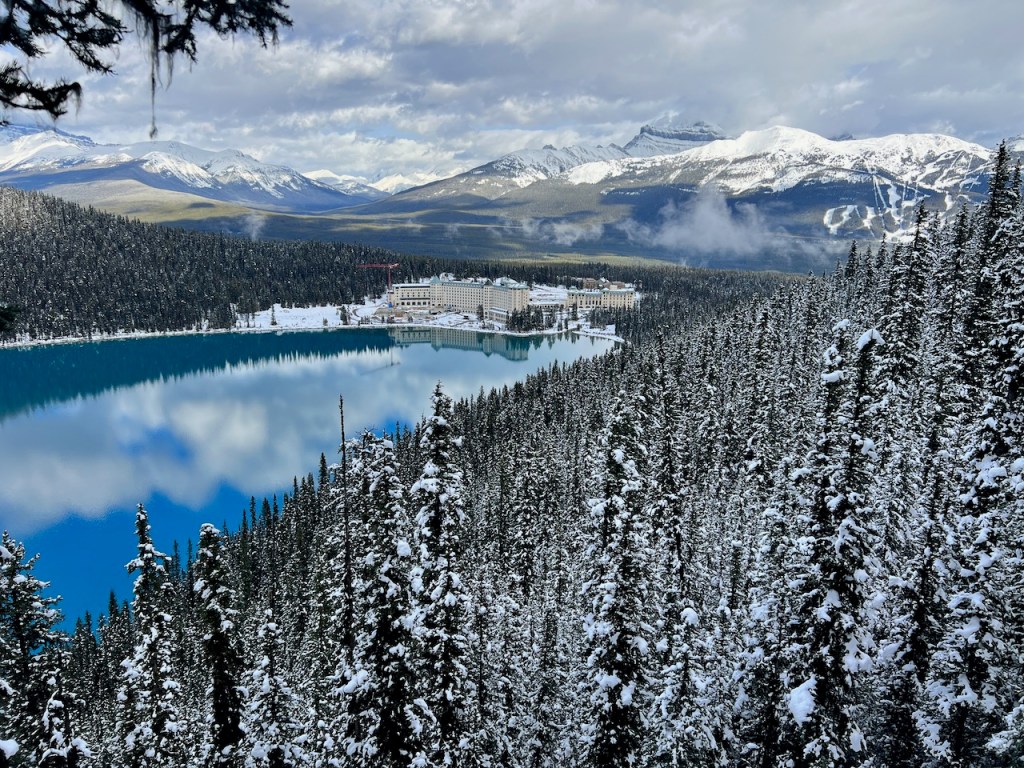
The Fairview Lookout gave us the ability to have views of Lake Louise. The elevation gain allowed for more of the deep blue color to shine through the lake shores; something we wouldn’t experience as strongly from the lake shore elevation at ground level.
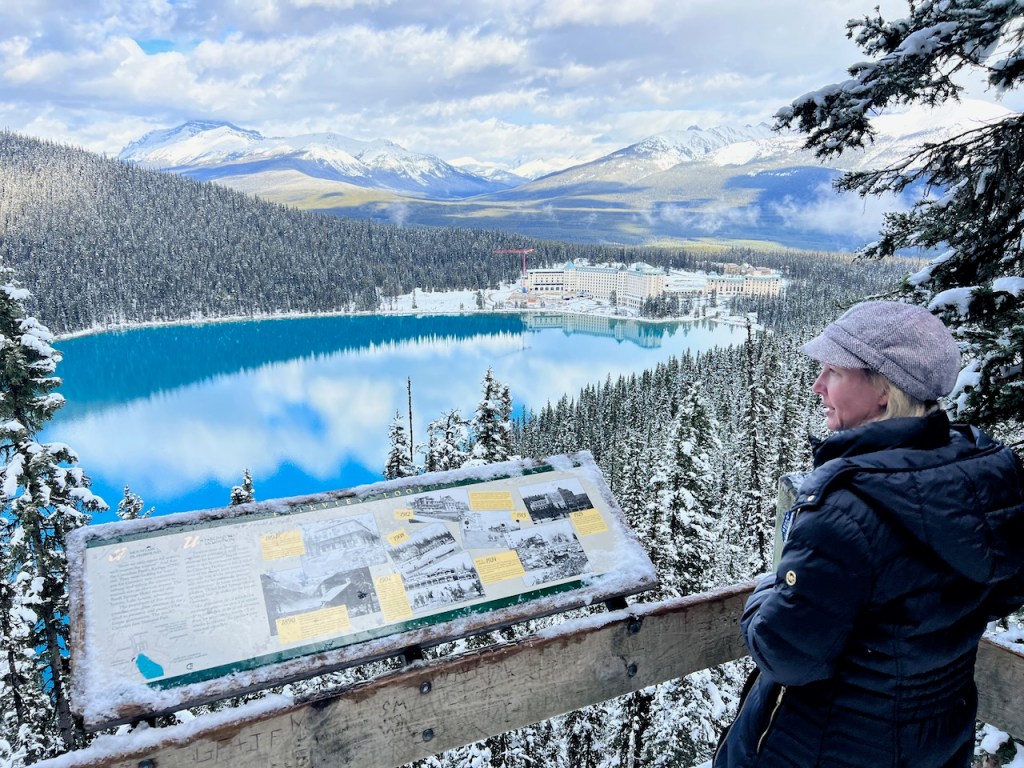
The Fairmont Château Lake Louise looked absolutely stunning in the valley, with the Lake Louise ski area located behind it, covered in a dusting of early winter snow.


After the hike, we returned to the Fairmont Château Lake Louise hotel, to collect our car and head off for a walk towards Bow Falls, Banff in the afternoon.
My Thoughts on Winter Hiking the Lake Louise Fairview Trail:
The Lake Louise Fairview trail was a bit of a climb up towards a view point that offered terrific Lake Louise views. Although not as easy as the Lakeshore viewpoint, it was certainly one of the hallmark views of our time in Lake Louise.
Hiking this trail in conjunction with the Lakeshore trail allowed us to get a great feel of the Lake Louise area, despite the winter season visit.
If you’ve visited Lake Louise, is the Fairview Trail a must see trail ?

Air Canada has announced a promotion for elite Aeroplan member travellers that happen to find themselves a little short of Aeroplan status miles for the end of the qualifying year. Air Canada is offering an opportunity for elite members to buy up to the next (or current) level of status instead of having to fly the required amount of qualification miles. This is a time limited offer and only makes sense under the right circumstances. As a result, make sure that this makes sense for you prior to spending your hard earned money.
If you enjoyed this post, please follow us here or on social media through Facebook, Twitter “X” or Instagram for more travel tips and hacks on how to “Upgrade Your Travels”.
Targeted: Air Canada Offering Buy Up to Next Aeroplan Elite Status Level.
On Thursday of this week, existing Air Canada Aeroplan Elite members received a personalized email to their in boxes.
The marketing email offered an unique opportunity to buy up to the next Air Canada Elite level.

As always, some of these offers offer terrific value, where as others are better for convenience reasons of not having to spend a weekend away flying up to the next status level.
My Current Status:
I have earned Air Canada Aeroplan Elite status for about fifteen years. Aside from a few years off when I had children, I’ve almost always earned Air Canada Aeroplan 35K Elite status or equivalent.
My status this year is Aeroplan 35K. I found this to be about my personal sweet spot, at least before Air Canada cut off Maple Leaf Lounge access for North American lounges in July 2023 this year.
I have been travelling a lot less “tail in seat” miles with Air Canada these days. I have also flown a lot of shorter flights this year in propellor planes, leading to a higher than usual segment count but a lower elite qualifying mile count.
After I cleaned out my account for my latest Aeroplan redemption, I’ve only earned about twenty five thousand (25,332) Elite Qualifying Miles this calendar year. This is a lot less than the sixty two thousand, five hundred and thirty five (62,535) miles I’ve actually flown across all carriers. It’s also a lot less than I’ve flown in 2022 where I earned thirty eight thousand, six hundred and twenty two miles (38,622).
How is Air Canada Aeroplan Status Earned?
Air Canada Aeroplan Status is earned by flying a specific number of miles on Air Canada aircraft. The current structure of status levels has been in place for several years, with qualification required in both status qualifying miles, status qualifying segments and status qualifying dollars.
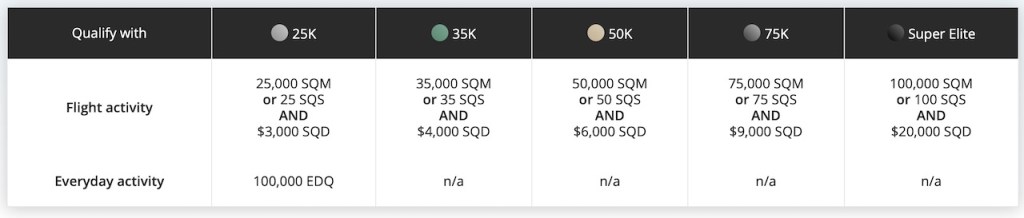
It’s important to remember that you need both the qualifying dollar amount along with either a segment or mile amount in order to qualify for the status. Aside from some Elite Qualifying Mile (up to Aeroplan Elite 25K) earning through an Air Canada co-branded credit card such as the Toronto Dominion Aeroplan Visa, all earning has to occur through flying on aircraft.
What does Air Canada Aeroplan Status offer?
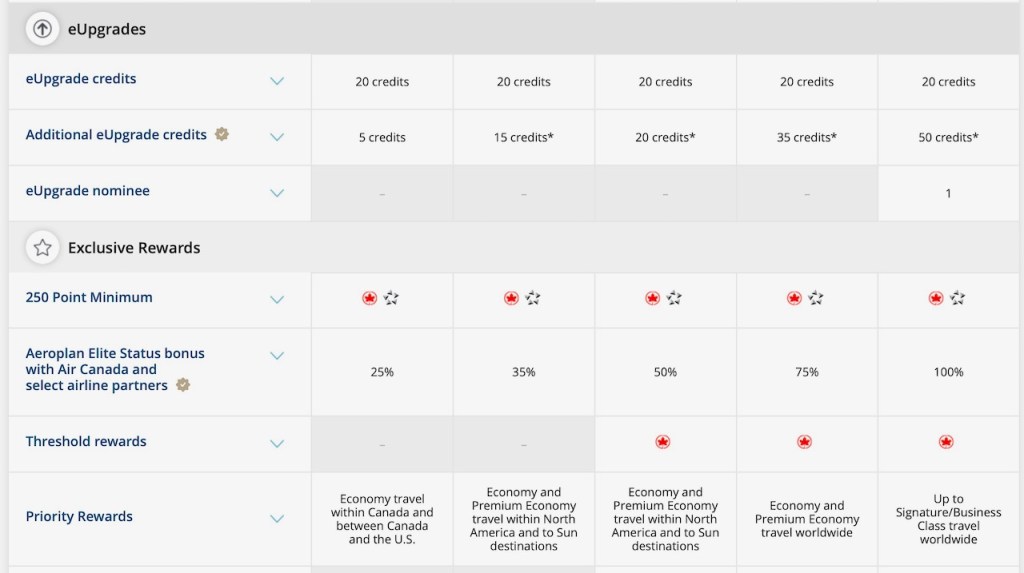
Air Canada Aeroplan status offers a lot less than it used to. At the lowest level at Aeroplan 25K, you’ll be offered priority services that consist of Priority Check In, a small amount of e-upgrade credits that can be used to upgrade into business class, a 250 point minimum, a bonus on Aeroplan miles earned on Air Canada and select partners (United, Lufthansa), along with complimentary baggage allowance.


It’s worth mentioning that the Aeroplan Elite program doesn’t offer much that isn’t already available through the purchase of a standard Air Canada business class ticket. As a result, the main benefit of the Air Canada Aeroplan comes from when you are travelling in economy class.
The Elite Status Buy Up Offer:
From my targeted email, as an Air Canada Elite 35K that has only flown about 25,332 miles this year, I was offered a buy up back to my current Aeroplan 35K level.

The offer indicated that this would include 3 complimentary checked bags, priority baggage handing, priority rewards and priority security access.

The offer indicated that I had to purchase before December 18, 2023. The terms and conditions indicated that the status would become valid within 10 days and was based on a non refundable offer.

The offer would be processed by http://www.points.com. As a result, it doesn’t qualify for the category bonuses that typically come with credit cards that offer an increased earn rate for expenses based on travel.
In my case, the offer to buy up was for $499 CAD.

Unfortunately, there was no offer to buy up to the Aeroplan 50K level. This may have been something worth considering, if it was presented.
What I think of this offer:
In my humble opnion, the major steps in the Air Canada Aeroplan program are at 25K, 50K and 100K.
At Aeroplan 25K, a traveller gets all the benefits of the priority suite of services. These include a more comfortable route through the airport that includes priority check in, priority boarding, and complimentary checked baggage. Boarding in Zone 2 is always great for a traveler that usually goes with “carry on” only.
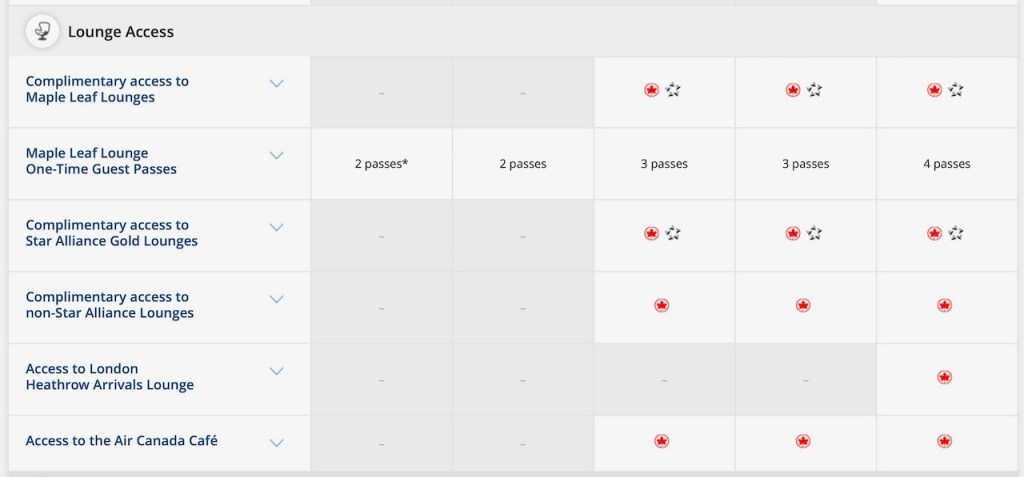
At Aeroplan 50K, a traveller gets all the additional benefits benefits of Air Canada Maple Leaf Lounge access, and Star Alliance Gold lounge access worldwide; including guest privileges. If you are a regular traveller, this can be a real benefit.
At Aeroplan 100K, a traveler gets access to the priority lines within the Air Canada network, especially at check in desks and at the Maple Leaf Lounges. The crowding has become much worse in the lounges and through the Maple Leaf Lounge network in general. As a result, if you’re flying this much, Super Elite status is the most rewarding level.
The incremental change between 25K, and my buy up offer of 35K, only offers priority baggage (that only seems to actually work about 50% of the time), a ten percent premium based on bonus Aeroplan miles earned, and a few additional e-upgrades. Since I am mostly flying on business class tickets these days, these incremental efforts aren’t worth $499 CAD.
Before receiving the buy up offer, I had debated doing a 6 segment oriented mileage run in order to push me over the 35k level through the old fashioned “tail in seat” method towards the fall of 2023. However, I ultimately decided that it wasn’t work the minimal difference in status level. Like many road warriors, I’d rather spend the weekend at home than sitting on a plane.
As a result, I have decided to pass on this particular offer.
The Bottom Line: Air Canada is offering targeted Aeroplan Status Buy Up
This week, Air Canada has sent out a targeted email to current Air Canada Aeroplan Elite status holders offering a buy up to the current existing status level.
These buy ups aren’t cheap, but they do offer you to maintain the current status level, without losing your valuable time and setting foot on an aircraft before the end of the year.
In my circumstances, the value proposition didn’t work, and I didn’t see the value in parting with five hundred dollars to maintain Aeroplan 35K status. I might feel differently if i was chasing 50K or 100K status, as those points offer great value in the Air Canada Aeroplan program.
Are you going to take advantage of the Air Canada Aeroplan Elite Status Buy Up offer ?

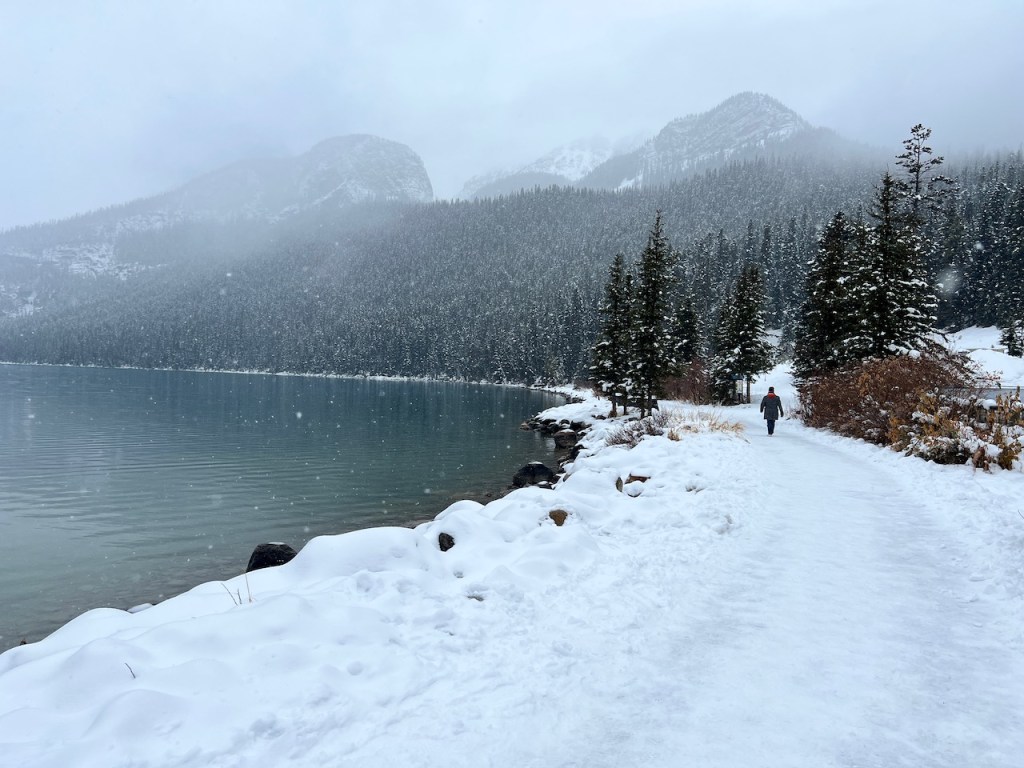
I returned to Lake Louise in early November on an introductory trip with my wife whom had never seen the area. Since the Lake Louise ski hill hadn’t officially been opened for the season, we were looking for some local hiking activities to fill our time and allow us to enjoy our Lake Louise experience. On the day of our arrival, we took in the fairly simple Lake Louise Lakeshore hike.
If you enjoyed this post, please follow us here or on social media through Facebook, Twitter “X” or Instagram for more travel tips and hacks on how to “Upgrade Your Travels”.
Winter Walking the Lake Louise Lakeshore Trail, Banff National Park, Alberta, Canada
The Lake Louise region of Banff National Park is full of hikes and trails. Two of the most popular are the Fairview Lookout trail, the Agnes Teahouse Trail and the Lake Louise Lake Shore Trail, as described here.
About the Lake Louise Lakeview Trail:
The Lake Louise Lakeview Trail is located within Banff National Park. To enter (and park your vehicle) in the park, you’ll need a daily park pass from the Banff National Park entry gates.
During the time of our visit, the admission fees were $10.50 CAD per person per day. In our case, we passed through the park gates at around noon, and were given a twenty eight hour pass lasting until 4 PM the next day. If you are a regular visitor, or are staying a longer period of time, an annual pass may be a more economical version for you at $72.25 CAD for a single person or $145.25 CAD for a family.
The Lake Louise Lakeview Trail is an easy two kilometre trail that runs along the western side of the Lake Louise lake. Being a lakeside trail, the trail is level and does not contain any material elevation change.
The trail is rated to be approximately 1 hour round trip between trail head and trail head.
The trail head is located immediately behind the Fairmont Château Lake Louise hotel, between the lake and the hotel itself on the right hand (west side) of the boardwalk.
Preparing for Winter Hiking:
On the day of our walk, we arrived into town and checked ourselves into the Fairmont Château Lake Louise. It was not recommended by Banff National Parks administration (Parks Canada) to walk many trails in the winter for reasons of slipperiness, avalanche debris and other hazards. I was interested to see how easy this experience would be in our early winter weather.
After touching down and getting dressed for the weather, The Fairmont Château Lake Louise Concierge was able to loan us some winter crampons for the trail. We were recommended not to use them within the hotel to avoid breakage against the hard floors of the hotel.
The crampons were really easy to put on and off. We were also loaned a precautionary can of bear spray. Although there were a fair amount of people on the trail and with winter setting in, most bears were probably nearing or into hibernation states of deep sleep.
Starting at Fairmont Château Lake Louise:
We started off from Fairmont Château Lake Louise trailhead. After exiting the hotel doors, we took a right to head towards the Lake Louise Lakeview Trail.
We had a bit of a snowy day weather wise, with clouds misting through the lake area. There were no issues finding the trail head, and it was well worn with traffic despite the winter conditions.

With the “not recommended” designation for winter hiking, I wondered what condition the trail would be in. Instead, we found a well worn trail with packed snow. Although the trail was not sanded or maintained, the dry snow temperature didn’t yield any ice or slipperiness on the trail. We almost didn’t need the use of those winter crampons, but kept them on anyway.


The trail itself was flat and level. While I wouldn’t go so far as to say it was wheelchair accessible, it was level enough that my mom could easily walk portions of the trail.

Walking the Lake Louise Lakeview Trail offered inspiring views of the mountains surrounding the Lake Louise Lake. With a light snow dusting, it was very inspirational and set the stage for a winter wonderland.


Arriving to the Top End of Lake Louise:
After about forty five minutes of slow to medium paced walking over packed snow conditions, we ended up at the top of end of Lake Louise. With mountains a little bit closer in distance, we were able to get a closer look at some of the winter features of the area.


We were treated to a massive ice waterfall that had frozen over on trails leading up to the nearby Beehive and the Lake Agnes Teahouse. We’ve occassionally seen winter waterfalls like this outside of Vail, Colorado and on the Sea to Sky Highway between Squamish and Whistler back home in British Columbia. However, this marked the largest one that I’ve seen in recent times.

At the top end of the lake, we ventured out to look back towards the hotel with an eastern look. The weather was cold enough, and we had a different viewpoint set against more of a valley orientation.

We also saw the extension of the trail towards the Plain of Six Glaciers, which was a further five kilometres along the valley. Since the weather was cloudy, we were not able to see the views towards the base of the Six Glaciers, which can normally be seen from the top end of Lake Louise.

Despite this, the top of the lake offered majestic views. The walk allowed us to take in all of what Lake Louise had to offer, despite the wintery weather of visiting Lake Louise in early November.


Walking back from the end of the hike, we were able to take in more lake oriented views. It’s simply spectacular at Lake Louise. The views of Lake are the reason visitors travel all this way.

As we returned towards the Fairmont Château Lake Louise, we were able to also take in a few hotel views of the majestic position on the lake shores.


After the hike, we retired to the Fairmont Château Lake Louise hotel, for the rest of the day, followed by a nourishing dinner at Louiza Restaurant.
My Thoughts on Winter Hiking the Lake Louise Lakeview Trail:
The Lake Louise Lakeview trail was an elementary and straightforward introduction to the Lake Louise area. While I was initially a little concerned that we wouldn’t be able to take in any winter hiking due to trail conditions, the trail was well packed and well traveled.
The Lake Louise Lakeview Trail offered a great welcome to the Lake Louise area. Despite the winter conditions, it made for a great introduction to the lake, along with getting that Lake Louise experience we had travelled all that way to experience.
If you’ve visited Lake Louise, is the Lakeview Trail one of your favorite trails?

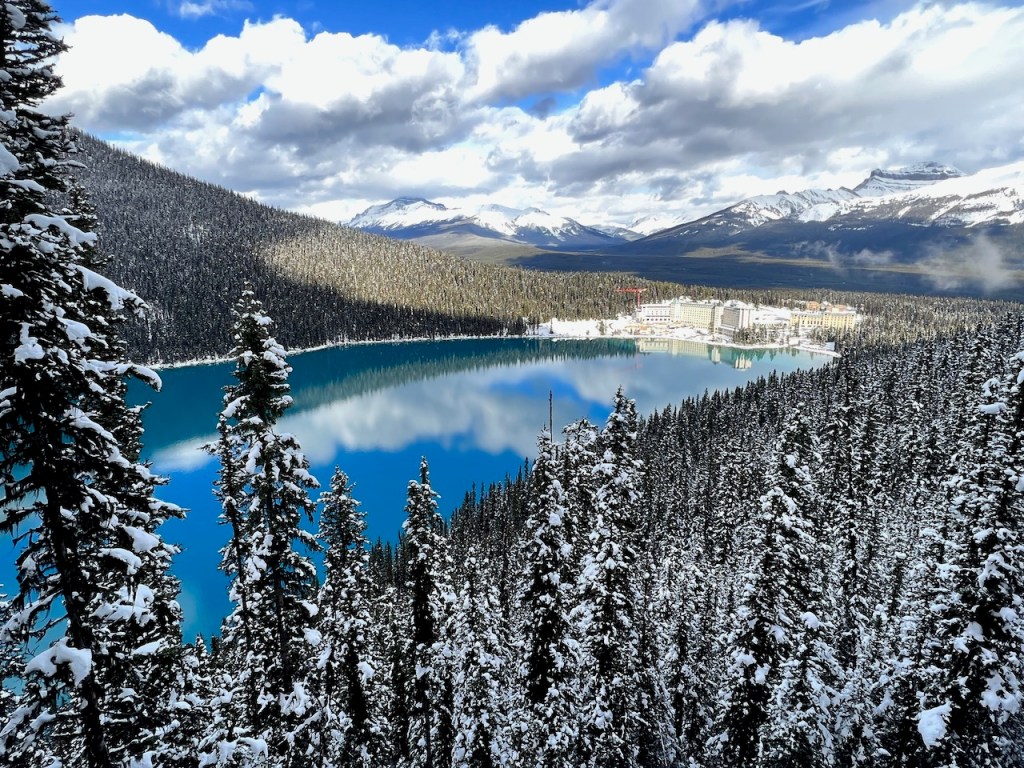
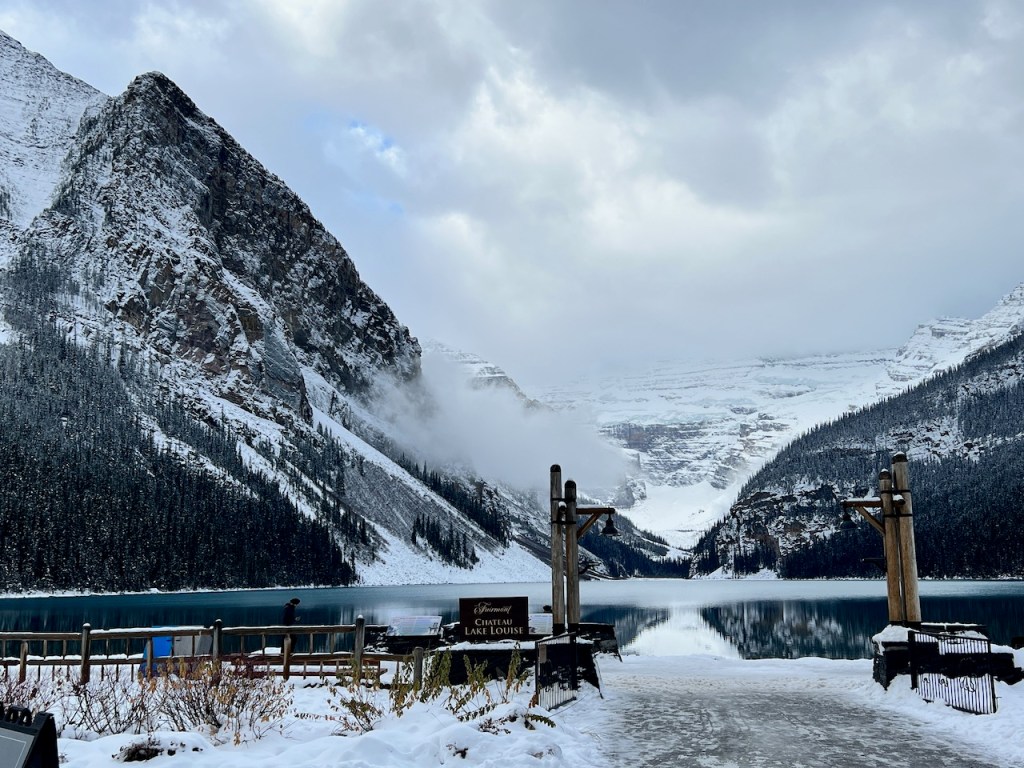
Despite moving all around Canada, and heavy travel across the North American business travel circuit, the picturesque town of Lake Louise had escaped my travel patterns for a substantial period of time. When my travel plans took me to Calgary for a week, and since MrsWT73 had never visited Lake Louise, it seemed like a great opportunity to rediscover Lake Louise, Canada with a stay at the Fairmont Château Lake Louise.
If you enjoyed this post, please follow us here or on social media through Facebook, Twitter “X” or Instagram for more travel tips and hacks on how to “Upgrade Your Travels”.
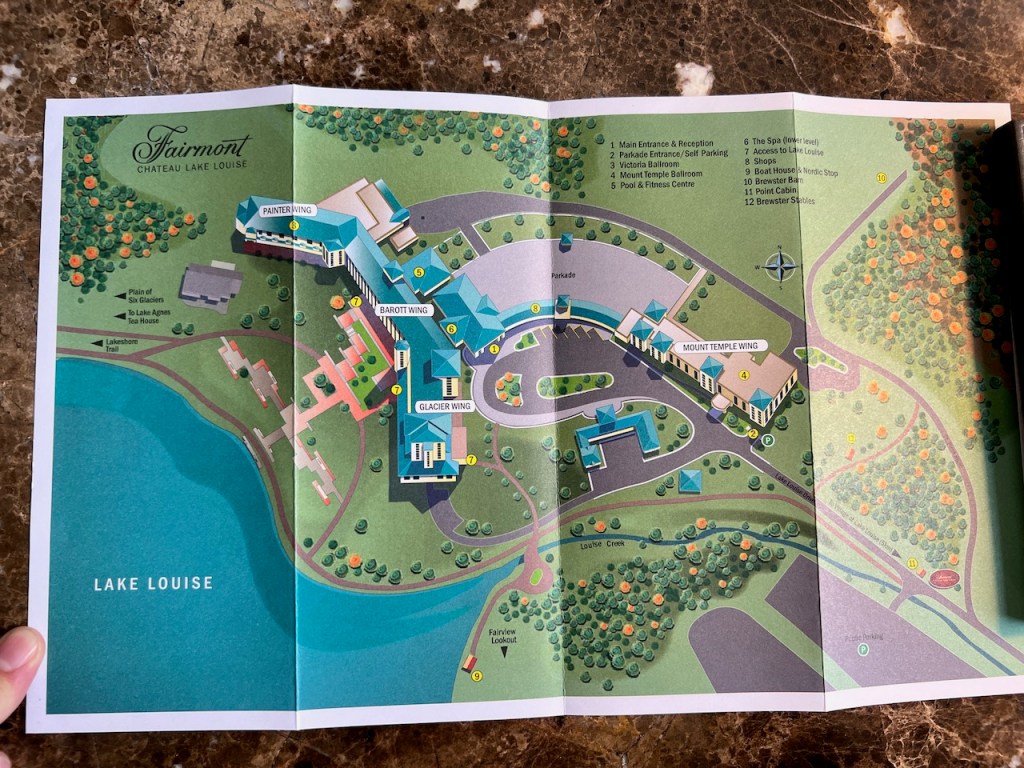
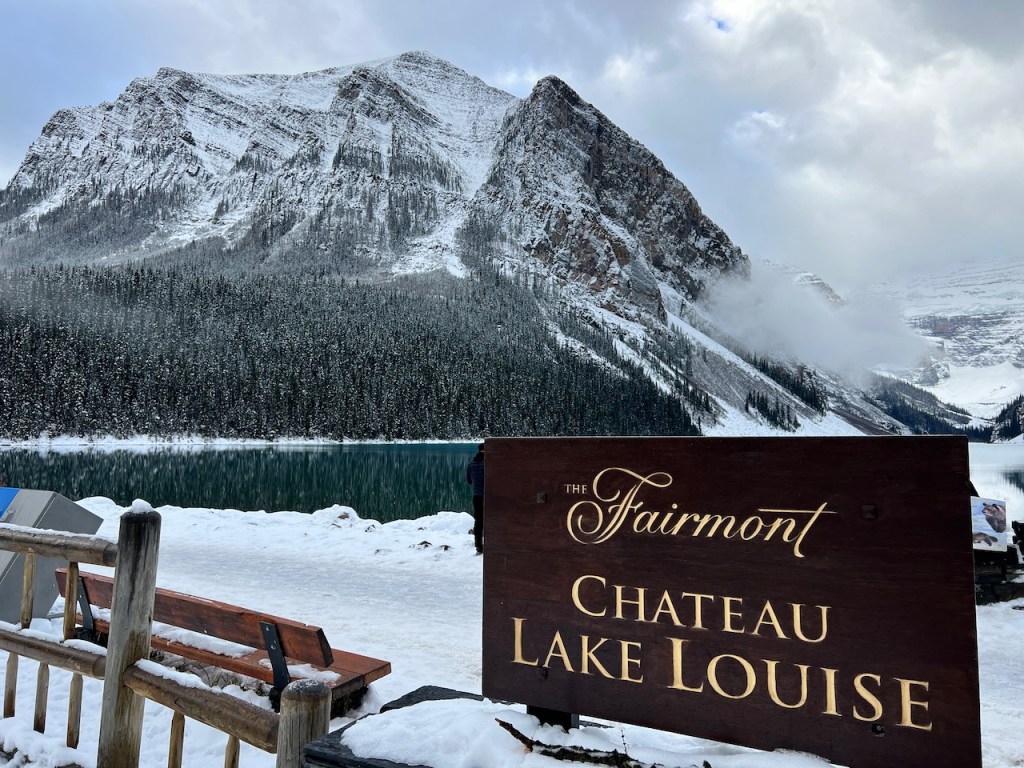
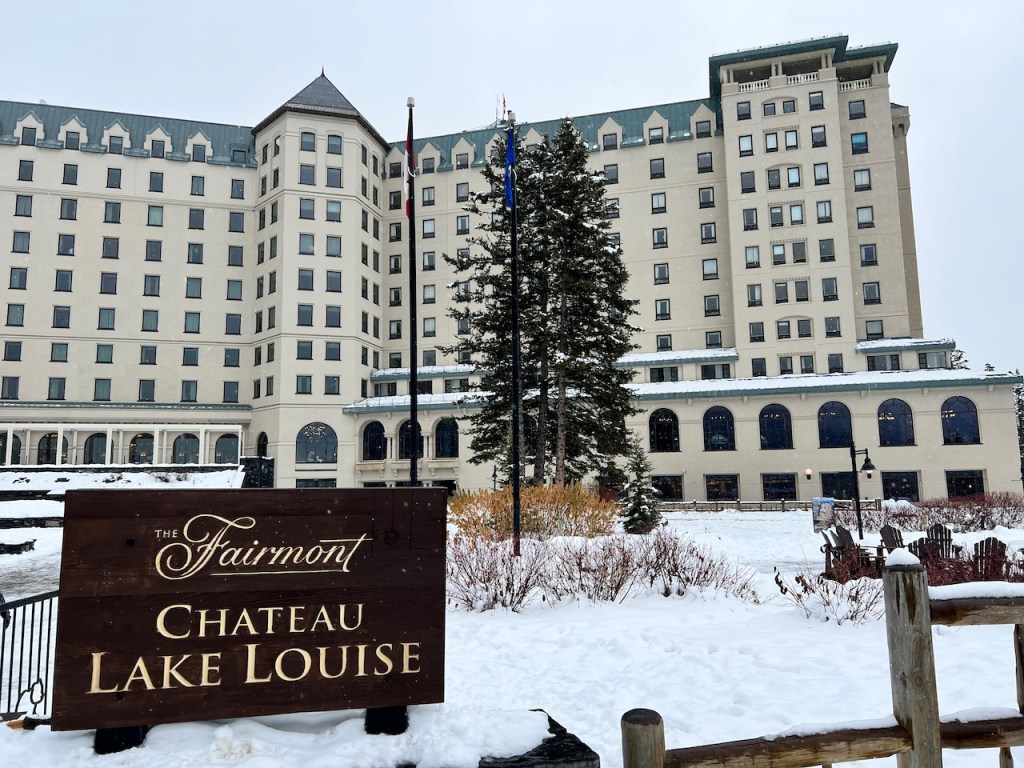
Review: Fairmont Château Lake Louise, Alberta, Canada
“The Fairmont Château Lake Louise offers old school luxurious resort accommodations set against the glorious back drop of Lake Louise. It’s a perfect base for luxury travels within the region “
The Fairmont Château Lake Louise is one of two railway hotels in the area of Lake Louise and Banff with the Fairmont Banff Springs hotel being the other property of similar vintage. Both properties are legendary in the area, having served guests since the 1940’s.
We would end up staying at the Fairmont Château Lake Louise property in early November. This is reported to be among the worst seasonal times to visit Lake Louise. Many of the nearby hiking trails have snow on them and are sometimes closed due to weather conditions. The condition of Lake Louise itself usually has no water activities such as canoeing, stand up paddle boarding or ice skating, due to the winter months and usually hasn’t fully frozen. As a result, November remains to be among the least popular times to visit the resort.
Booking The Fairmont Château Lake Louise:
The property is bookable direct on the Fairmont website with the potential of occurring All Accord loyalty points.
During my stay, rates booked directly on Fairmont had rooms starting at $375 CAD.
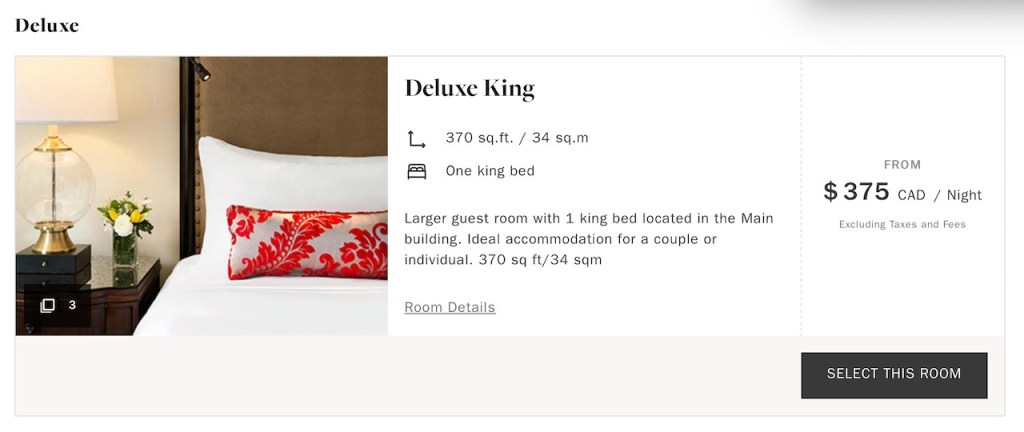
The hotel is a member of the All Accord Limitless Program. All Accord Members who are gold level members or higher (30 nights & 7,000 Status points or 2,800€ spend) may be entitled to a room upgrade, when booking through direct channels.
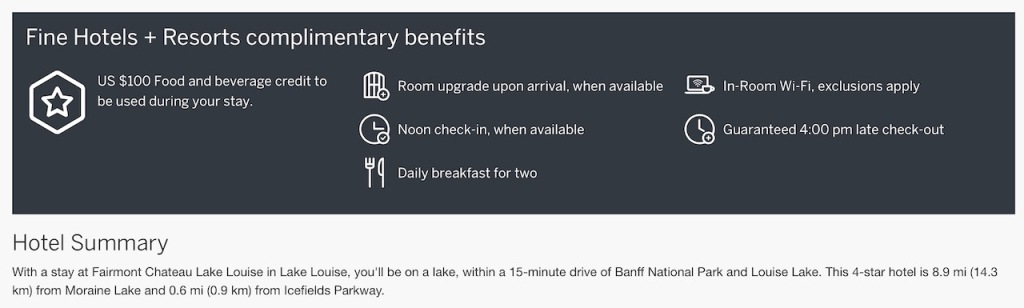
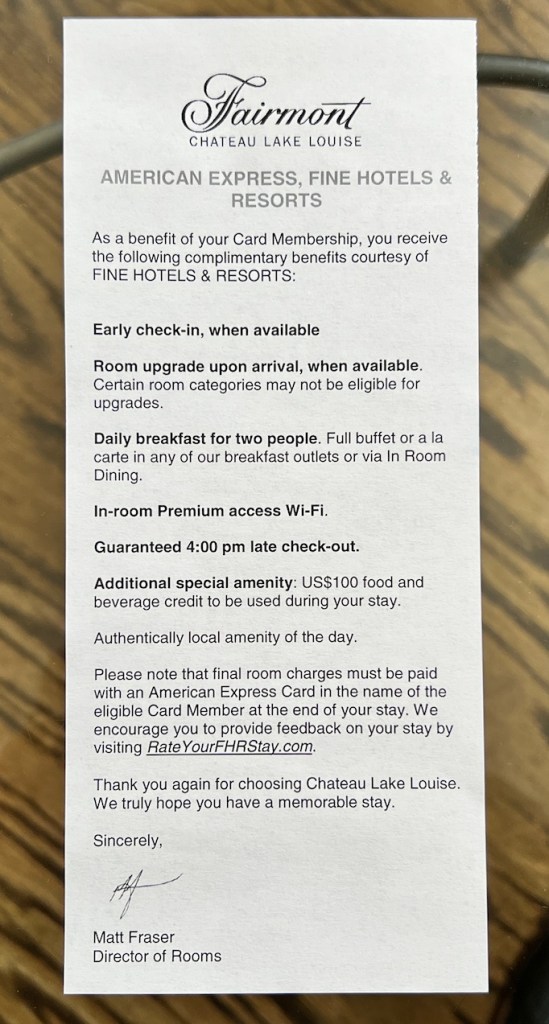
Despite this, the property is also well represented through the American Express Fine Hotels and Resorts program, available to American Express Platinum Cardholders.
For those that don’t remember, American Express Fine Hotels and Resorts program offers a suite of benefits with rates usually near the full “un-discounted” rack rate.
Receive this special suite of benefits with each Fine Hotels + Resorts booking:
- Unique property benefit ($100 USD Food and Beverage Credit)
- Daily breakfast for two
- Guaranteed 4pm late check-out
- Room upgrade upon arrival when available
- In-room Wi-Fi (exclusions apply)
- Noon check-in, when available

With all these inclusions, I ended up booking a rate for a room for $521 CAD ($381 USD) approximately 2 months prior to my stay. By booking the Fine Hotels and Resort Rate, I was able to get in a complimentary full breakfast, and a $100 USD Food and Beverage Credit to be used against dinner and snacks.
The American Express FHR rate was prepaid with 100% refund available for cancellation up to 72 hours in advance of travel.
The Fairmont Château Lake Louise is also a member of the American Express Fine Hotels and Resorts program for those with access to an American Express Platinum Card. Assuming you are not looking to earn All Accord Elite status, booking through the American Express Travel website will afford you with a series of benefits from the American Express Fine Hotels and Resorts program which include:
- US $100 Property credit to be used during your stay
- Room upgrade upon arrival, when available
- Noon check-in, when available
- Daily breakfast for two
- In-Room Wi-Fi, exclusions apply
- Guaranteed 4:00 pm late check-out
Dependent on the rates, you may end up being ahead if all these inclusions offer value to your travel circumstances. In our case, staying only one night, the value proposition with the American Express Fine Hotels and Resorts clearly outweigh the benefits of booking direct.
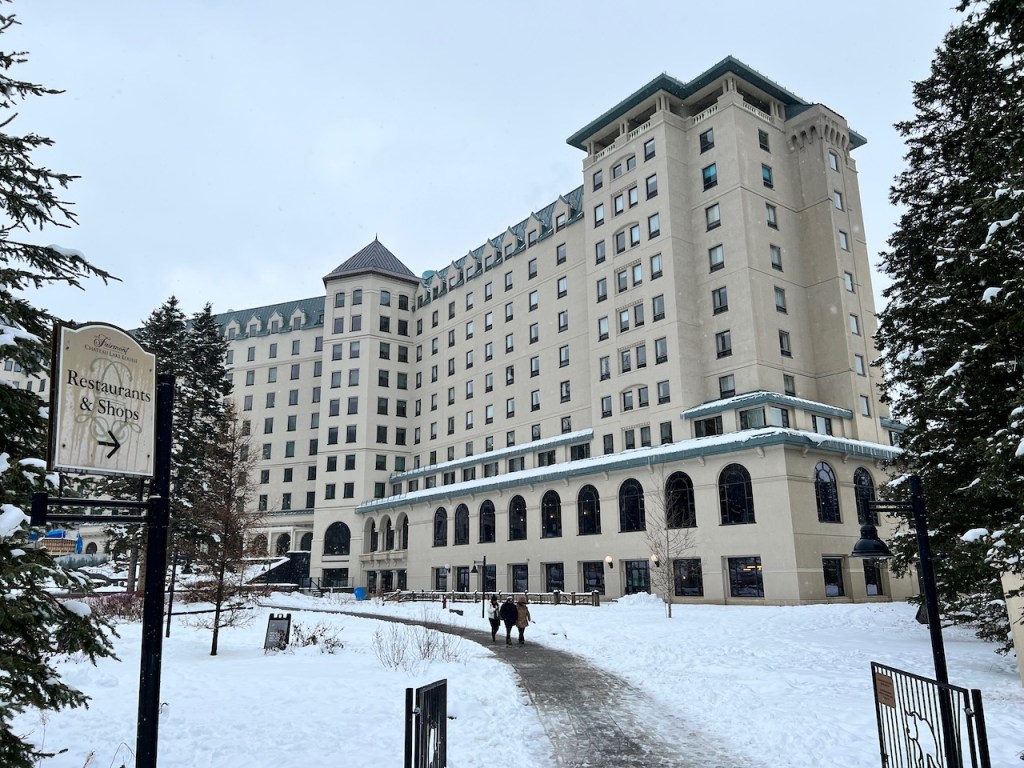
Getting to the Fairmont Château Lake Louise:
The Fairmont Château Lake Louise is located well into Banff National Park. In our case, we were arriving off an Air Canada flight into Calgary International Airport. With a Hertz rental car in hand, I ended up self driving from Calgary International Airport to the Château Lake Louise.
The Fairmont Château Lake Louise is located within the Banff National Park. Banff National Park is run by Parks Canada; a federal government institution under the Canada National Parks Act.
Park Entry Fees range from $10.50 CAD per person per day, and there is an option to purchase a Parks Canada Annual Discover Pass for $72.75 CAD. While you can drive past the gates without stopping and pass through the park (without paying the fee), you can be liable for arrest, enforcement and removal from the park for being in the park without paying the fees.
We paid $21 for 2 adult passes, which were valid until 4 PM the next day. While I was a little concerned about having to exit the park the next day before 4 PM, we didn’t have any issues with enforcement.
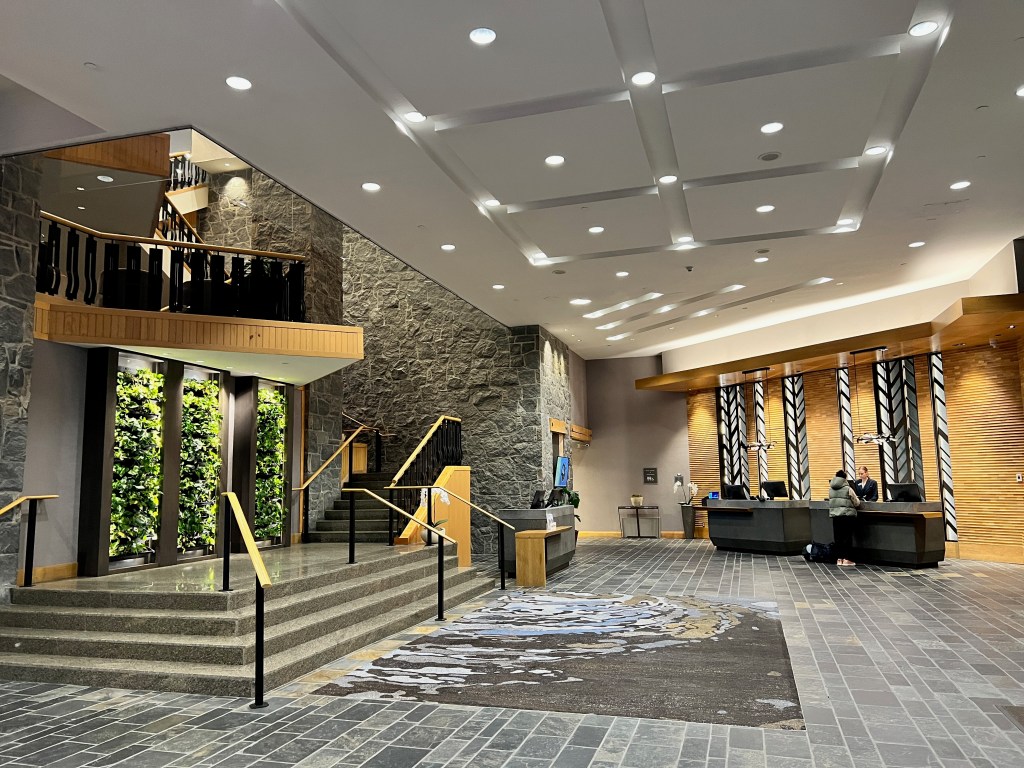
Arriving to the Château Lake Louise:
After a two hour drive from the Calgary International Airport, we arrived to the small town of Lake Louise, Alberta. We self navigated upwards the Château Lake Louise. Due to over crowding, Fairmont has a manned security gate at the property entrance.

After confirming our reservation at the security gate, and confirming that we did not require porter assistance with luggage, we were given instructions for self parking $30 CAD ($22 USD). We didn’t opt for the valet at $45 CAD ($33 USD) a day.
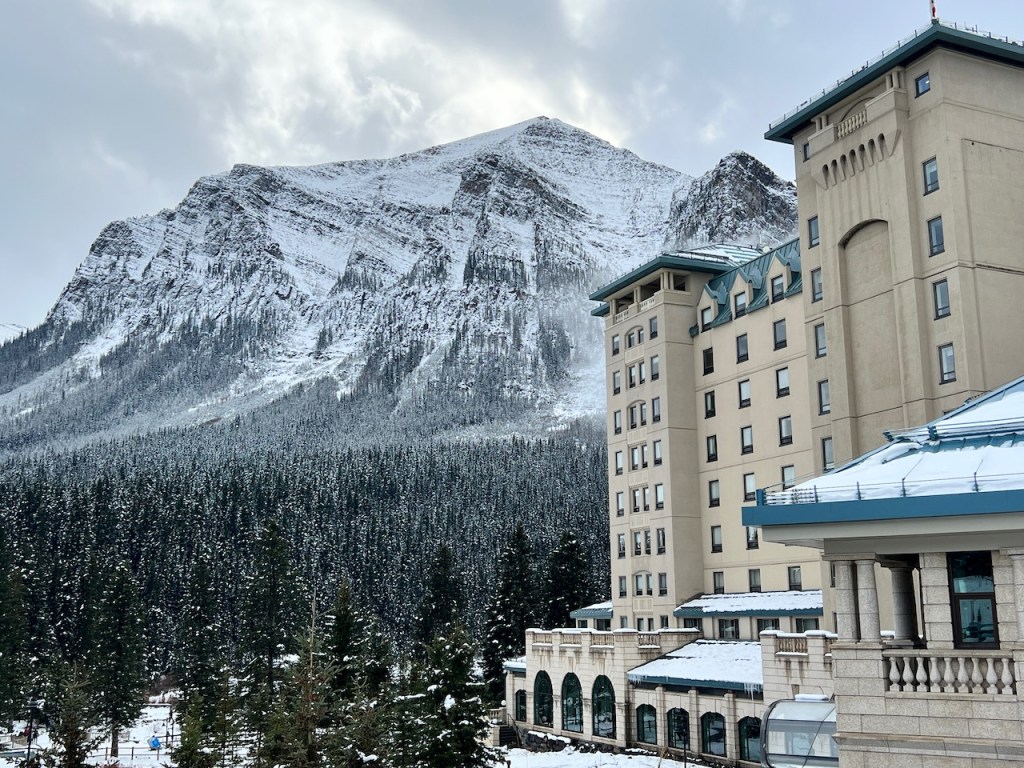
Arriving on the roof of the self parking garage, we took in pretty spectacular mountain views. With our early November arrival, there was a dusting of snow on the nearby mountains, making this stay in the Rockies particularly beautiful.
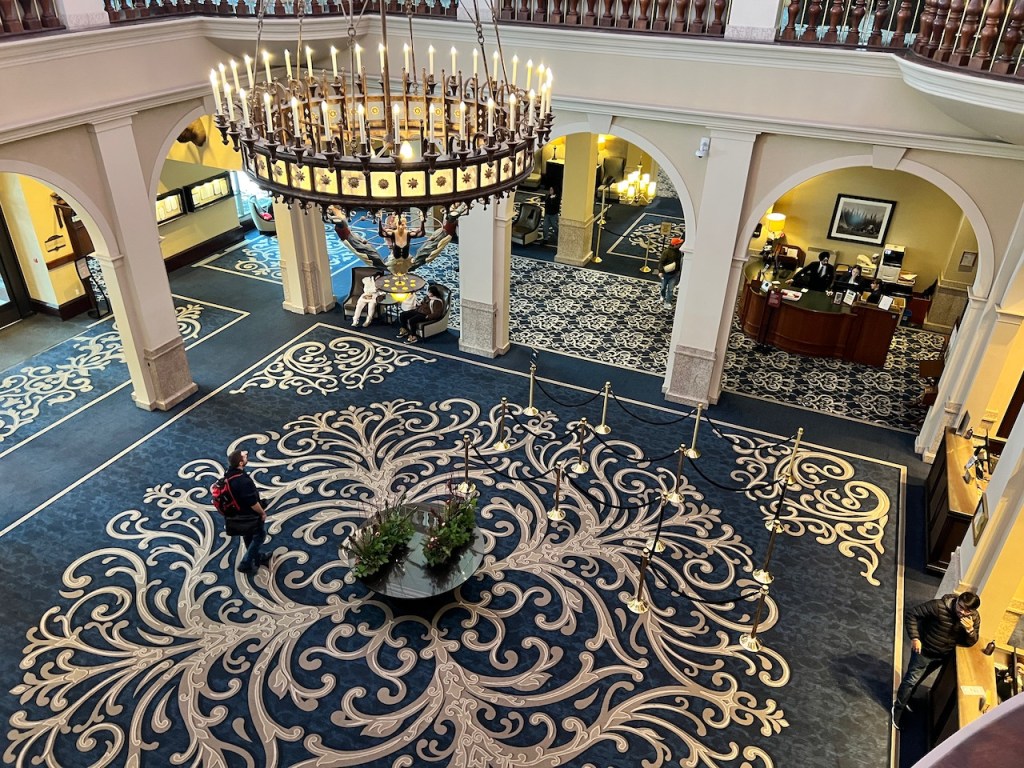
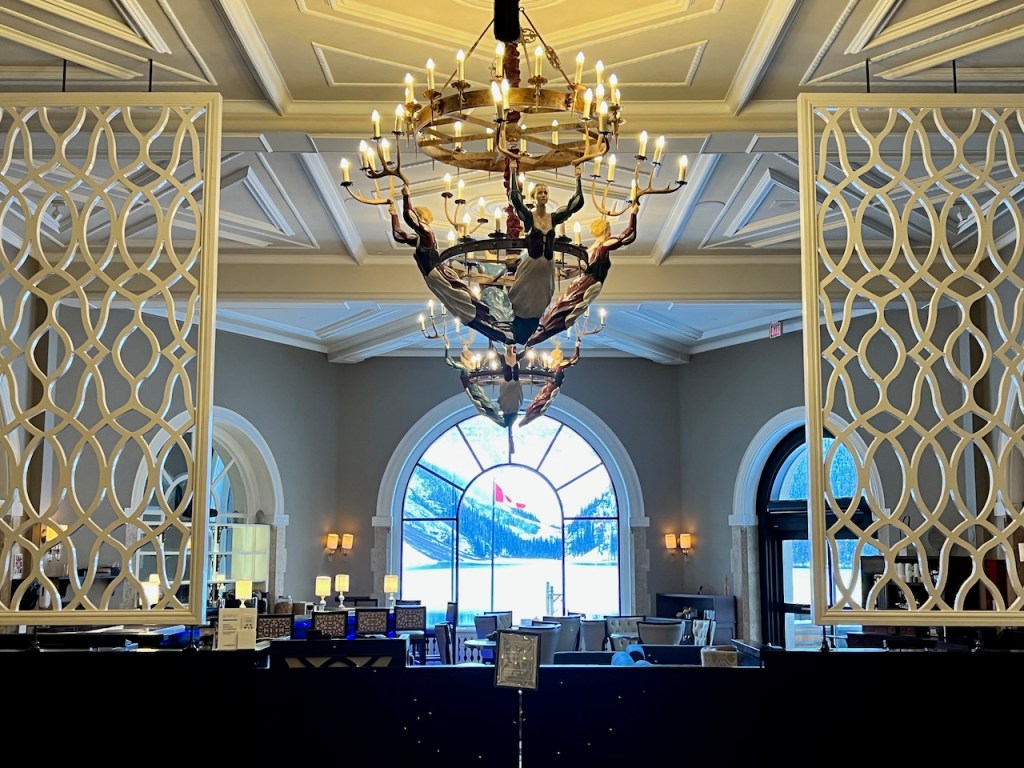
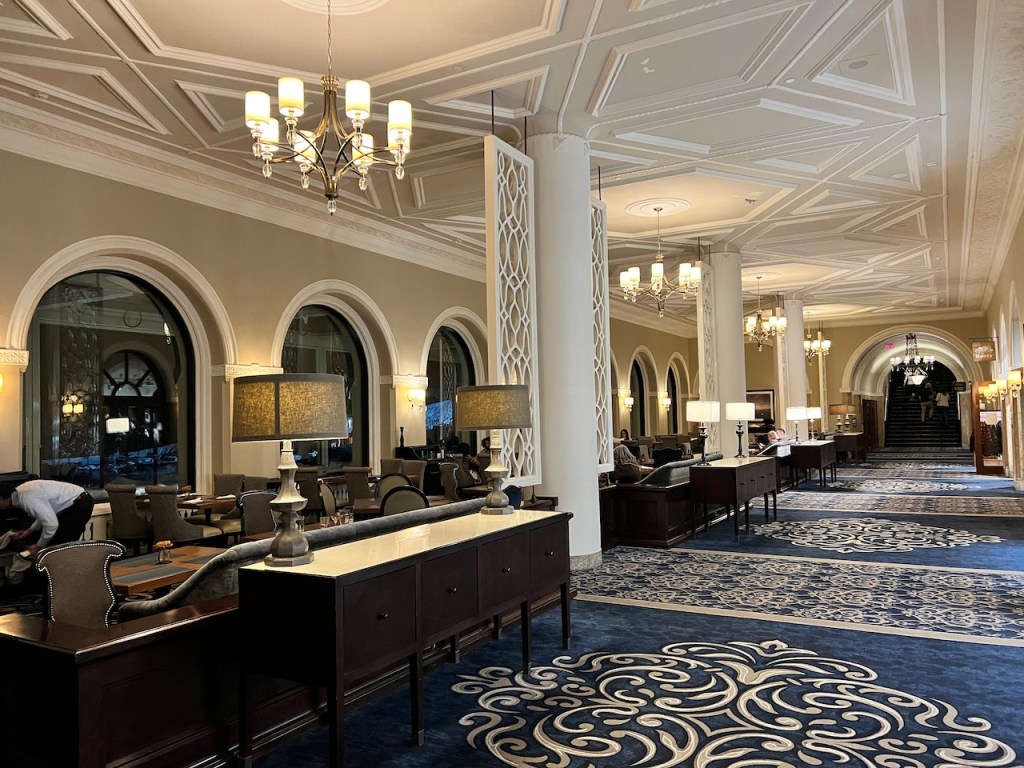
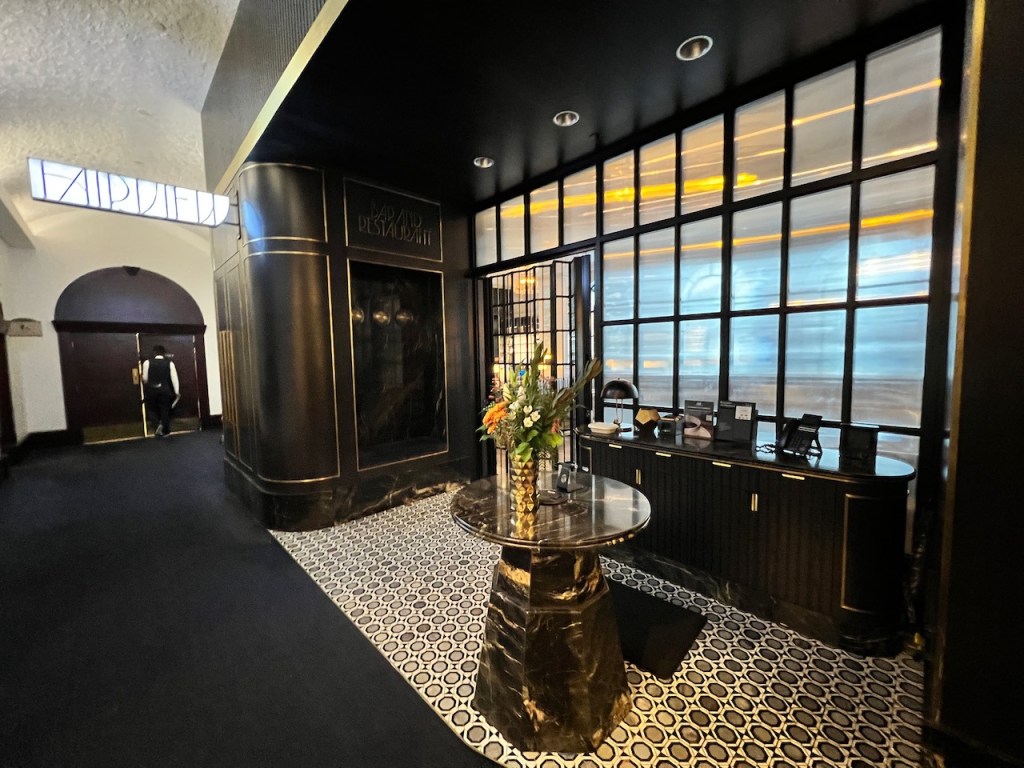
After taking the parking elevator down from the top floor of the parking garage, we arrived to a grand château styled lobby. Complete with a grand staircase, we arrived to a lobby with peek a poo views over Lake Louise.
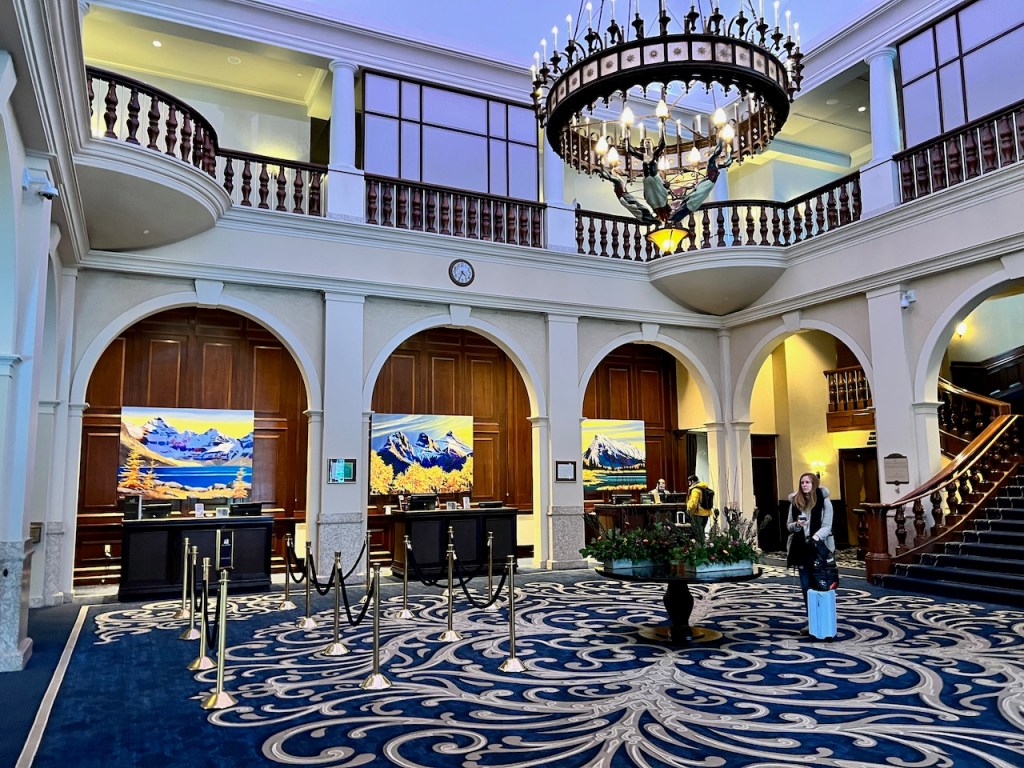
There was no line at the check in desk when we arrived at 1:30 PM. Hoping to take advantage of a “noon check in – when available” included with an American Express Fine Hotels and Resorts rate, we were pleased to learn at check in that our room was already available.
Included with the Amex FHR rate, we were given a one category upgrade to a Junior Suite facing away from Lake Louise. We had initially booked a non lake view room, and our upgrade was consistent with a non lake view orientation. We would end up being upgraded into a room that was about the same amount as our initial purchase, without the inclusions.

Our American Express Fine Hotels and Resorts benefits card offered a full buffet breakfast for two at restaurant (or room service), and an additional special amenity of $100 USD (which worked out to $128 CAD at the hotel’s conversion rate) to be used at any or all food and beverage outlets.
The food and beverage credit represented tremendous value as the Fairmont Château Lake Louise restaurants were quite expensive, given the remoteness of the property and lack of other competing restaurants. Given our one night stay, it was the perfect way to maximize value at this property.
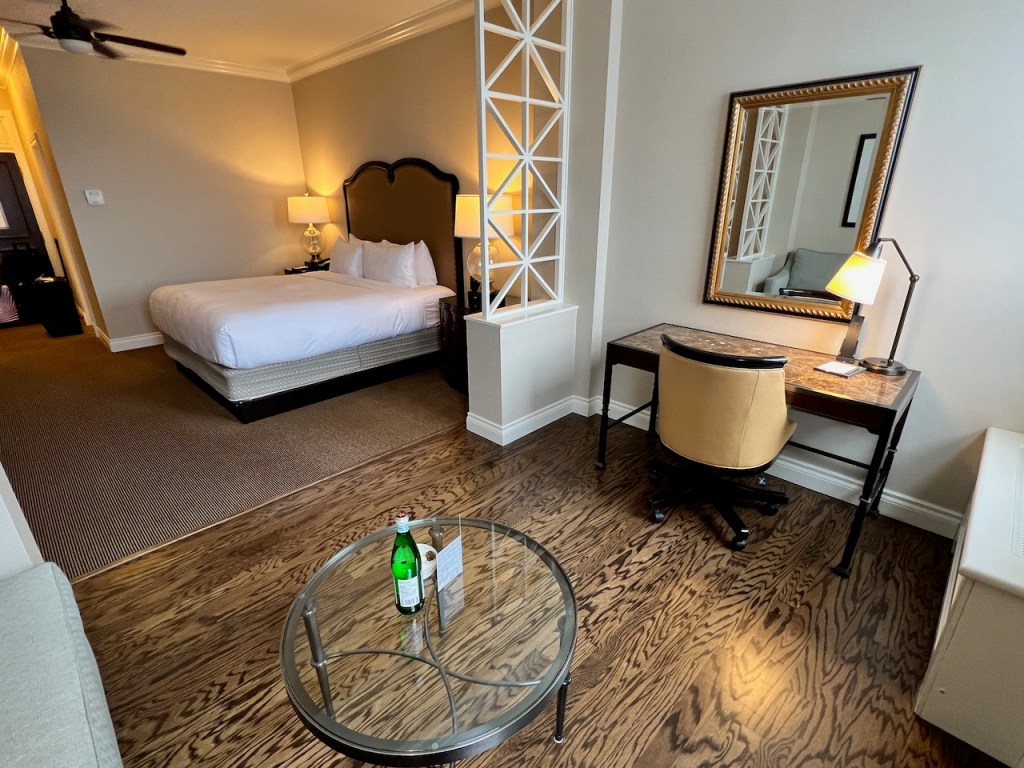
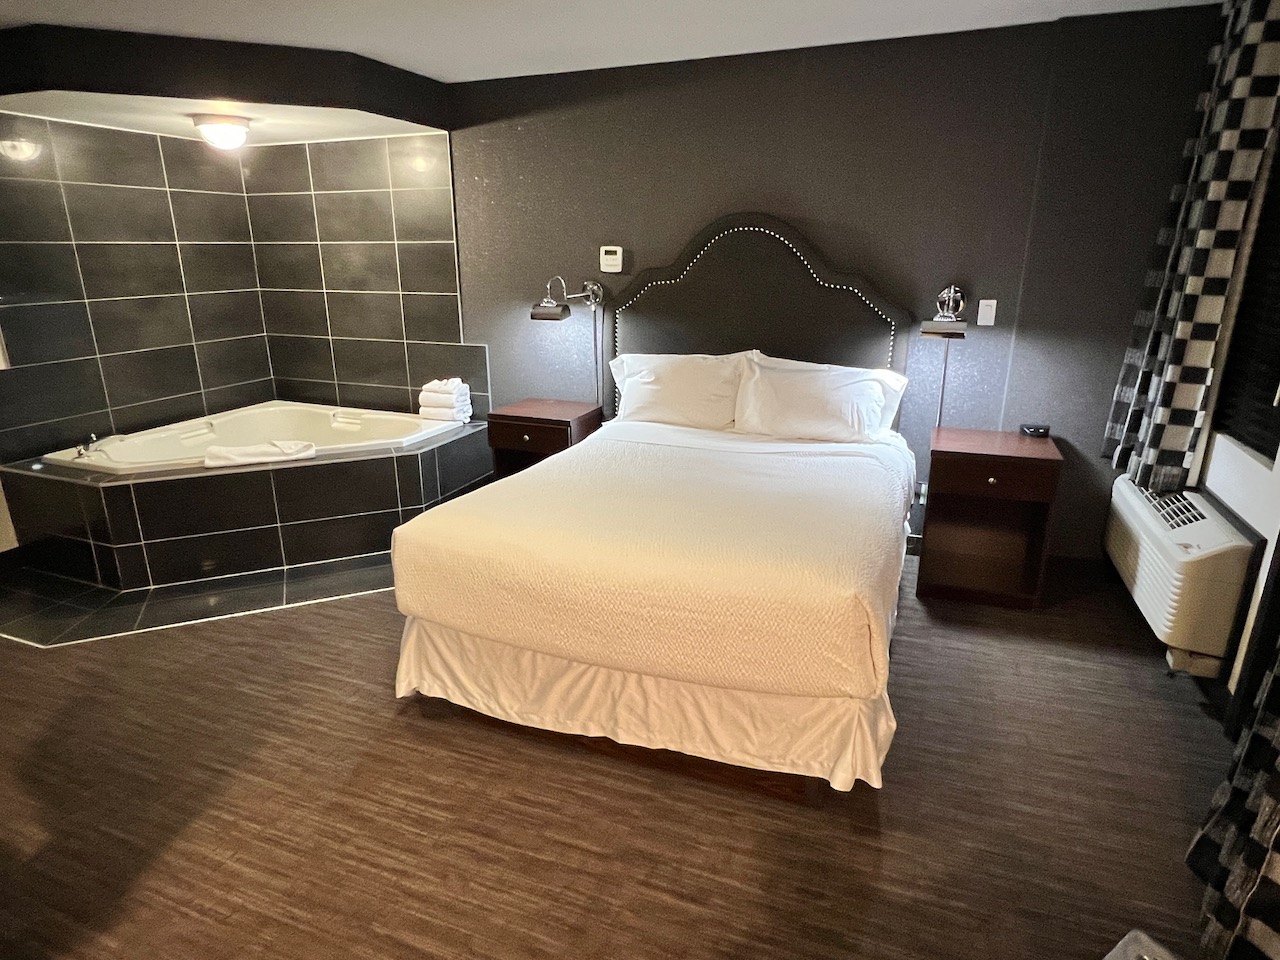
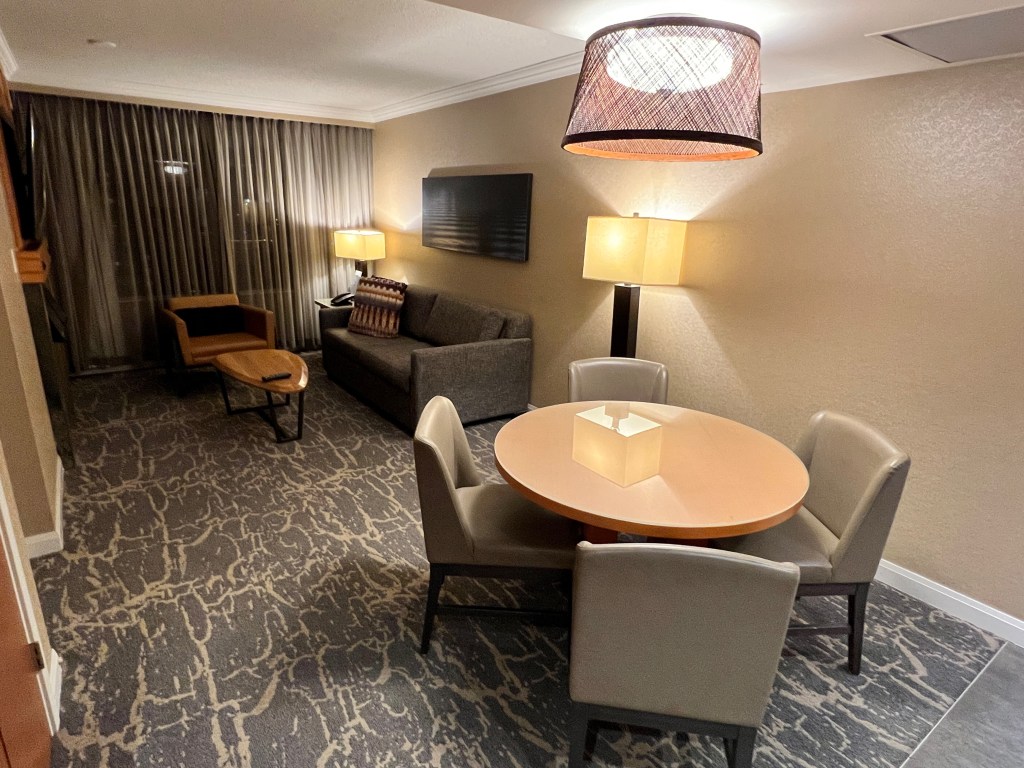
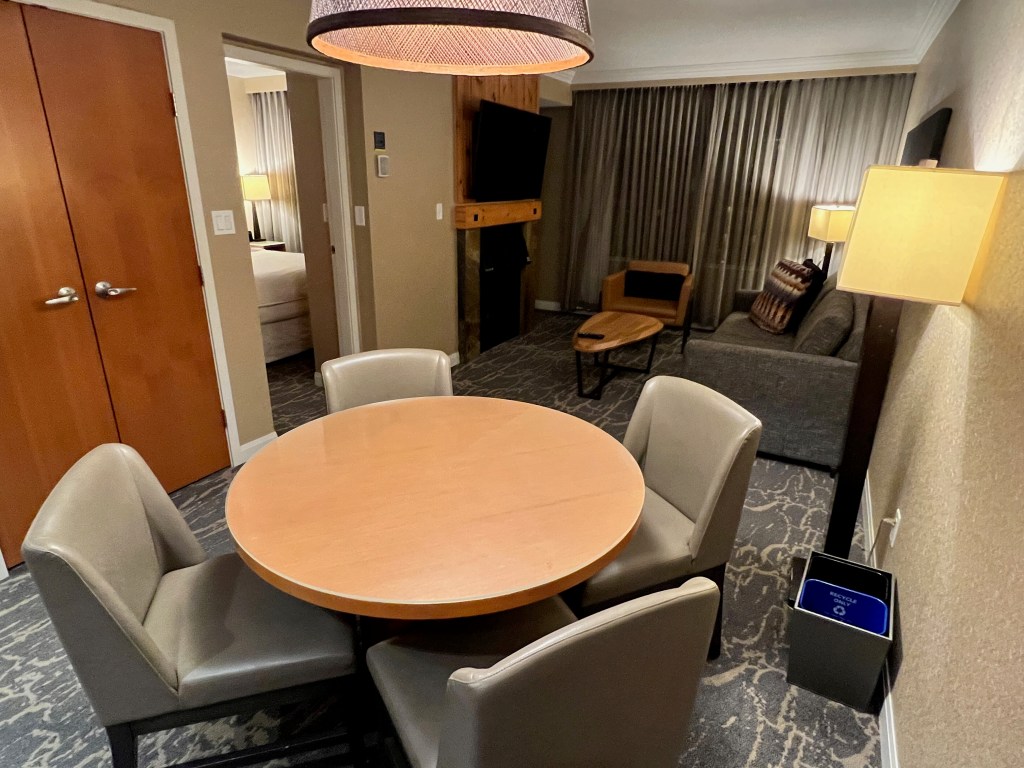
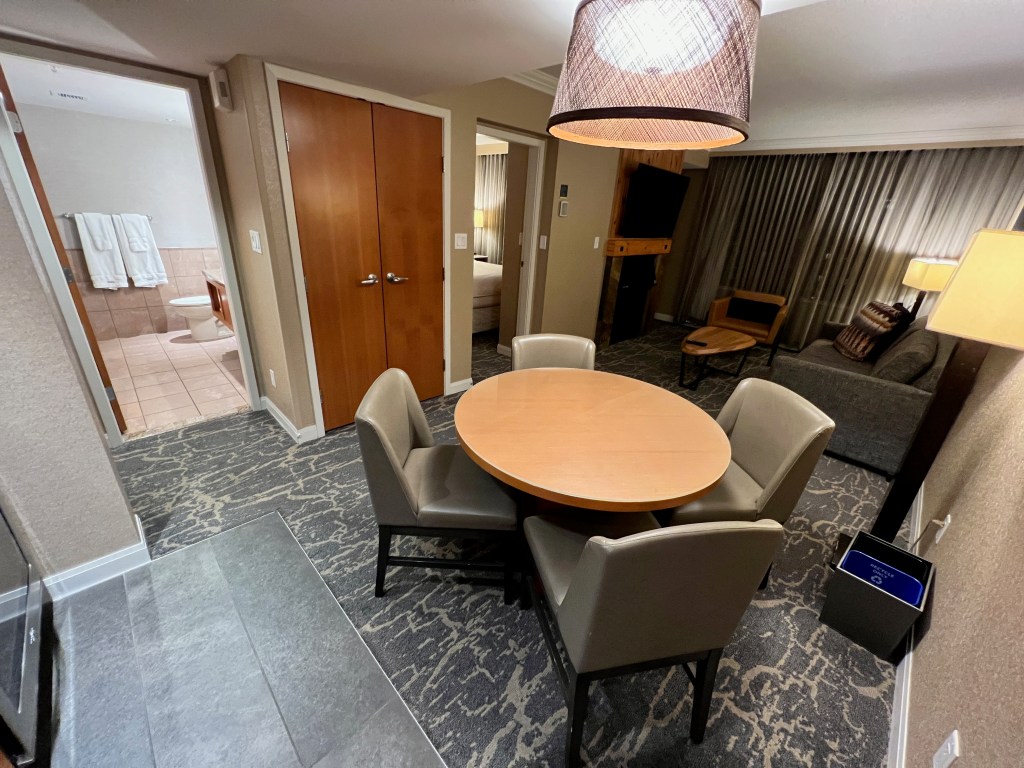
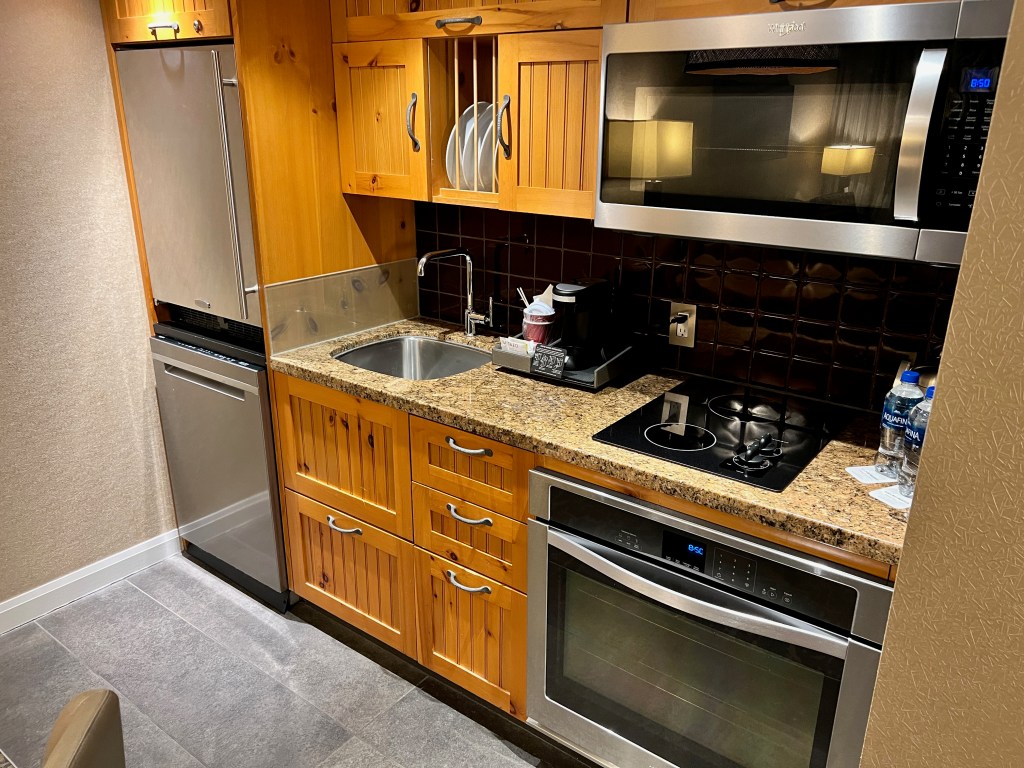
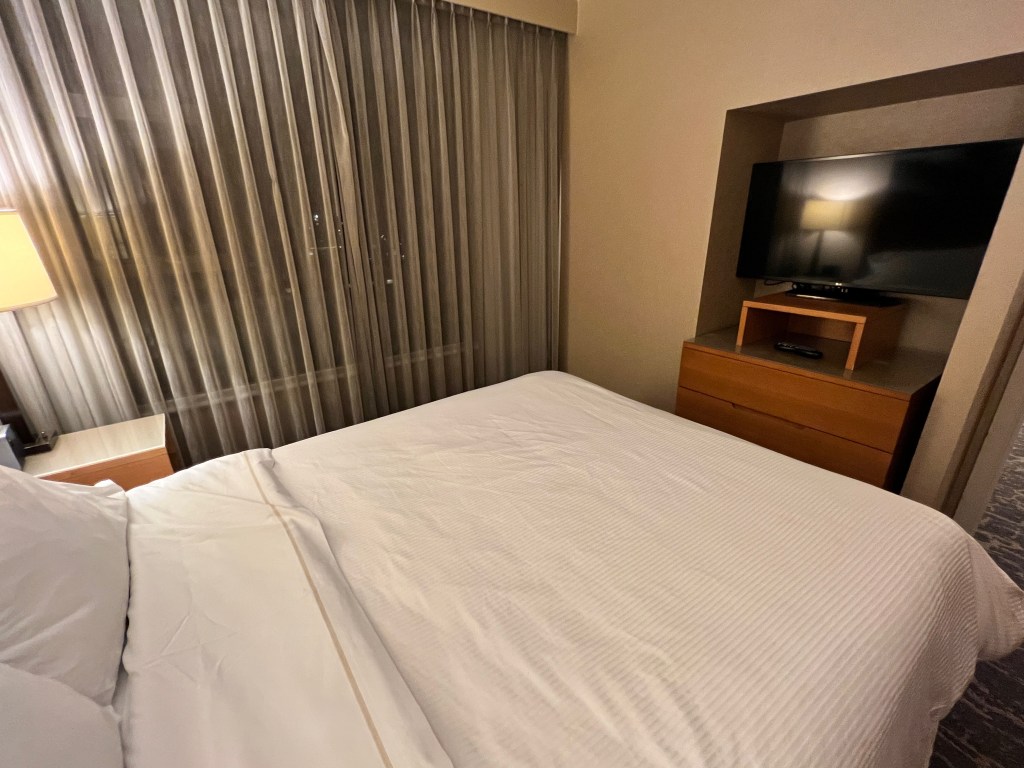
The Room: Junior Suite, One King
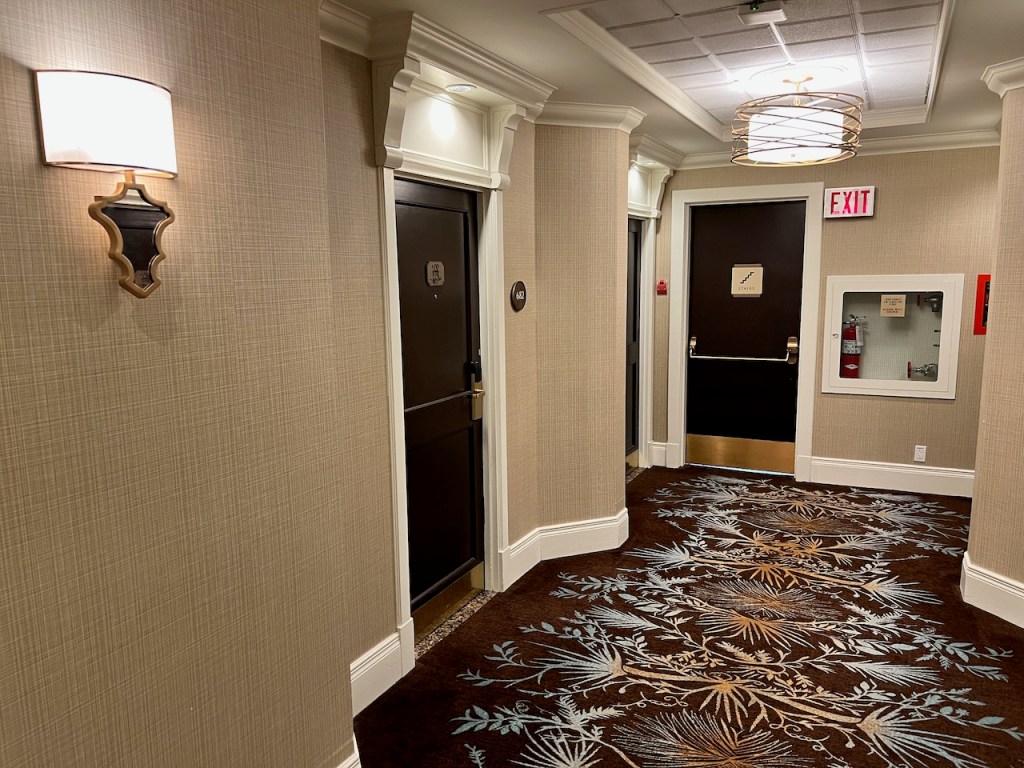
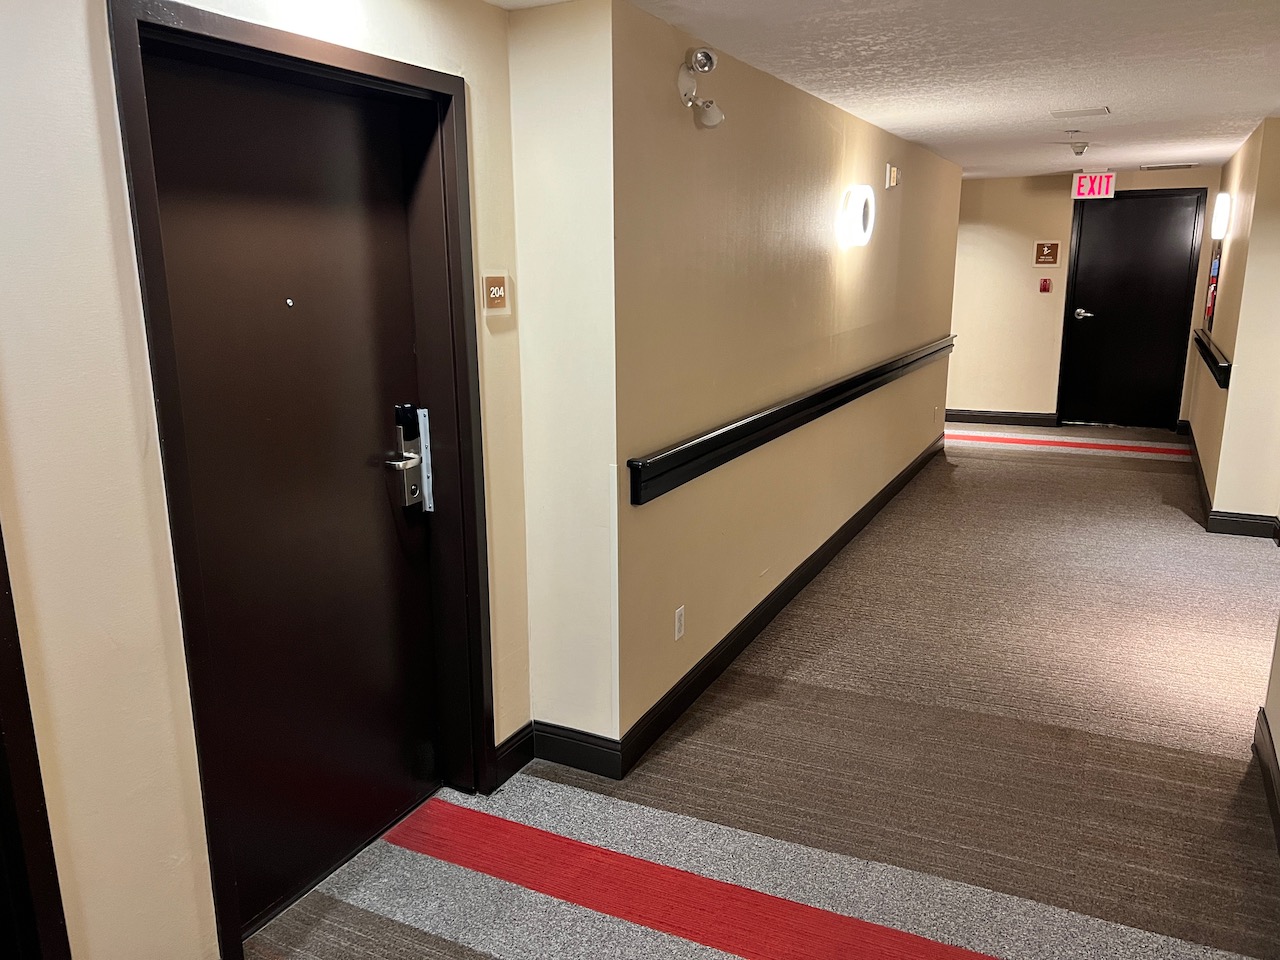
On receiving our room assignment, we headed up to our assigned room #682. Our room was located at the far end of the hallway, which led to a quieter experience with less hallway traffic.
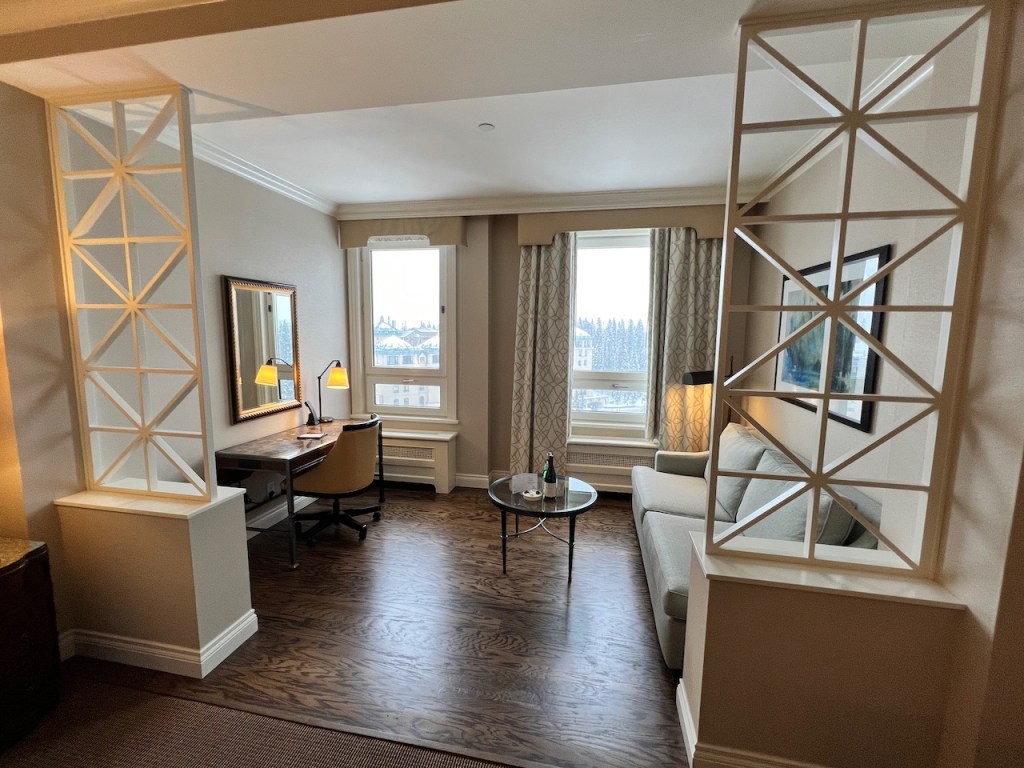
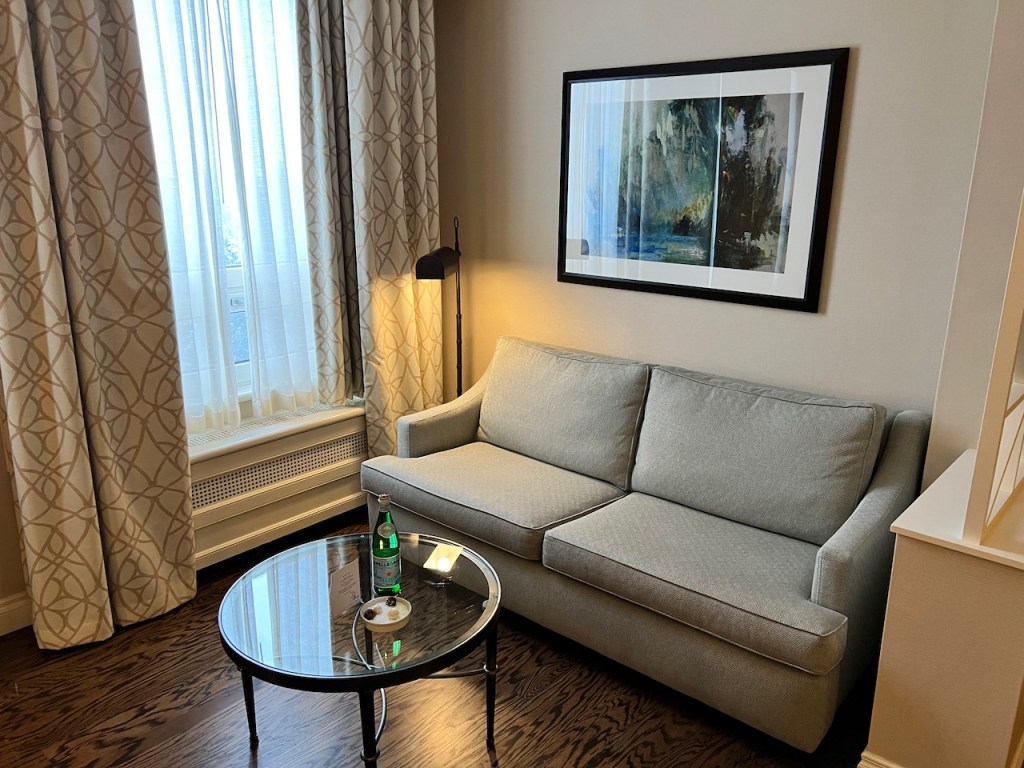
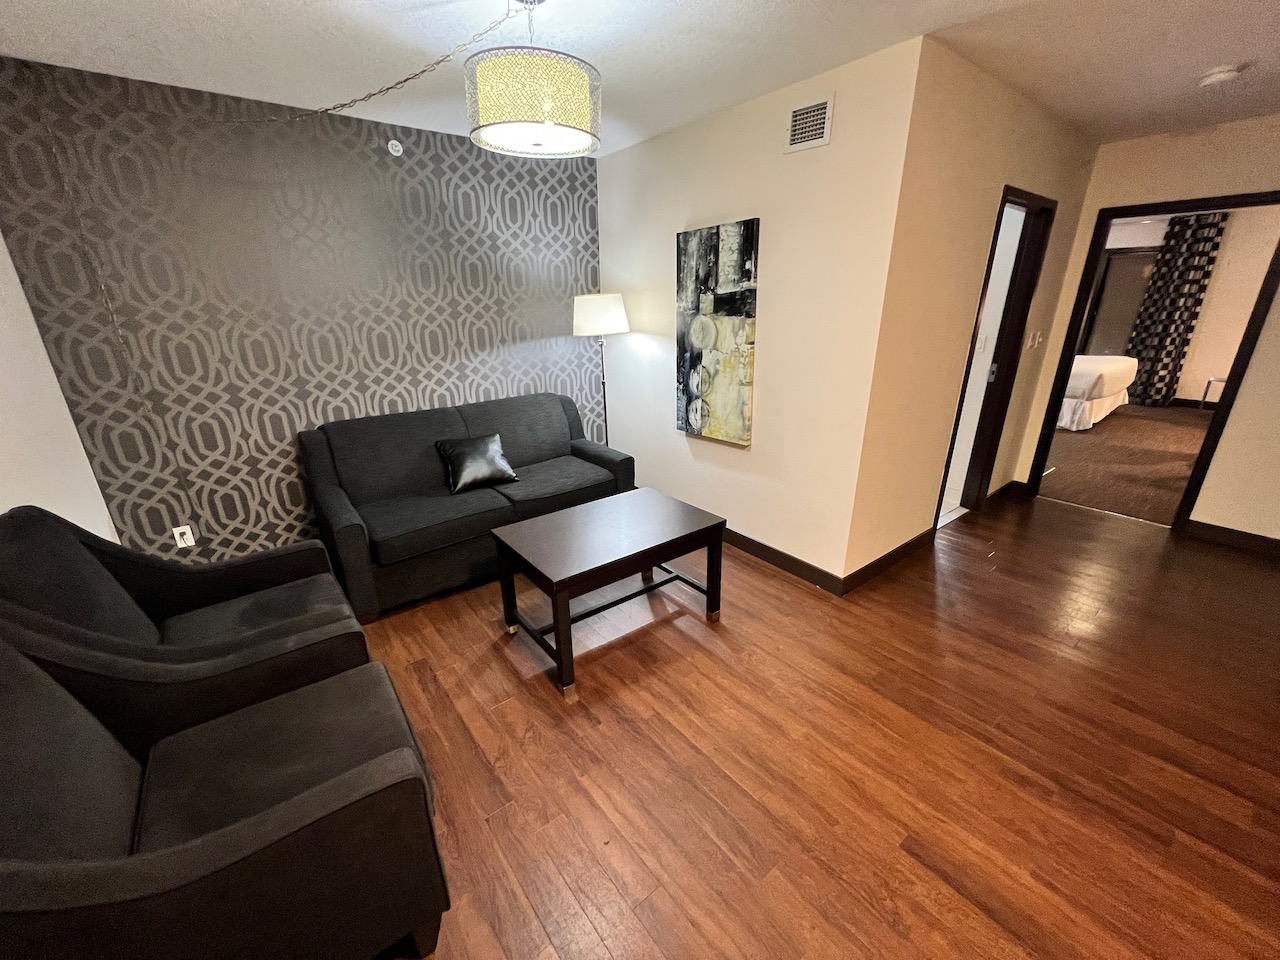
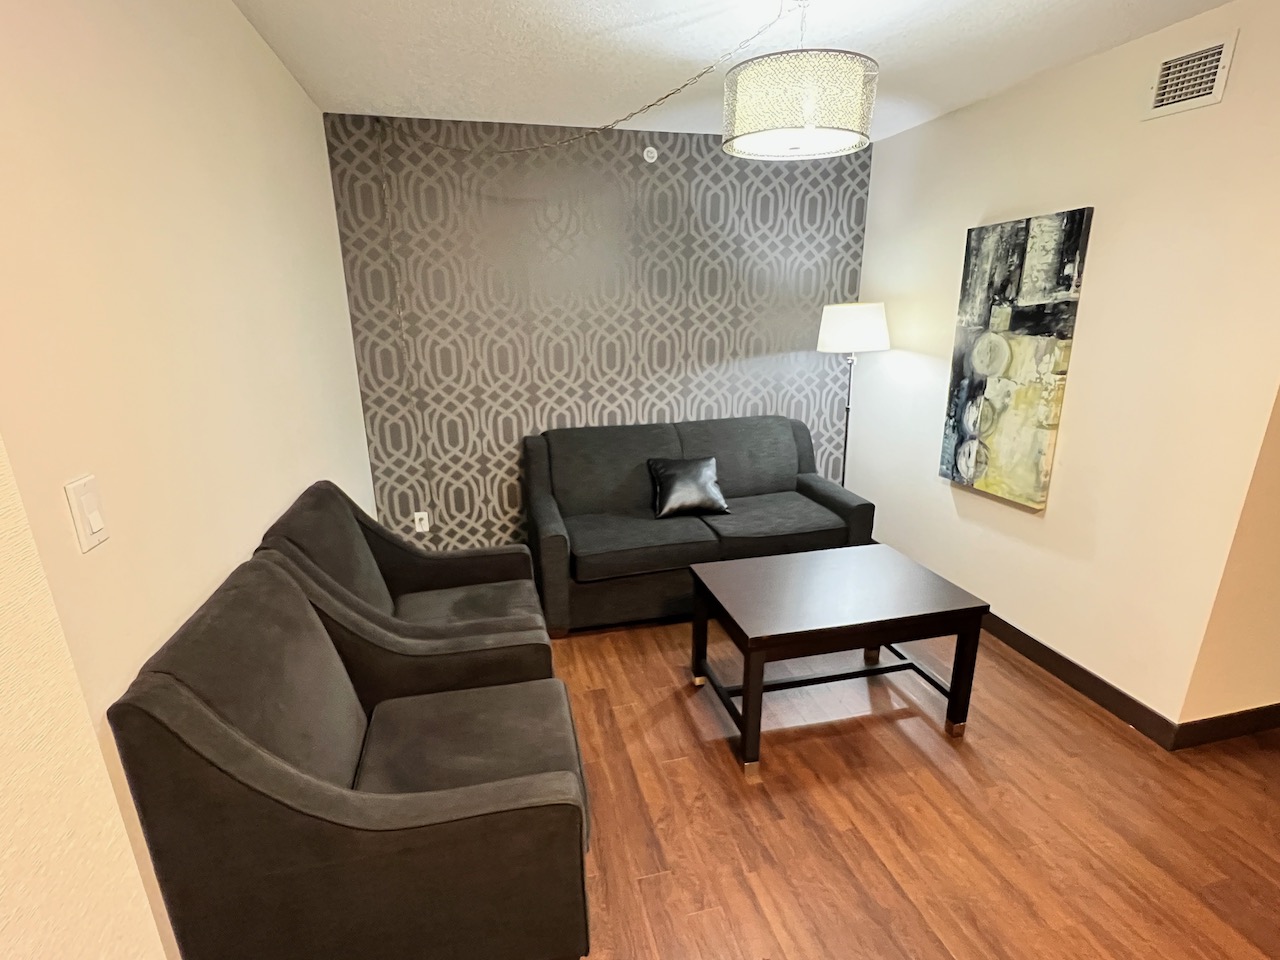
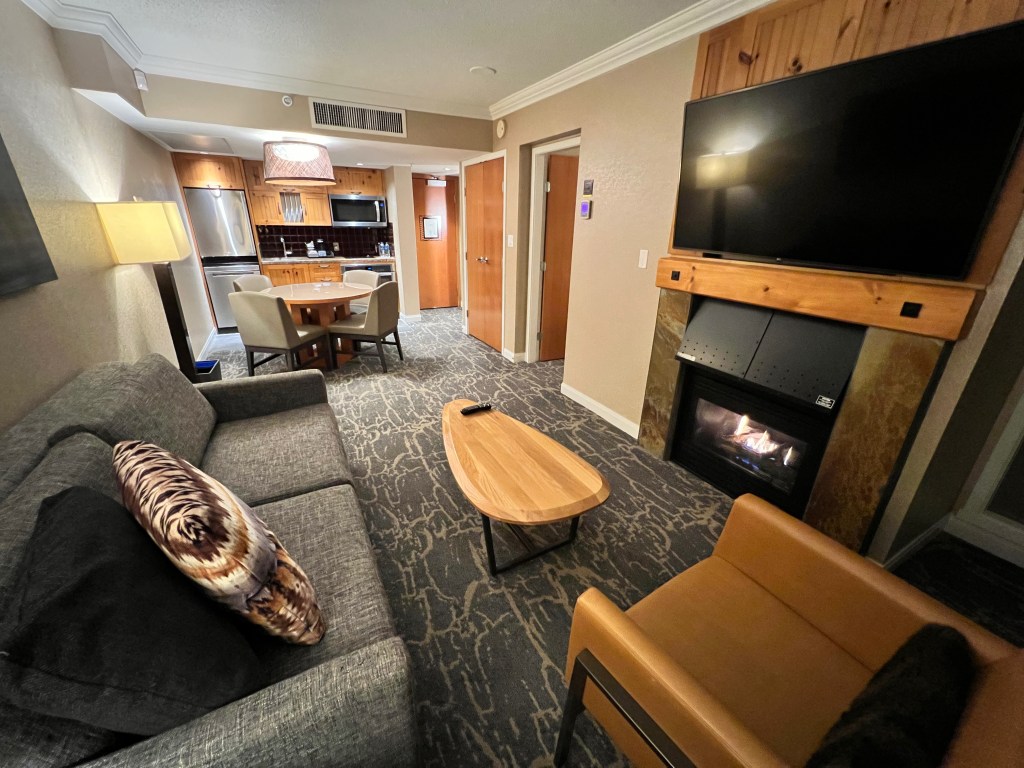
Upon entering the room, we found ourselves immediately in the bedroom of the Junior Suite. The Junior Suite offered a small separated sleeping area along with a sofa bed. The King Bed was really inviting, and looked exceptionally comfortable.
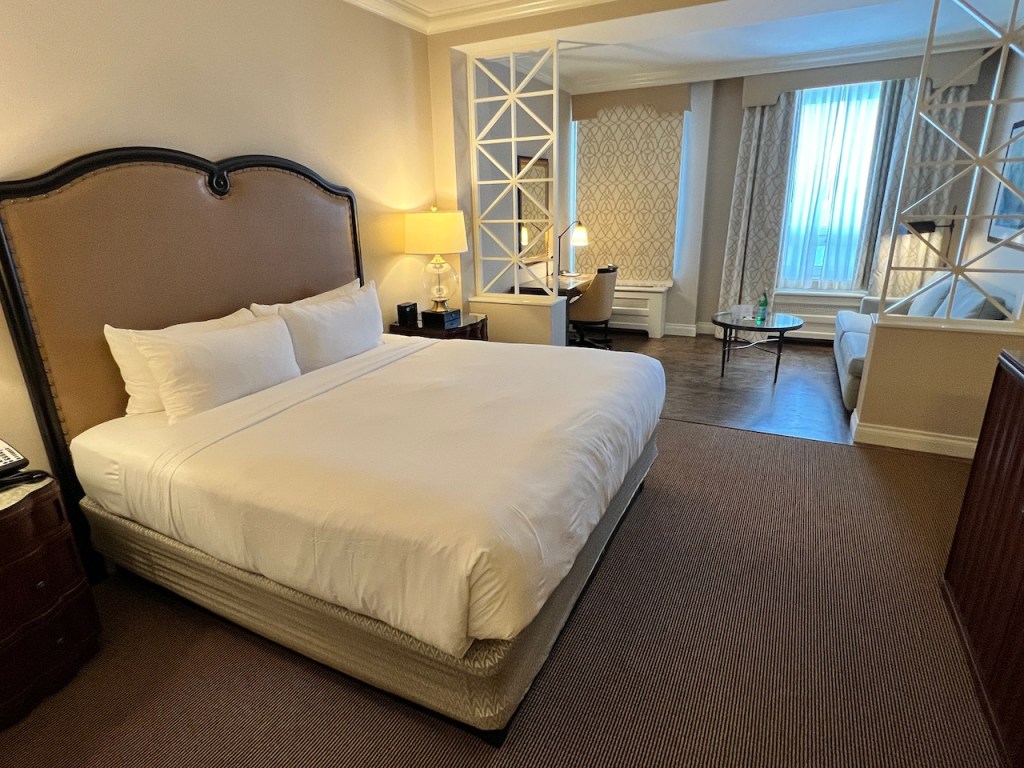
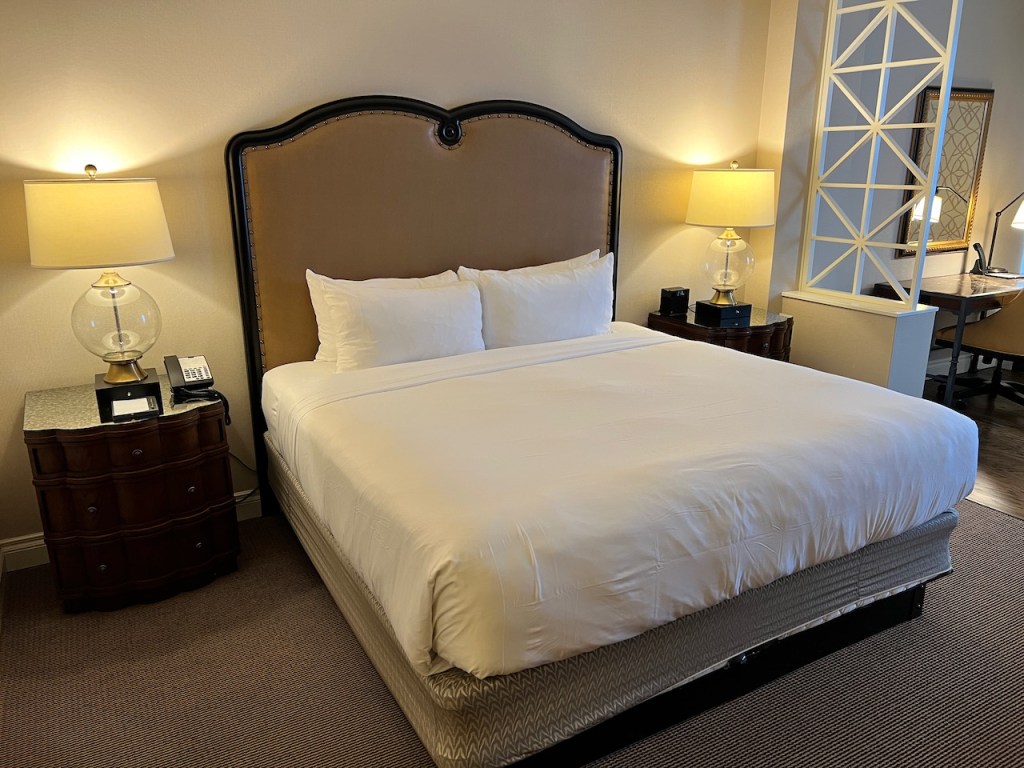
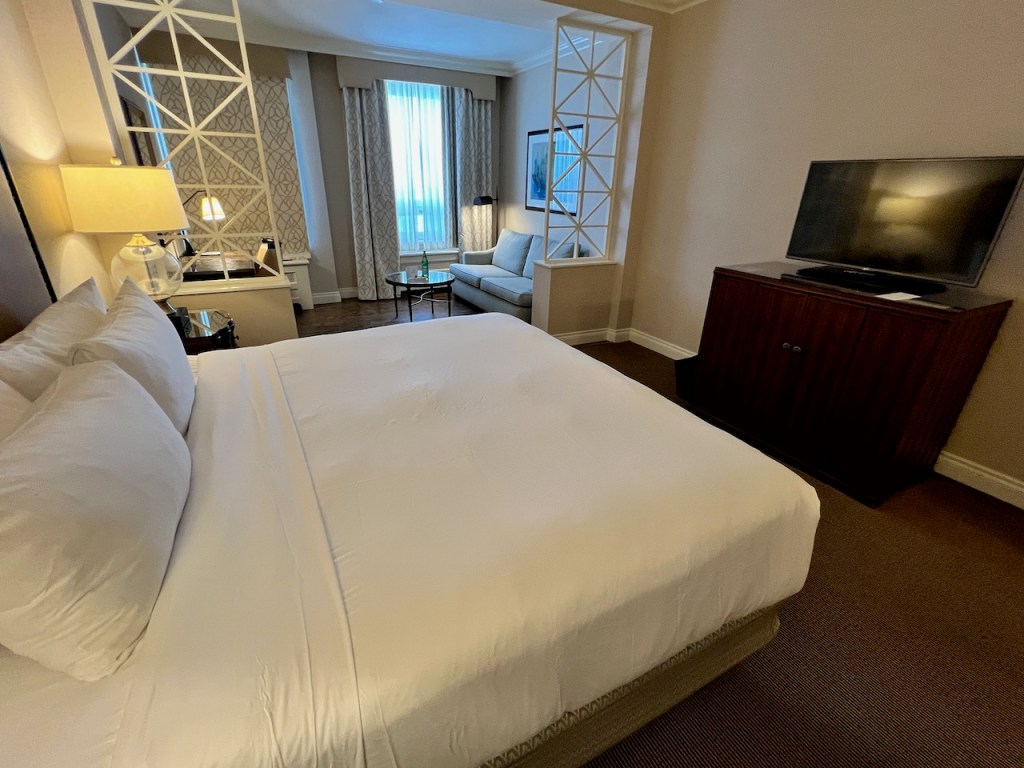

The Junior Suite space offered a sofa bed and a small desk area. The design team did a great job at keeping an open concept that offered a lot of natural light in to the room.

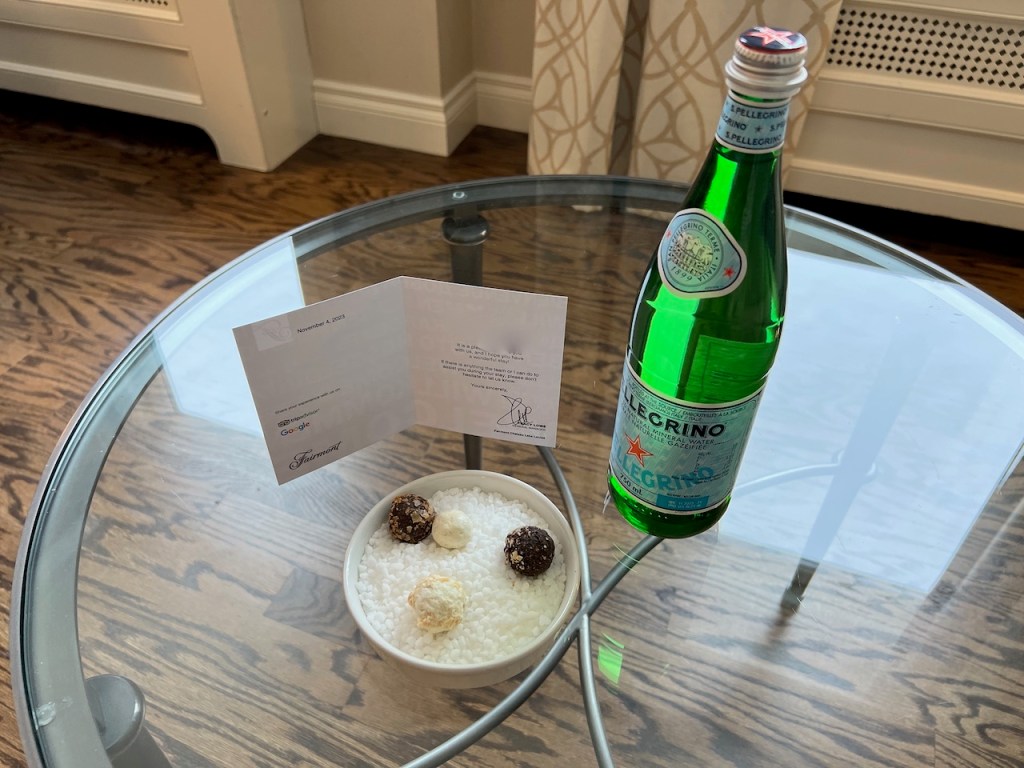
The American Express Fine Hotels and Resorts offered an in room amenity consisting of San Pellegrino, along with some delicious chocolate bite sized cookies.
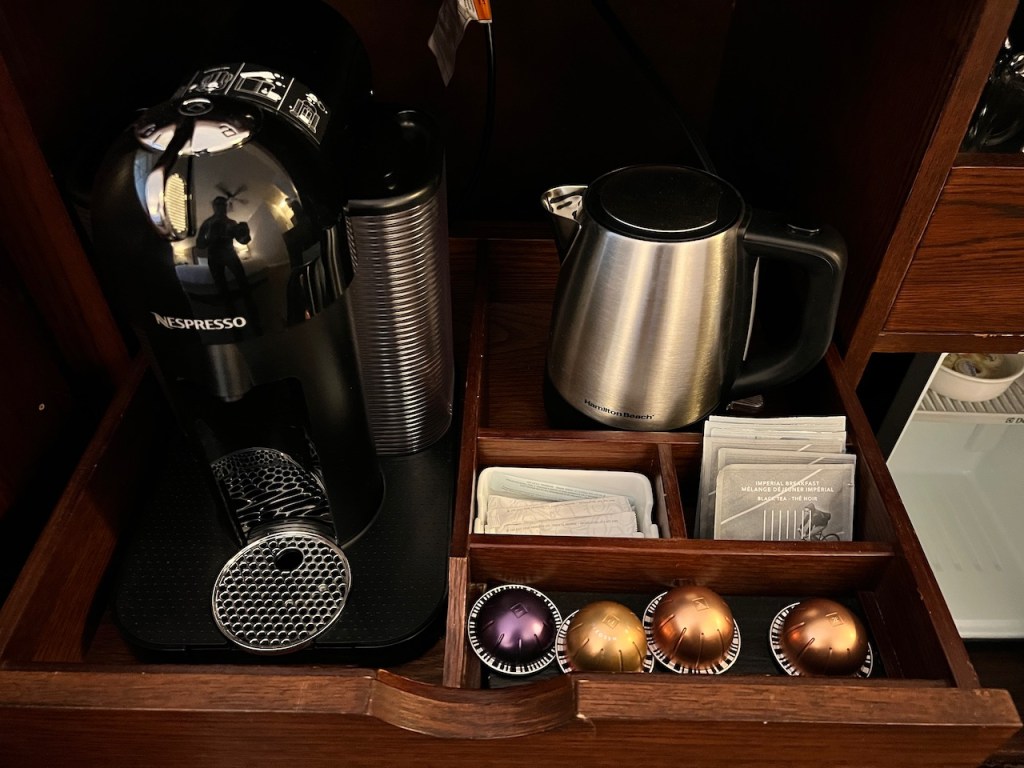
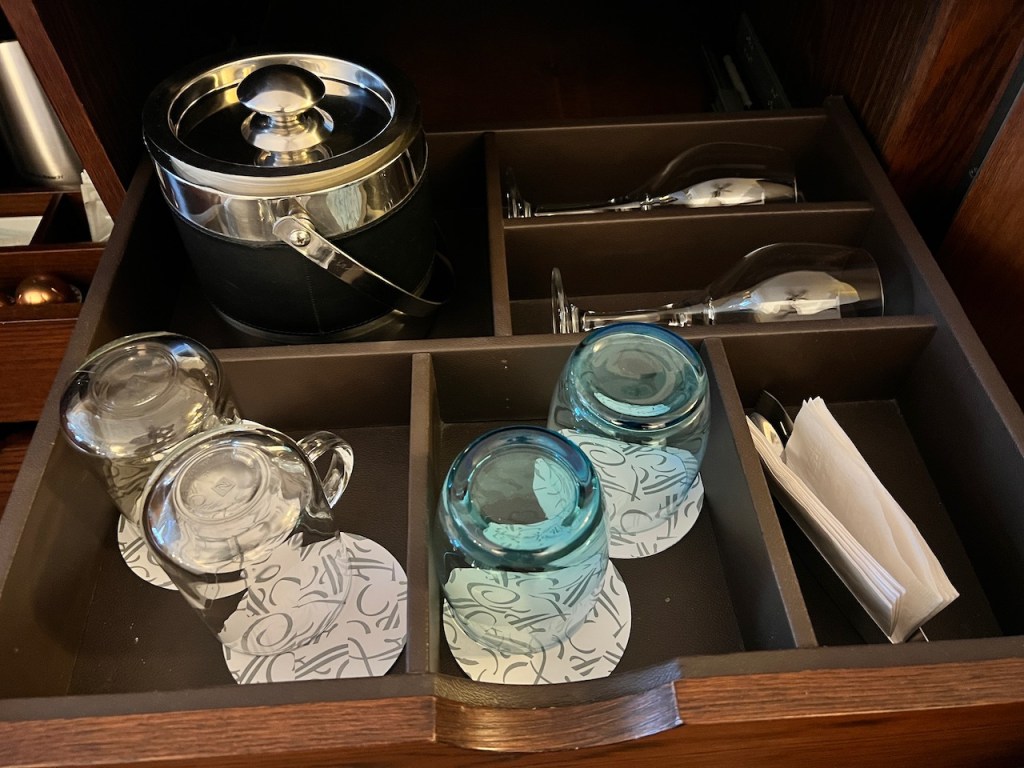
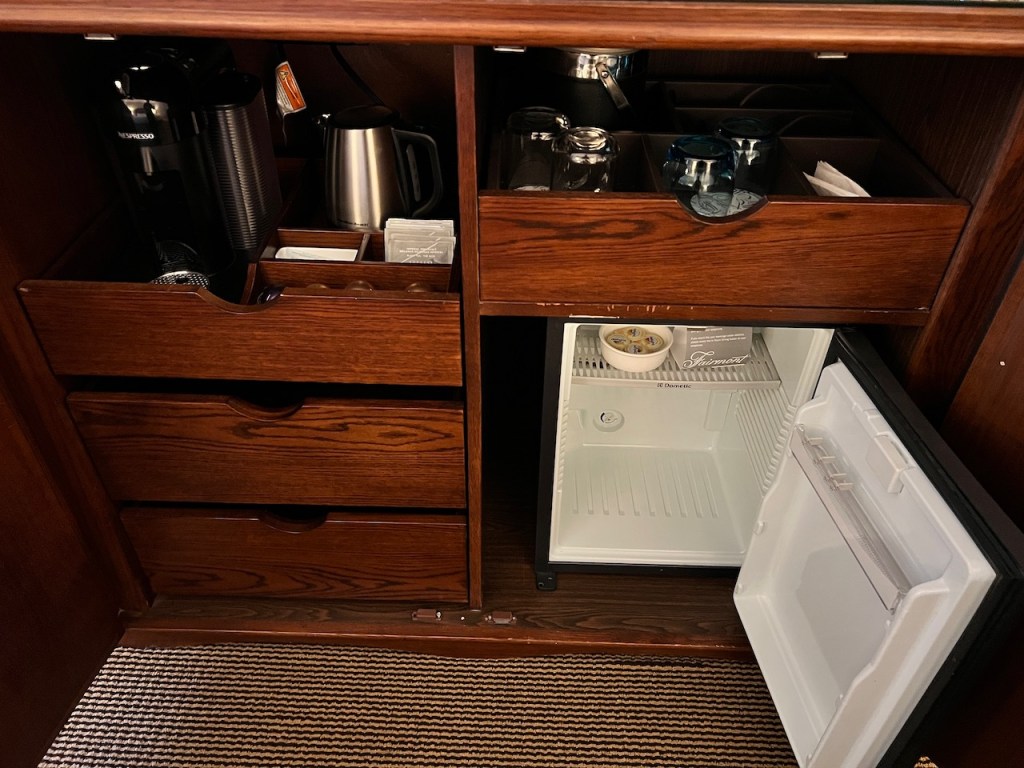
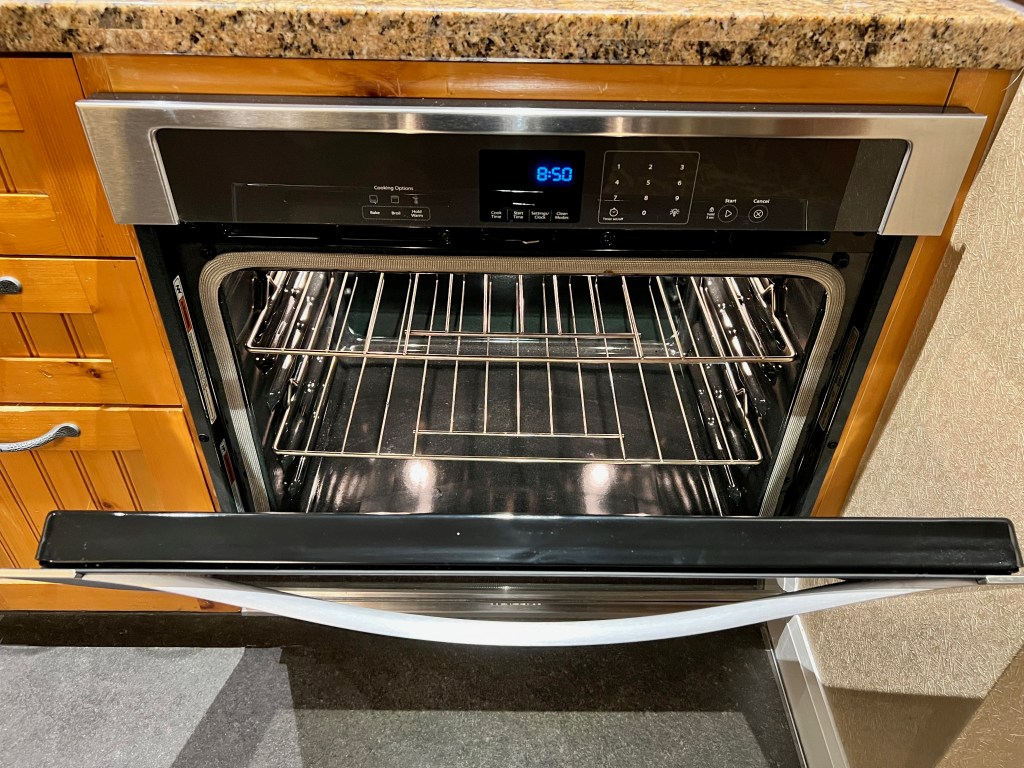
Consistent with a full service hotel, the room was fully stocked with a full series of glassware, a Nespresso Coffeemaker, and a tea kettle. There was a small mini fridge, which was also empty.
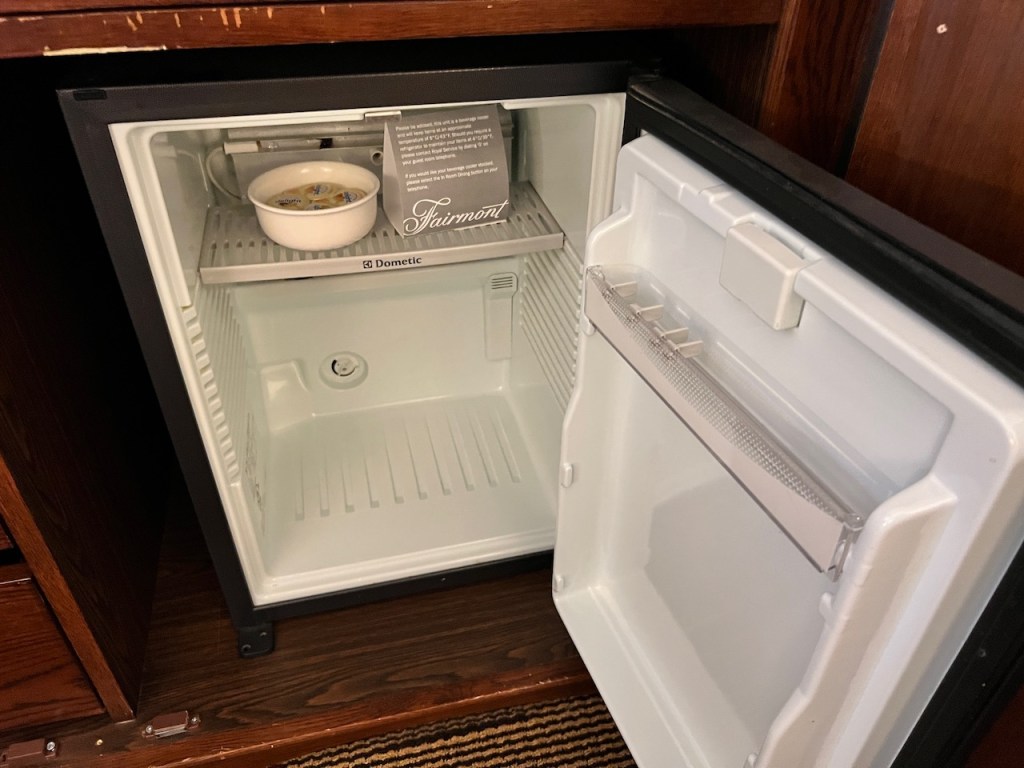
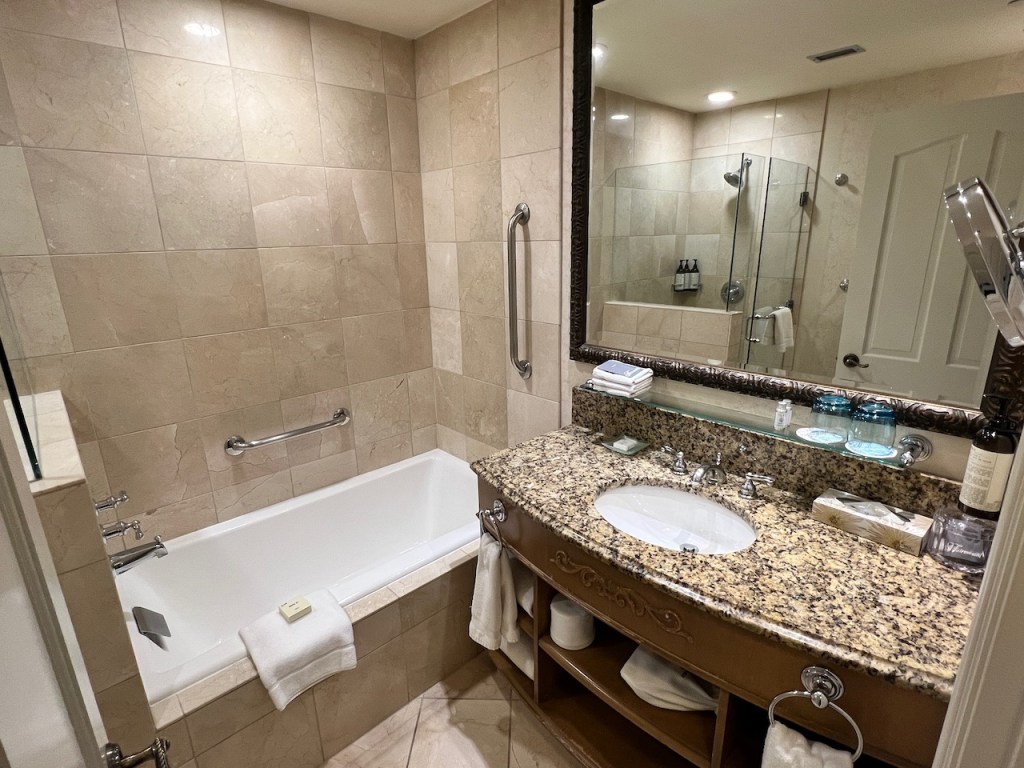
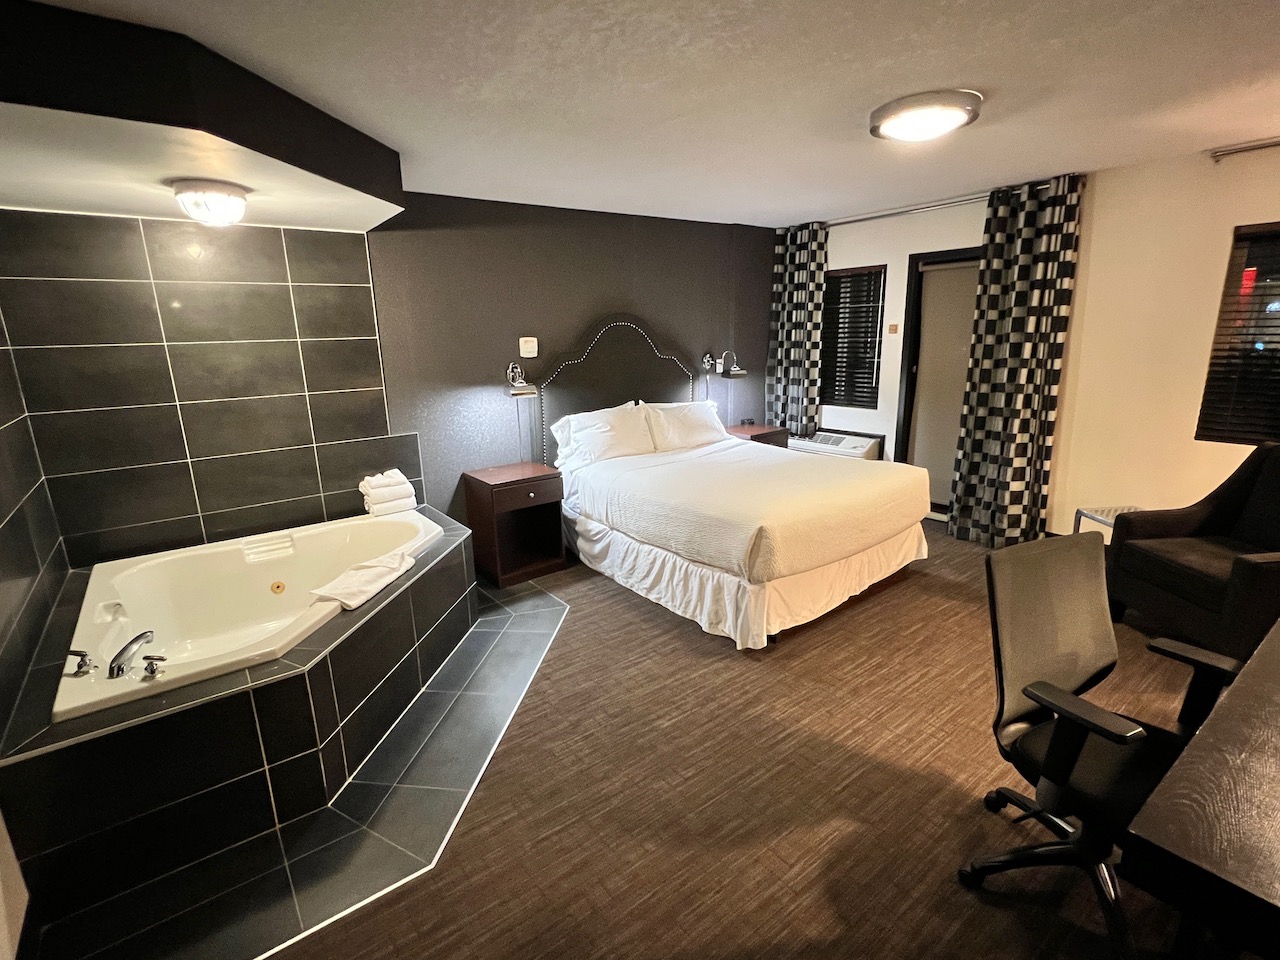
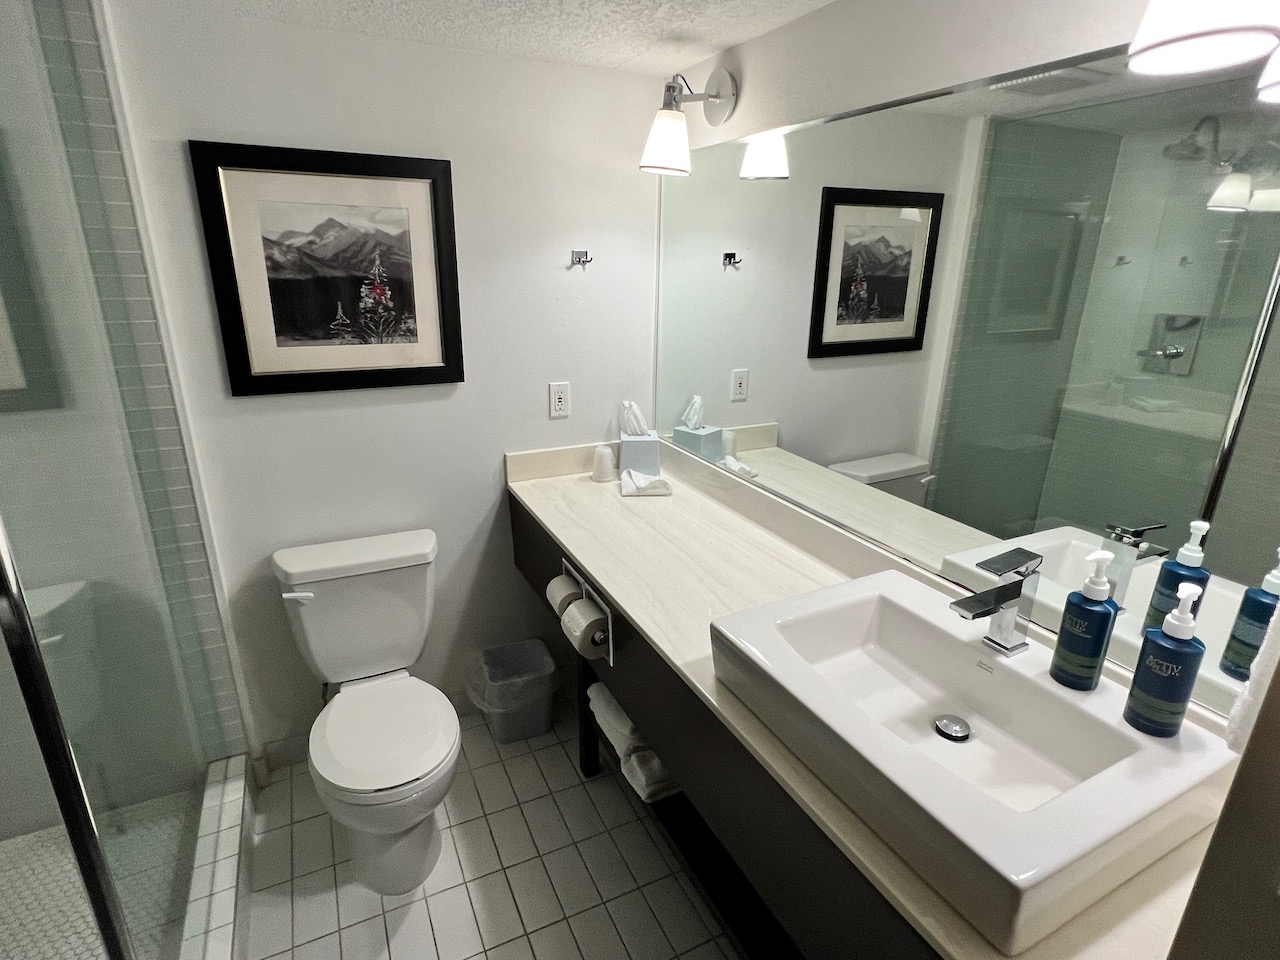
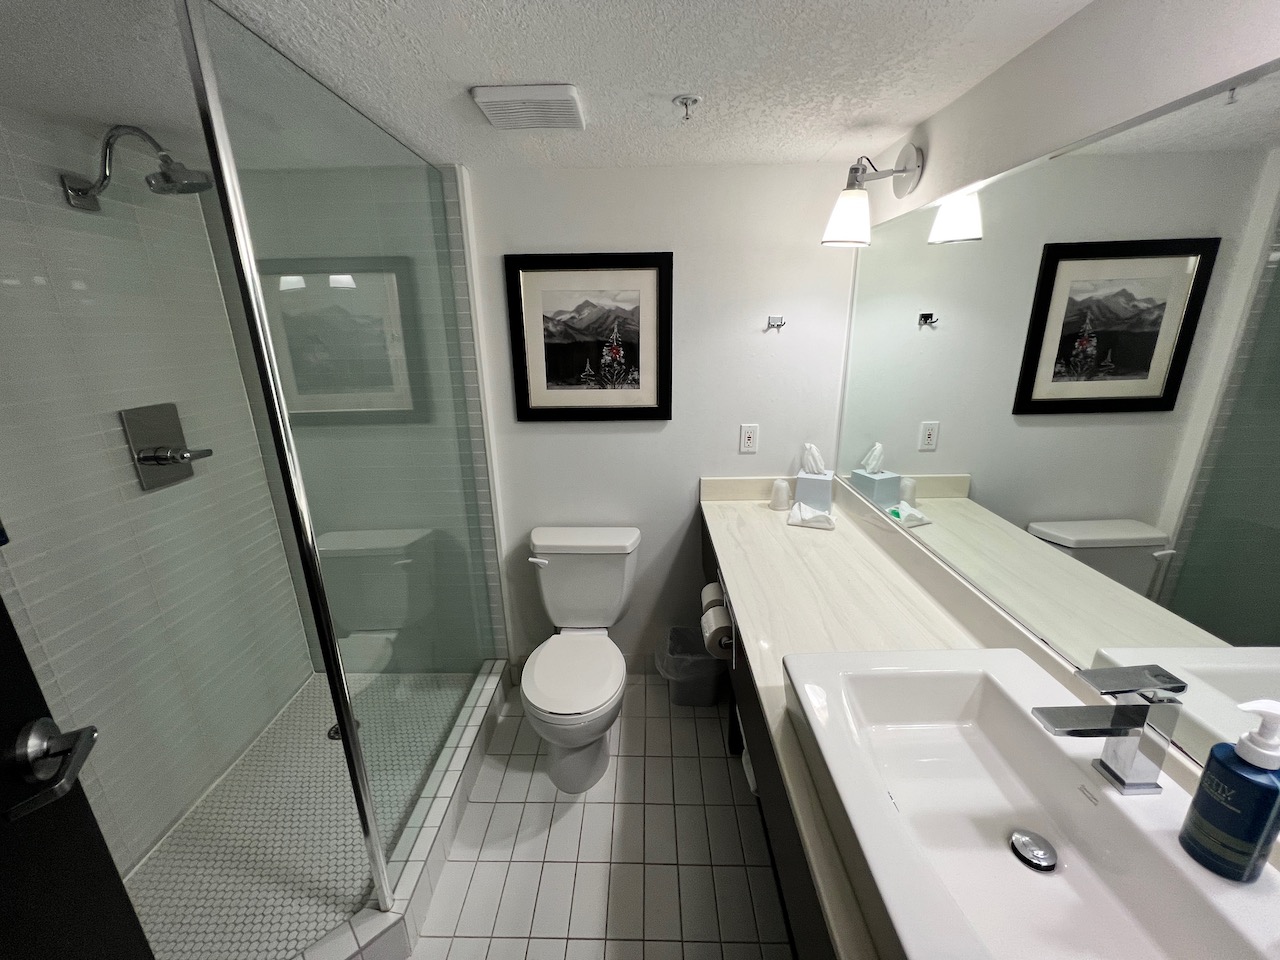
The Fairmont Junior Suite bathroom was a compact space. While it didn’t match the tiny bathrooms of their historic hotels, it was a space for one. The bathroom offered a single vanity sink, a smallish bathtub, along with a stand up shower.
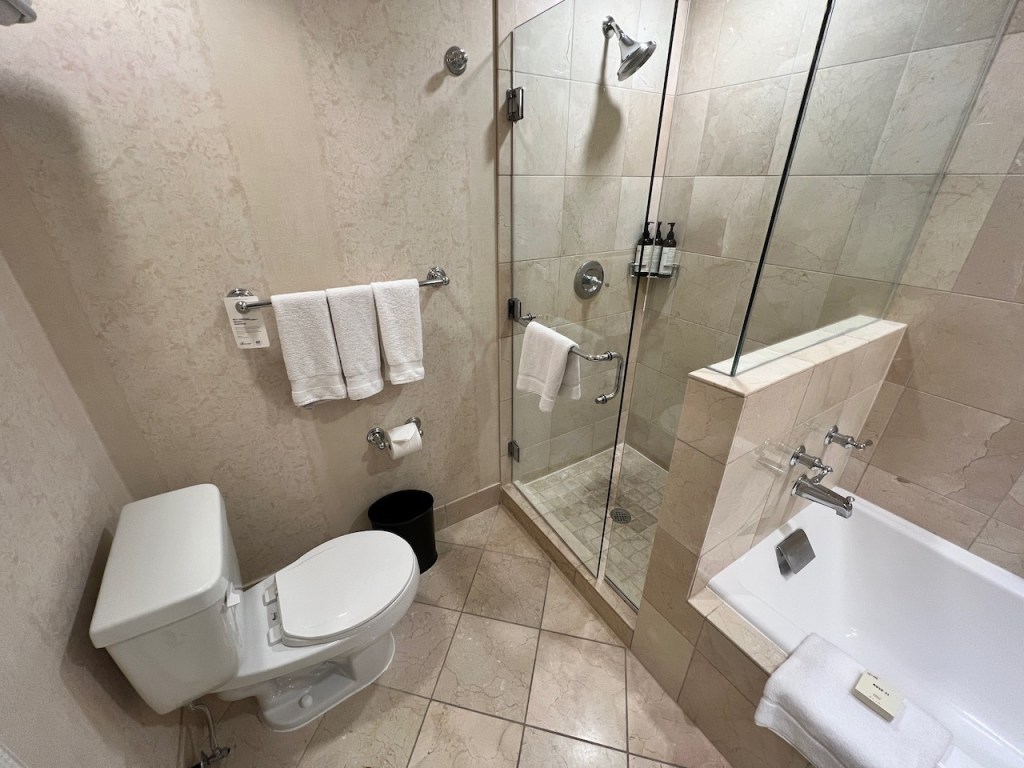
The Fairmont Château Lake Louise offered Le Labo Rose 31 soaps, shower gel, shampoos and conditioners, which is consistent throughout the Fairmont hotel chain.

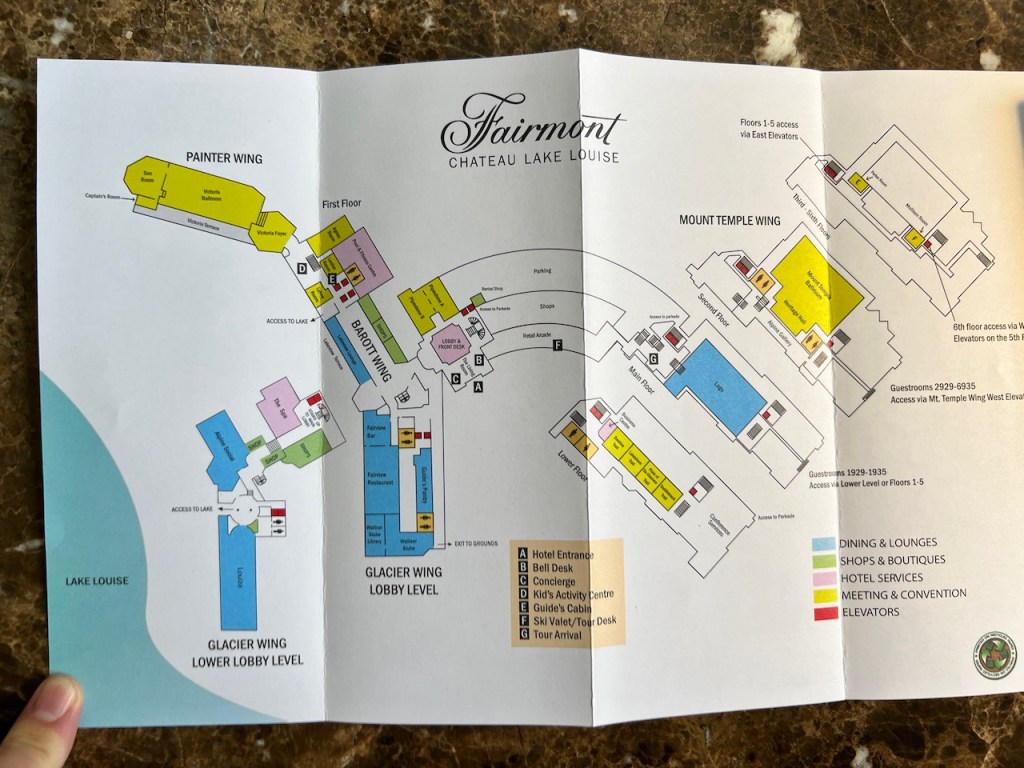
We were also provided a short resort map. While it was handy, we didn’t refer to it all that much.

It terms of sleep quality, as you might expect from a castle tucked away in the mountains, the room was exceptionally quiet and peaceful. Although the hotel featured five hundred and thirty nine rooms, the room was restful and tranquil.
Around the Property:
The Fairmont Château Lake Louise is the primary resort in town. As a result, the hotel features every feature and amenity possible for guests to enjoy a multi day stay.
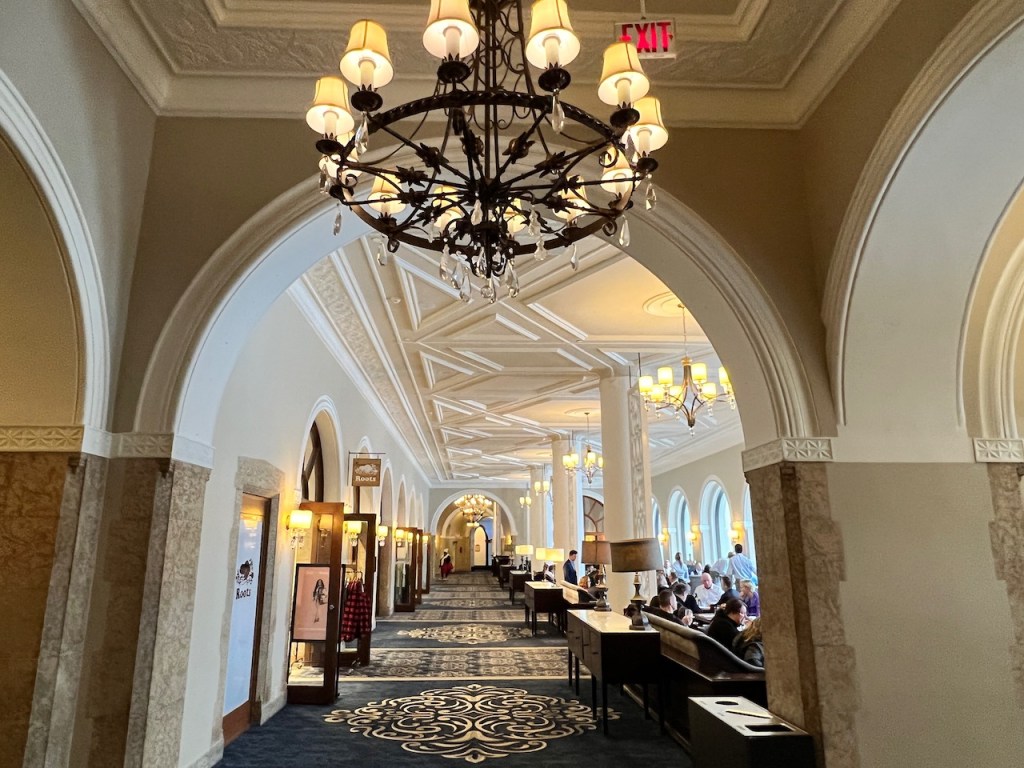
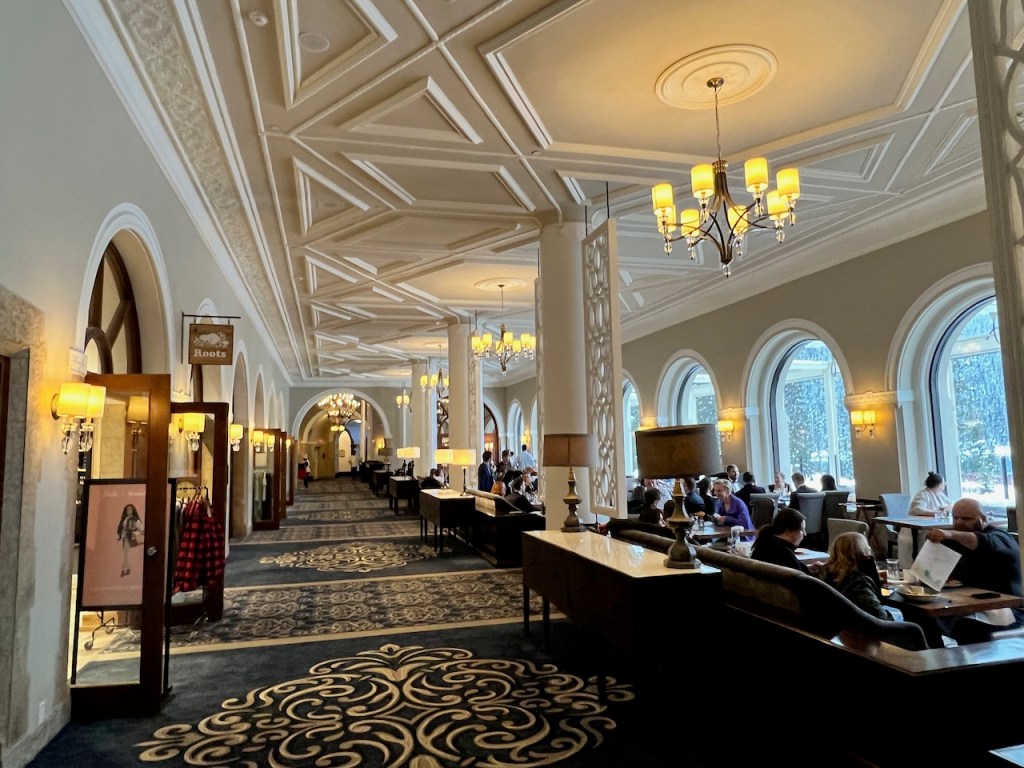
The Fairmont Château Lake Louise offers a grand castle like environment. Almost every feature of the public area of the hotel feels impressive. With rich carpeting, and giant picture windows of Lake Louise, the property feels impressive and is an experience to be enjoyed.
Visiting Lake Louise:
Right outside of the Fairmont Château Lake Louise, is the main event. Sparkling Lake Louise sits right outside the back of the hotel, as one of Canada’s most famous lakes.
Access to the lake shore waterfront is from the lower level of the hotel. Within steps, you can be right at the lake shore and all the views that it entails.


The hotel has a rather imposing place on the water front. Despite such a grand structure, the building fit into the environment as much as possible for a finve hundred room hotel.
During our visit, we managed to take in two hikes in the immediate area with hiking crampons & bear spray provided courtesy of the hotel concierge.
On the day of our arrival, we took in the Lakeshore Walk along the right hand side of Lake Louise. On the day of our departure, we took in the Fairview Viewpoint Hike, which led to a spectacular view of the lake. Both of these posts provide more details on these nearby activities.
Fitness Centre:
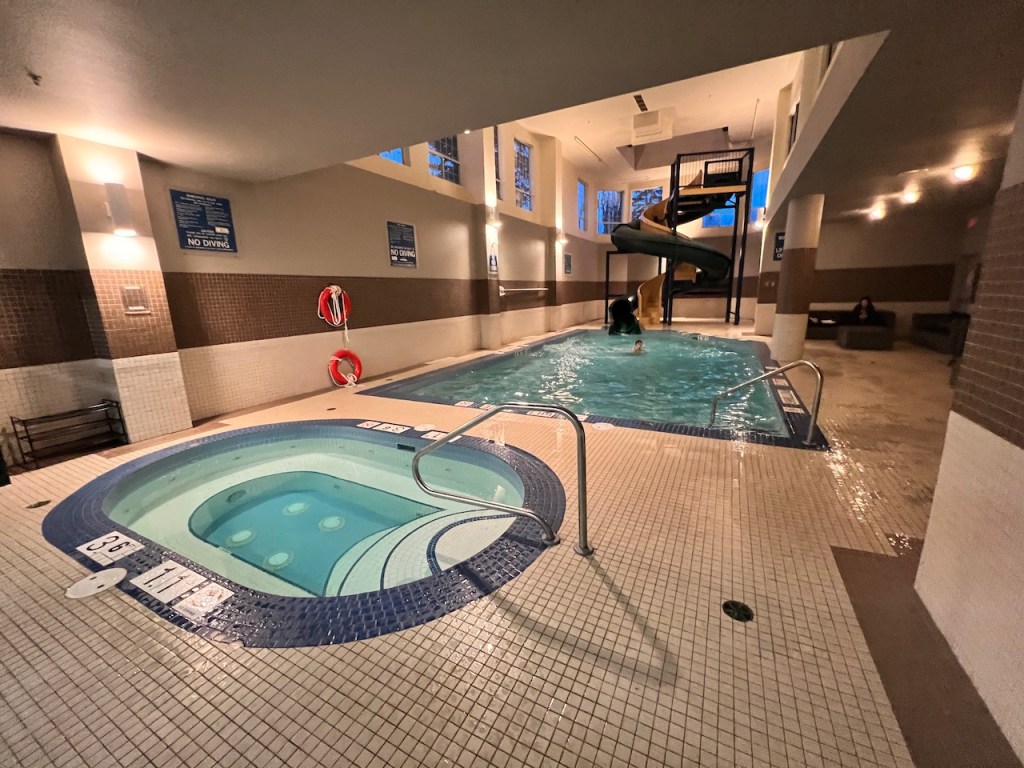
The Fairmont Château offers a dated fitness centre and indoor pool area. The pool was accessed through the lobby, with an entrance that was located one level up from the main lobby.
The pool was more of a place to take children for entertainment purposes, rather than an aspirational pool that you’d want to spend a lot of time in. The interior decor was a little gloomy. I would imagine that the pool could get quite full pretty easily given its smaller size.
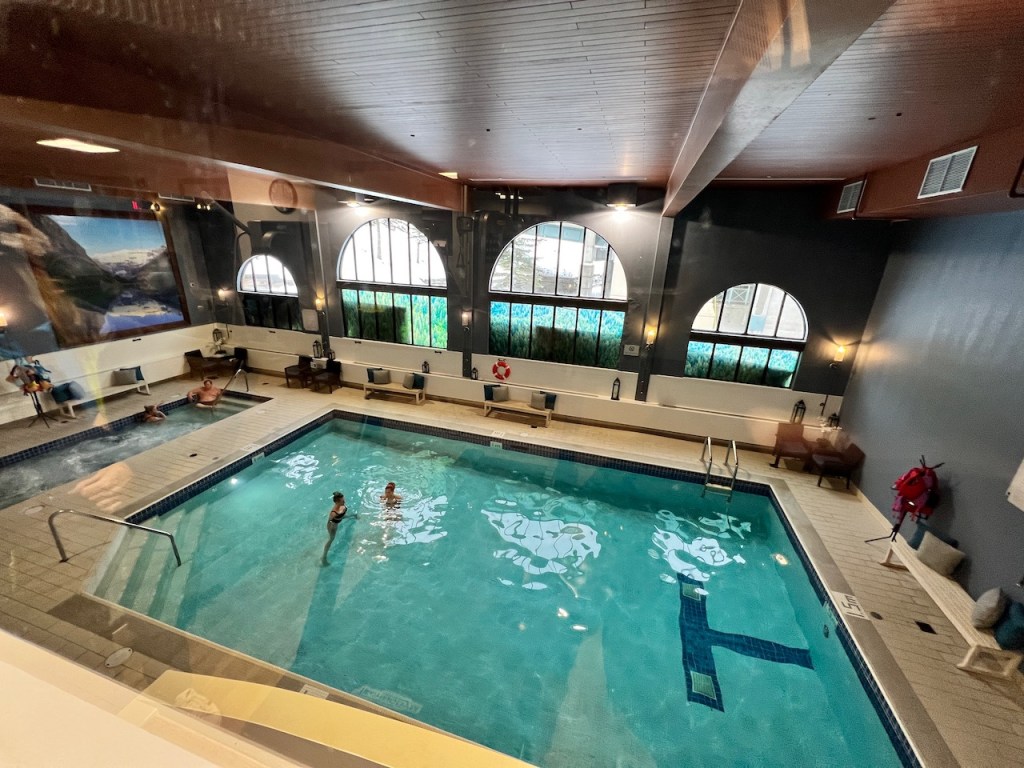
The pool offered “adult only” swimming between 10 PM – 11 PM, which should give you a subtle indication of how many children can possibly frequent this area.

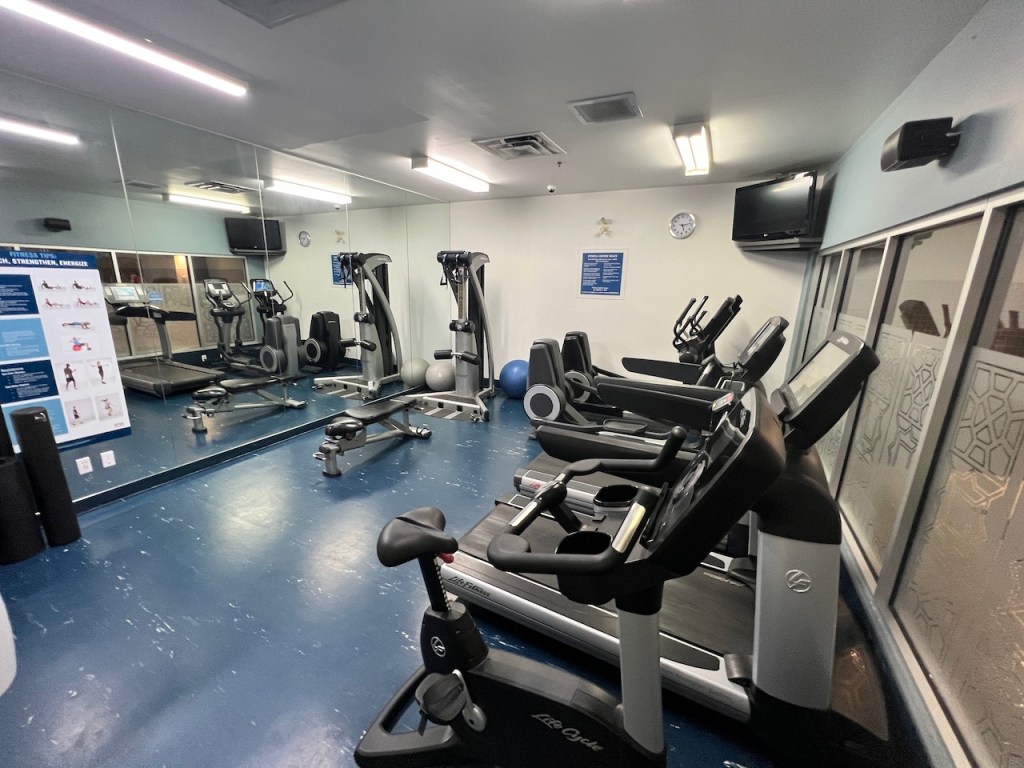
The pool area also captured the gym. The gym offered some indirect light, although was pretty small for a hotel of this size. With great hiking trails right outside the hotel door, I would generally be less reliant on this space for exercise.
It is also worth mentioning that the Fairmont Château Lake Louise is also upgrading the pool and spa facilities with a partially completed renovation project. The project will likely see these facilities moved to a different part of the hotel entirely.
Food and Beverage:
The Fairmont Château Lake Louise is one of the only resorts in town, with minimal off-site restaurants located in the town of Lake Louise. Given the lack of independent options, the food and beverage outlets on the resort can tend to be a little on the expensive side.
It is also worth mentioning that the hotel prioritizes hotel guests for dining in its restaurants. Reservations are recommended and we did find some food and beverage outlets to be quite full, despite our off season visit.
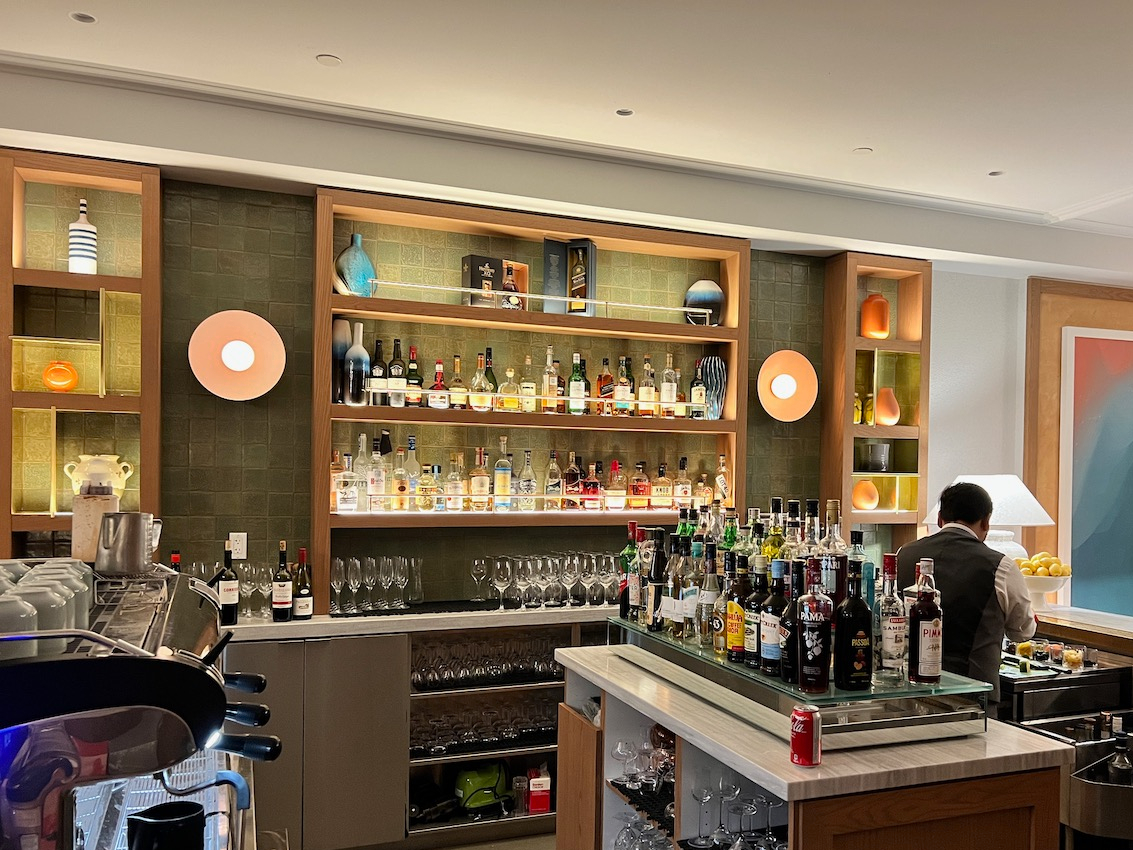
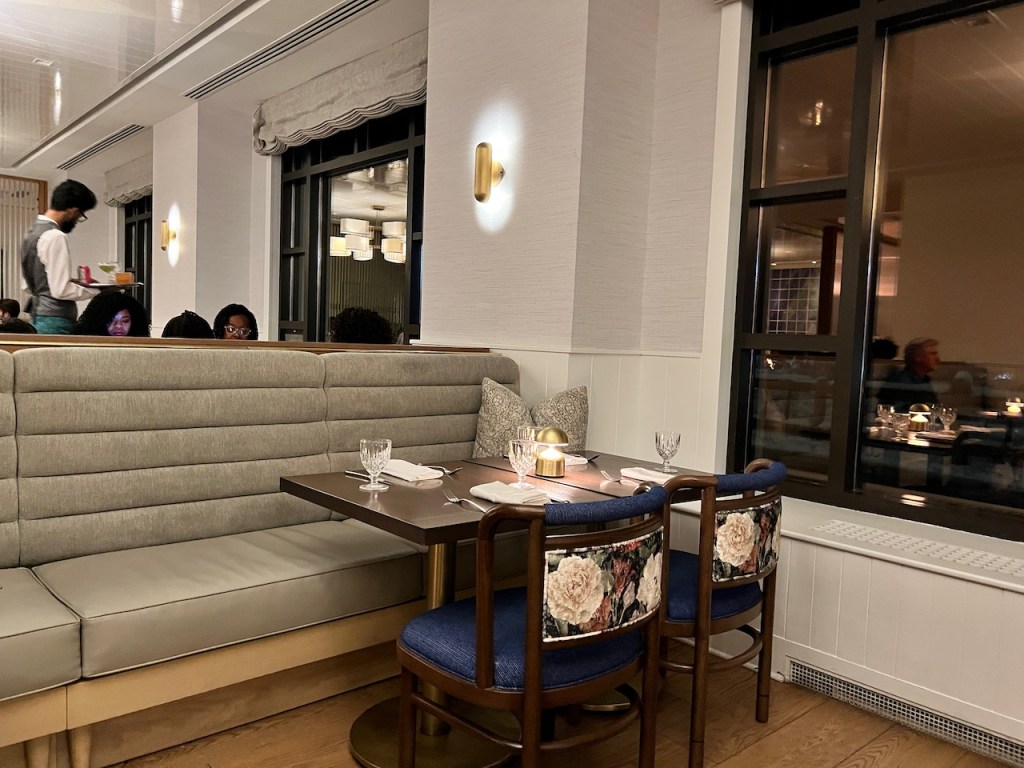
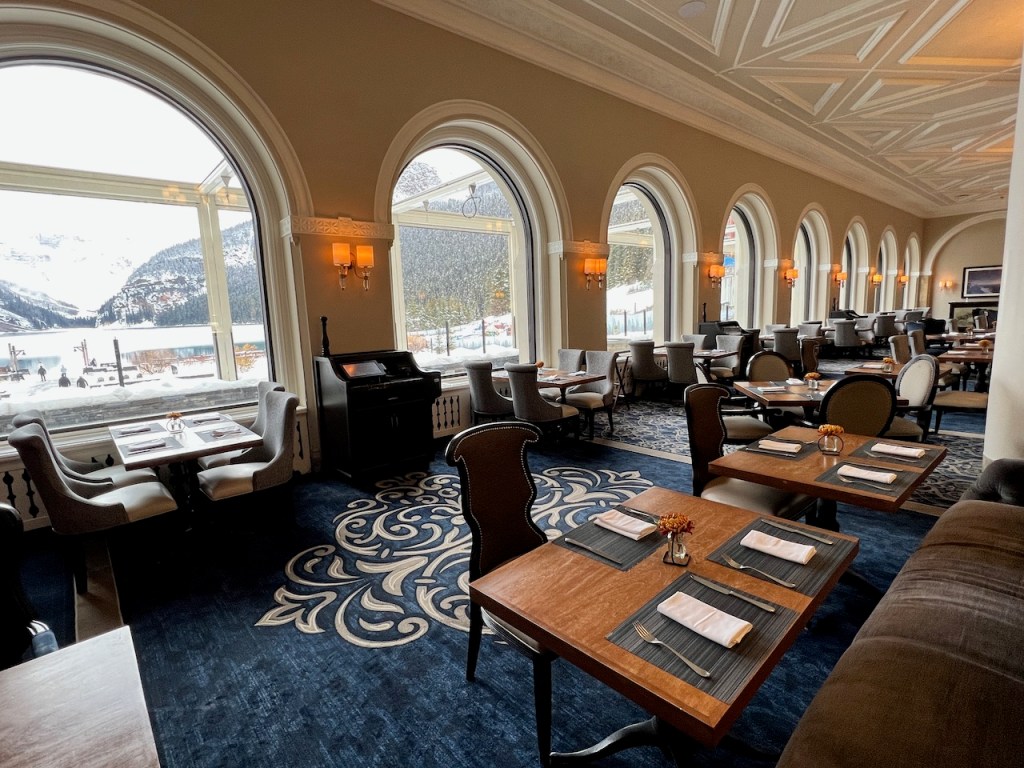
Louiza Restaurant and Bar:
Louiza Restaurant and Bar would form the basis of most of our dining at the Fairmont Château Lake Louise. As a result of the American Express Fine Hotels and Resort rate, we redeemed our $100 USD Food and Beverage Fine Hotels and Resort Voucher, along with enjoying breakfast next morning.
Louiza was located on the lower level of the Fairmont Château Lake Louise, immediately next to the lake access.
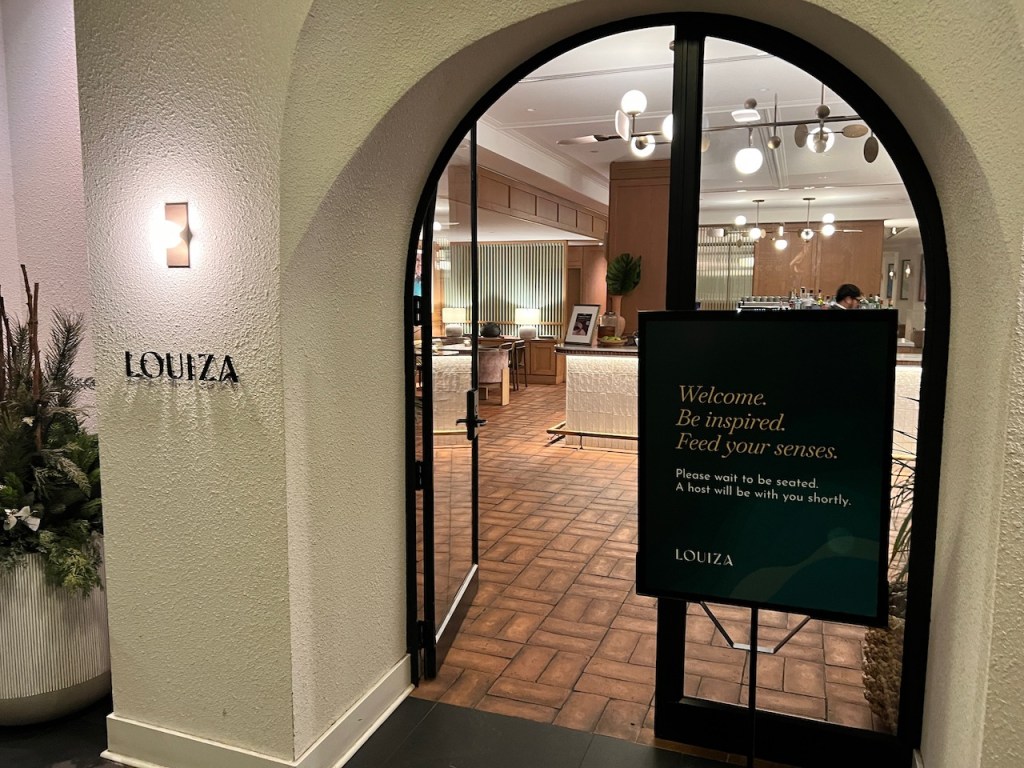
The Louiza Restaurant and Bar has a contemporary look and feel to the restaurant, with smaller bistro style seating spaces similar in concept to a Mediterranean restaurant.

For our evening dinner visit, based on recommendations from the hotel, I made an advance reservation for 7:00 PM via the email address listed on the hotel website. I received a confirmation within 24 hours for a table at 6:45 PM.
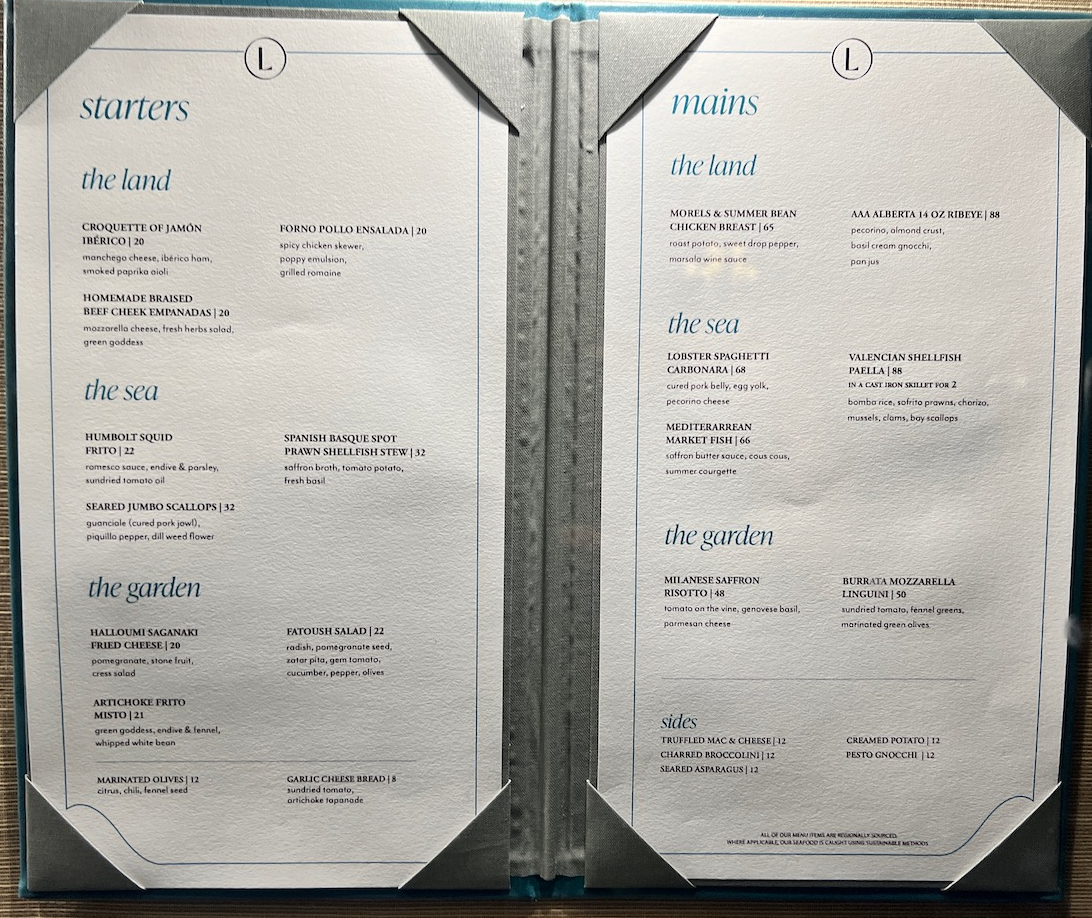
The Louiza Restaurant and Bar dinner menu featured a number of interesting plates that offered a solid variety of meals that were well curated and consistent with the concept.
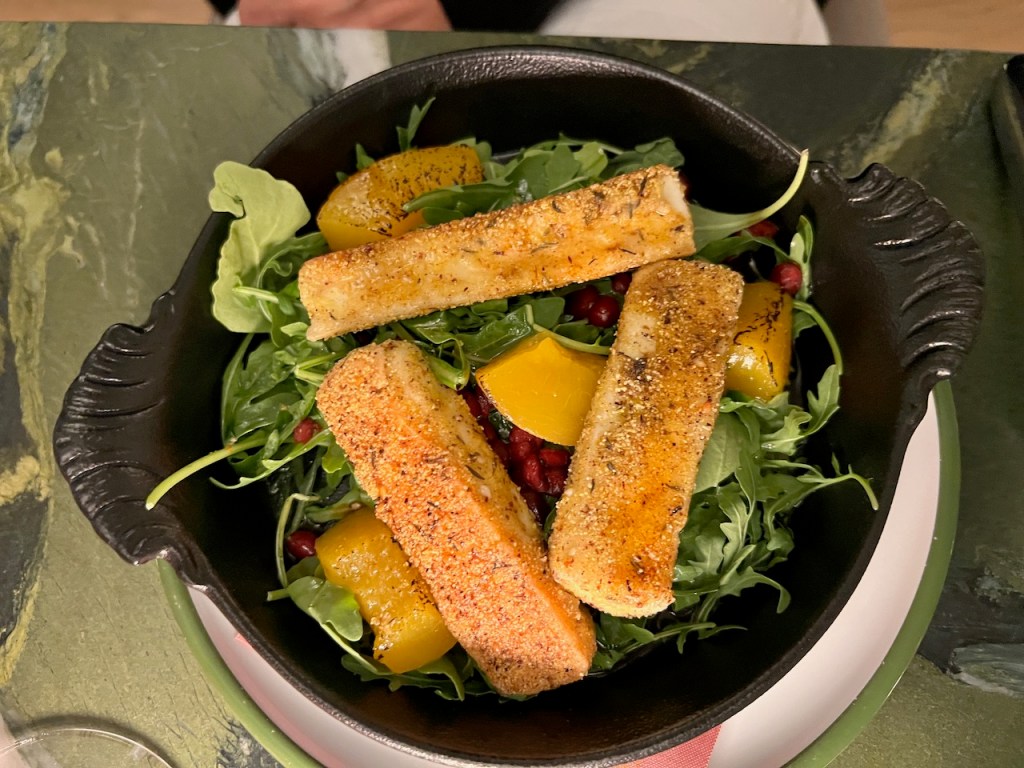
MrsWT73 went with a light meal that consisted of Halloumi Sakanagi Fried Cheese, Pomegranate, Stone Fruit and Cress Salad. As an appetizer, it was generously portioned. The Halloumi received high marks for it’s taste and flavour combinations with the stone fruit.
For a lighter dinner, MrsWT73 also enjoyed a Garlic Cheese Bread with sundried tomato, and artichoke tapenade. It was presented freshly baked and warm with cheese goodness inside.

I went with a more upscale main course in the form of a Lobster Spaghetti Carbonara, with cured pork belly, egg yolk and pecorino cheese. The lobster tail was a nice way to elevate the dish, despite an unexpected item to be on the menu in the middle of the land locked mountains.

The cheque came to $144 CAD with one appetizer, one bread, one entree and two glasses of wine. Our $100 USD food and beverage credit covered most of the dinner tab.
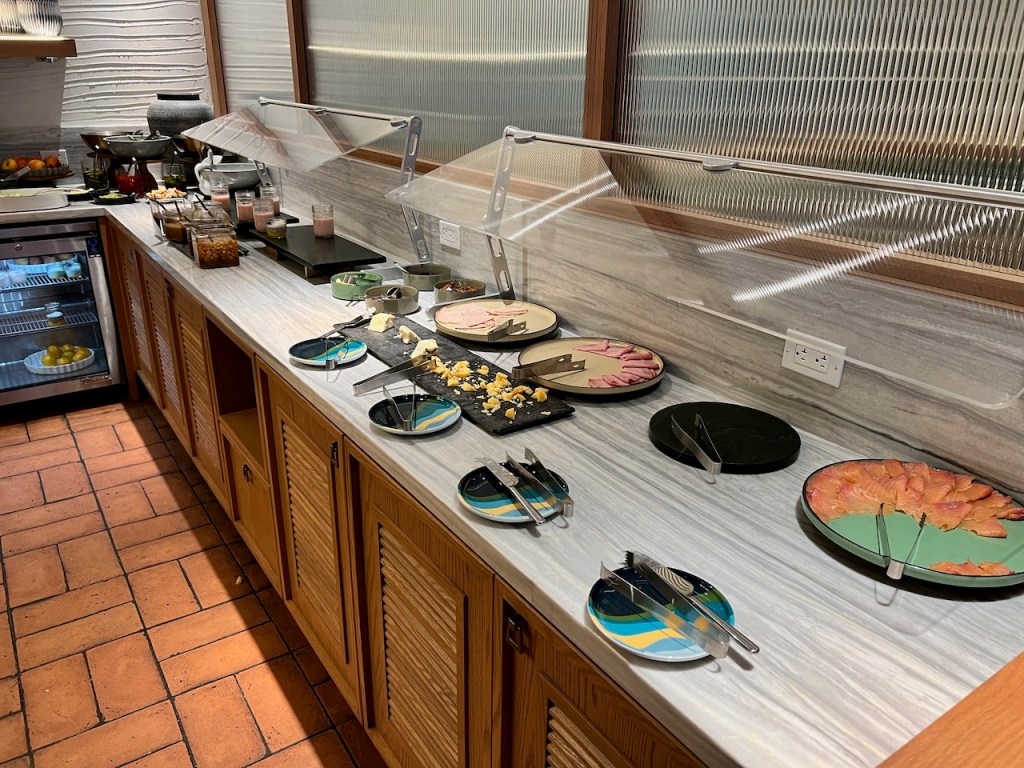
During breakfast hours, Louiza Restaurant served a breakfast buffet. The breakfast buffet was regularly priced at $43 CAD per person. Having it included in the room rate through American Express Fine Hotels and Resorts saved us about $100 CAD.


The breakfast buffet included freshly brewed coffee, Lott 35 teas, specialty coffees and smoothies available from the buffet.
The design of the breakfast offered some quicker items from the buffet, with most of the items available through ordering off of your waiter.


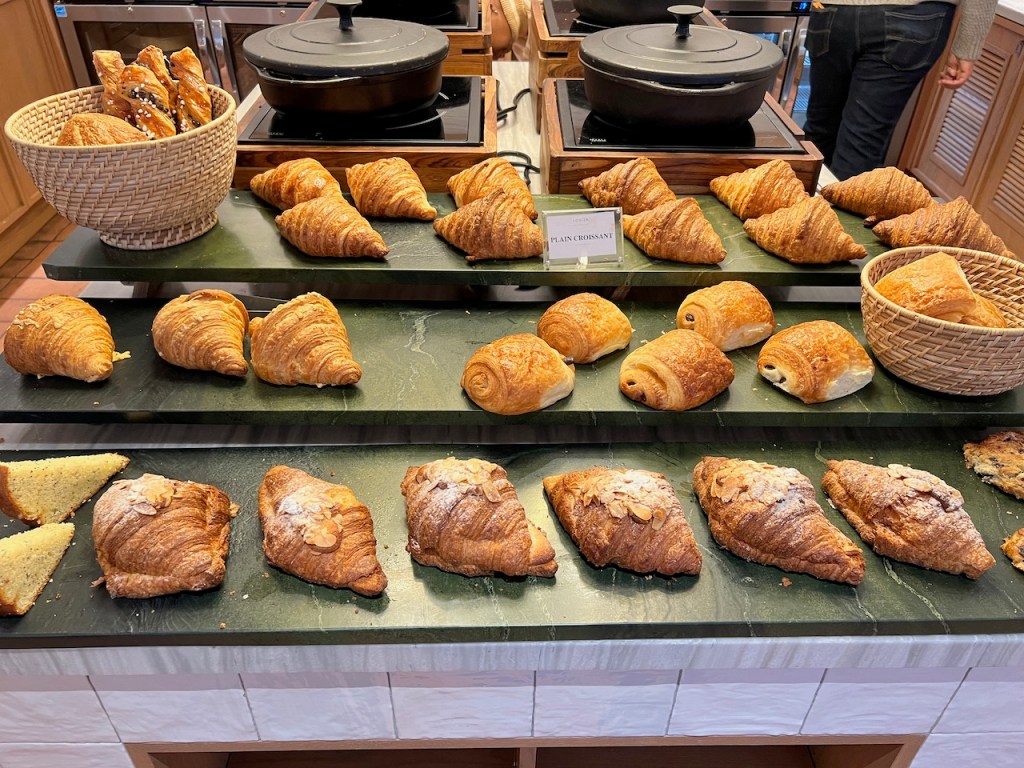
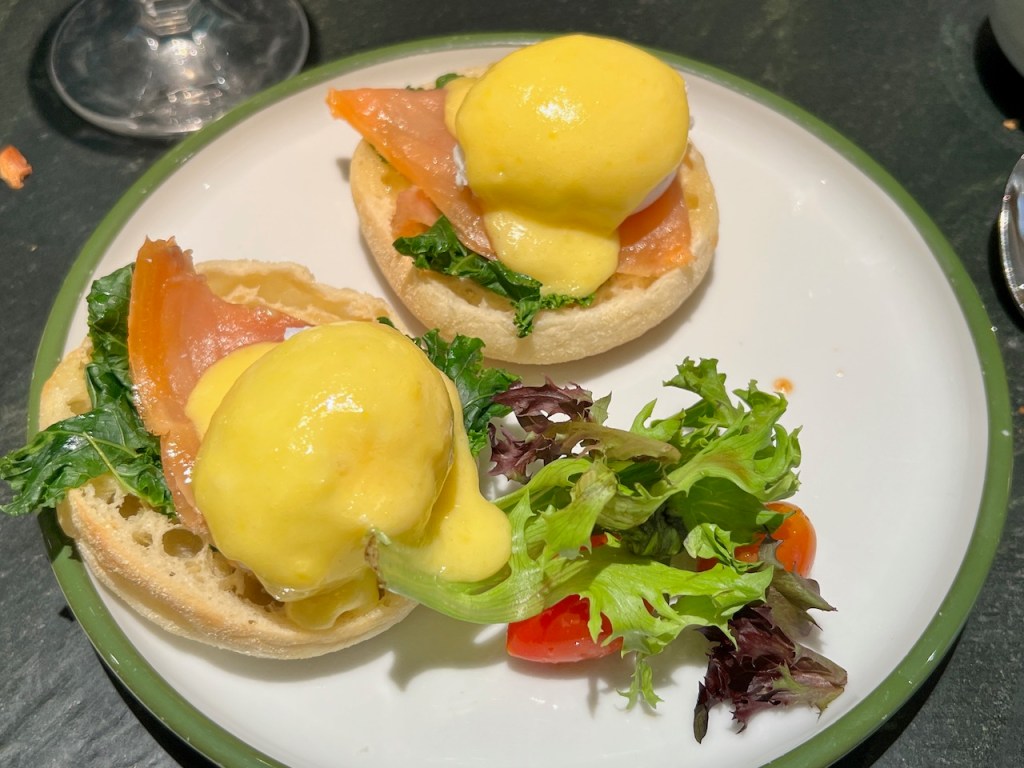
I enjoyed an a-la-carte Salmon Florentine Eggs Benedict, with saffron hollandaise presented on sourdough muffins. I also enjoyed a massive freshly baked Almond Croissant, which was a terrific way to start the day.

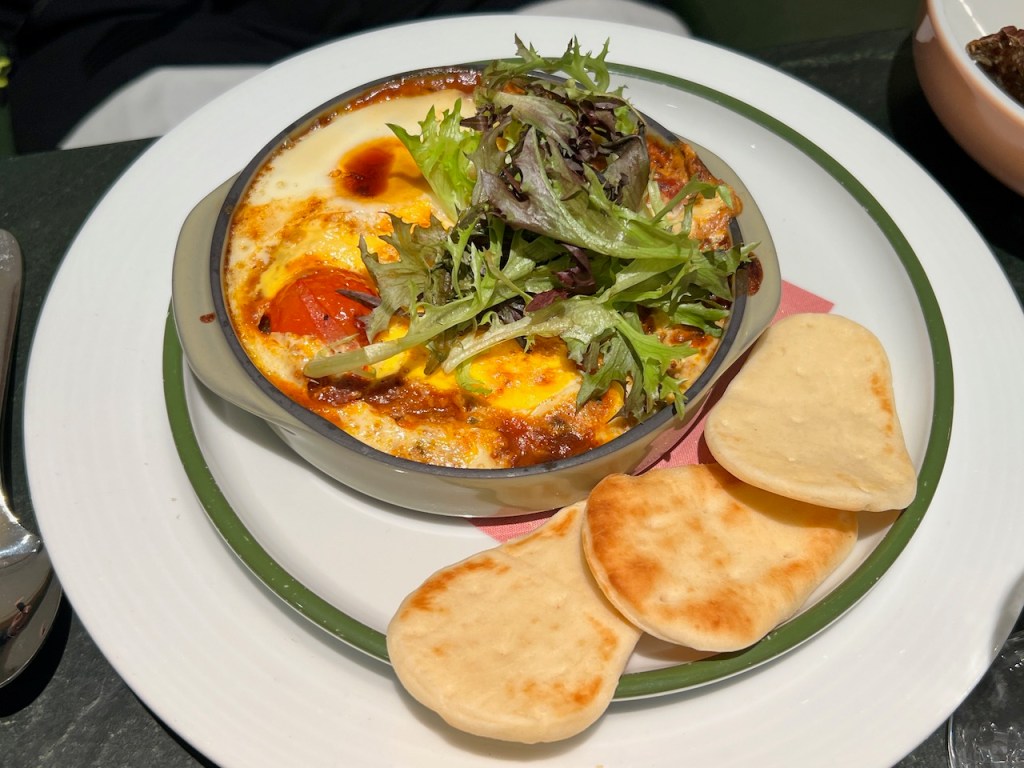
MrsWT73 went with a North African speciality of Shakshuka; baked eggs, onion, bell pepper, parsley and mini naan bread. It is pretty unusual to see this dish on menus in North America, so MrsWT73 jumped at the opportunity. The Shakshuka offered a great flavour profile that was different than the usual egg dishes which Middle Eastern flair.
We were pretty happy with Louiza Restaurant for both the dinner and breakfast options. Despite an elevated price, the food was enjoyable and nourishing at each visit.
Alpine Social:
The Fairmont Château Lake Louise offered Alpine Social as the “other” casual dining restaurant on the property. I didn’t feel to excited about this food and beverage outlet. Despite being a contemporary and remodel space, the facility occupied a windowless space located under the main floor on the lower level.

We didn’t end up dining at this location during our visit, and it didn’t seem to be too popular during our stay.
Fairview:
The Fairview Bar and Restaurant offered elevated and glamourous dining. The menu featured mostly upscale proteins including Alberta Beef Tenderloin, tomahawk pork chops, Elk and Bison wrapped in ham, and Organic Local Lamb Chops from Vulcan Alberta.
Seeking for something more casual, we ended up at Louiza’s restaurant instead.
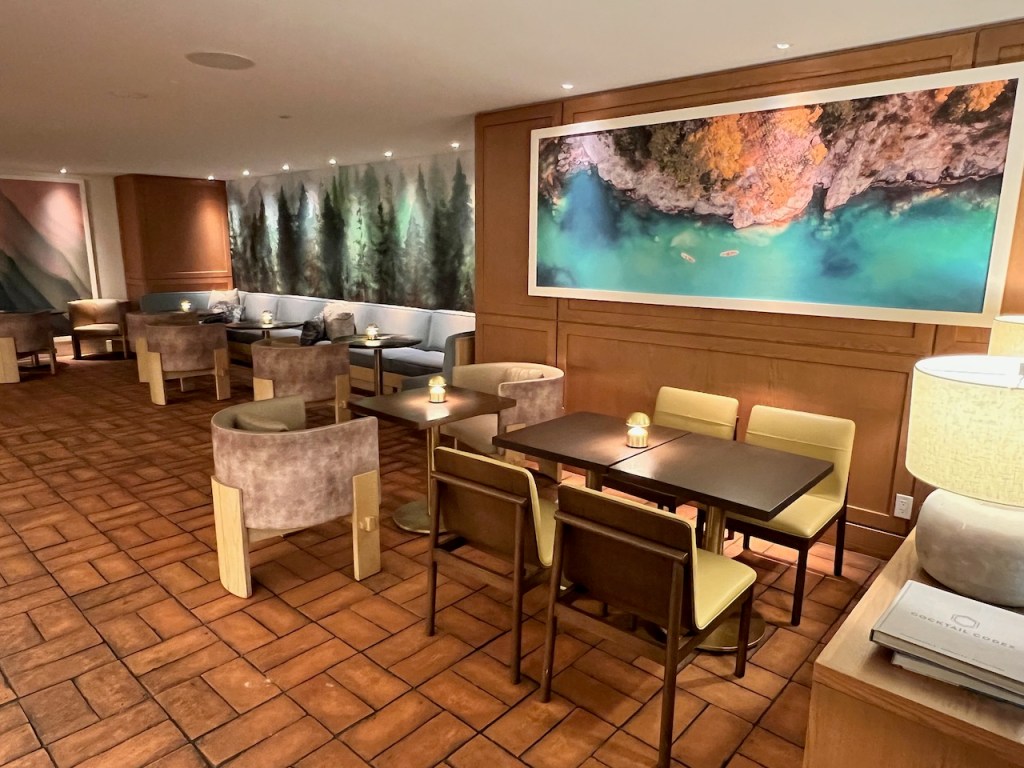
Lakeview Lounge:
Taking up the primary space in the main lobby was the Lakeview Lounge. The Lakeview Lounge featured absolteuly iconic views over Lake Louise in an old world setting.
This space was categorized as offering a lunch menu and a lounge menu during the dinner time. It was fully booked for a wedding reception on our Saturday visit, and was completely dead after hours.
My Thoughts on Fairmont Château Lake Louise:
I was really happy to have returned to the Fairmont Château Lake Louise, even if we happened to be visiting in the low season of November. We ended up getting exceptional value by booking through American Express Fine Hotels and Resorts, as a result of all the inclusions.
The Fairmont Château Lake Louise offered elegant and refined old world accommodations, set amongst the backdrop of the classic Canadian Rockies. While the property wasn’t the most state of the art, it allowed us to make the most of our time in the region. I spent a fair amount of time looking out of the window, walking on nearby trails, and enjoying the mountains of the area.
If you’ve visited the Fairmont Château Lake Louise, did you enjoy the hotel and its features ?

Occasionally, travels take me to unique restaurants that I wouldn’t ordinarily get the opportunity to visit. My recent travels through Calgary had me passing through Nick’s Steakhouse and Pizza restaurant in the west end of Calgary. Nick’s Steakhouse and Pizza is a bit of a Calgary institution that has been in operation since 1979; almost 45 years. Stepping through it’s doors leads you to an era long past, in a retro experience that reminds you of decades past.
Restaurant Review: Nick’s Steakhouse and Pizza, Calgary, Alberta, Canada
About Nick’s Steakhouse:
Nick’s Steakhouse and Pizza has been around for almost forever. It was founded in 1979 by Nick’s Petros.
Nick Petros was born in the small village of Kardiakafti, Greece. Nick immigrated to Canada at the age of 17, leaving his parents, five brothers, and three sisters behind. Having worked numerous jobs ranging from janitor to dishwasher, busboy, waiter, maitre’d, and even manager, he married Joan Baziuk in 1959 and together they raised three children: Kim, Tim, and Mark.
As indicated on the restaurant website, Nick spent years in the restaurant industry before he founded Nick’s Steakhouse & Pizza. With a collection of his mother’s homemade recipes combined with 25 years of on-the-job training, Nick’s grew a business that would survive 44 years.
After working tirelessly on the restaurant over the decades, Mark Petros and his wife Michelle purchased the business from Nick and Joan in 2000. This allowed Nick and Joan a proper retirement
Locating the Nick’s Restaurant:
Nick’s Steakhouse and Pizza restaurant is located directly across from the McMahon stadium (the home of the Calgary Stampeders CFL football team) and near the University of Calgary.
If you’re accessing the restaurant by vehicle, like I was, it’s fairly easy to get to from most areas of West Calgary. It was a short drive from the Four Points Sheraton Hotel and Suites Calgary West, where I was staying for the week.
The restaurant has free parking. If you are travelling by train, it is also walkable from the nearby Banff Trail LRT station.
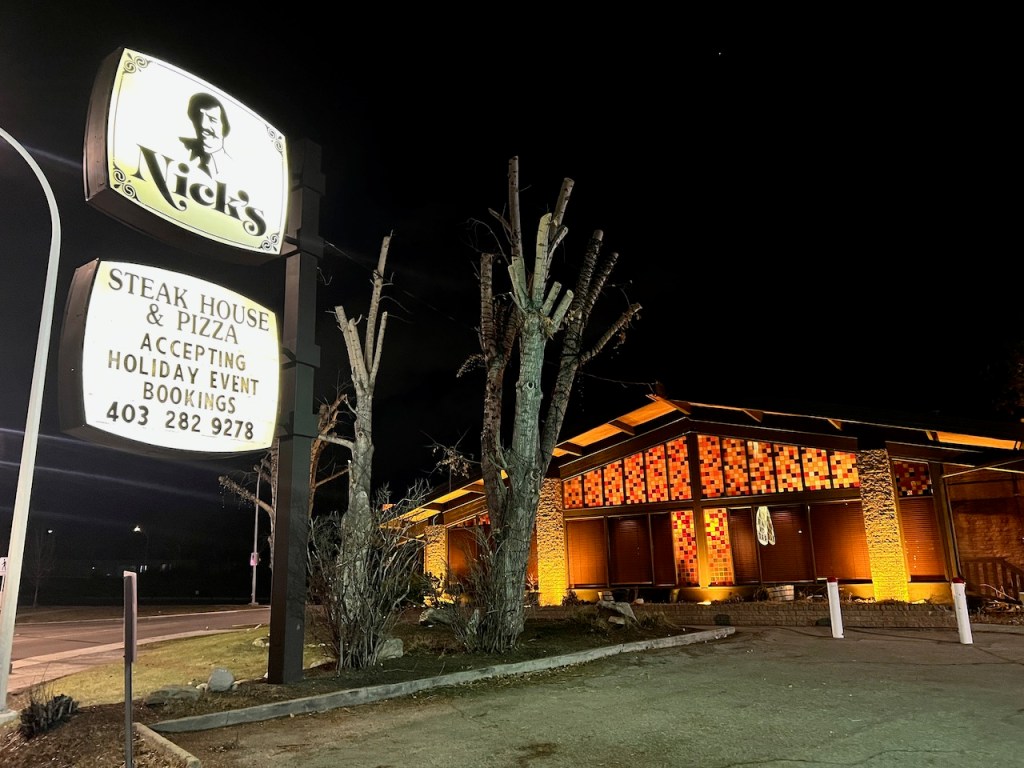
On our visit, we didn’t have any issues locating the restaurant or getting free parking. This location is the only version of Nick’s Restaurant, so there are no other locations around Calgary.
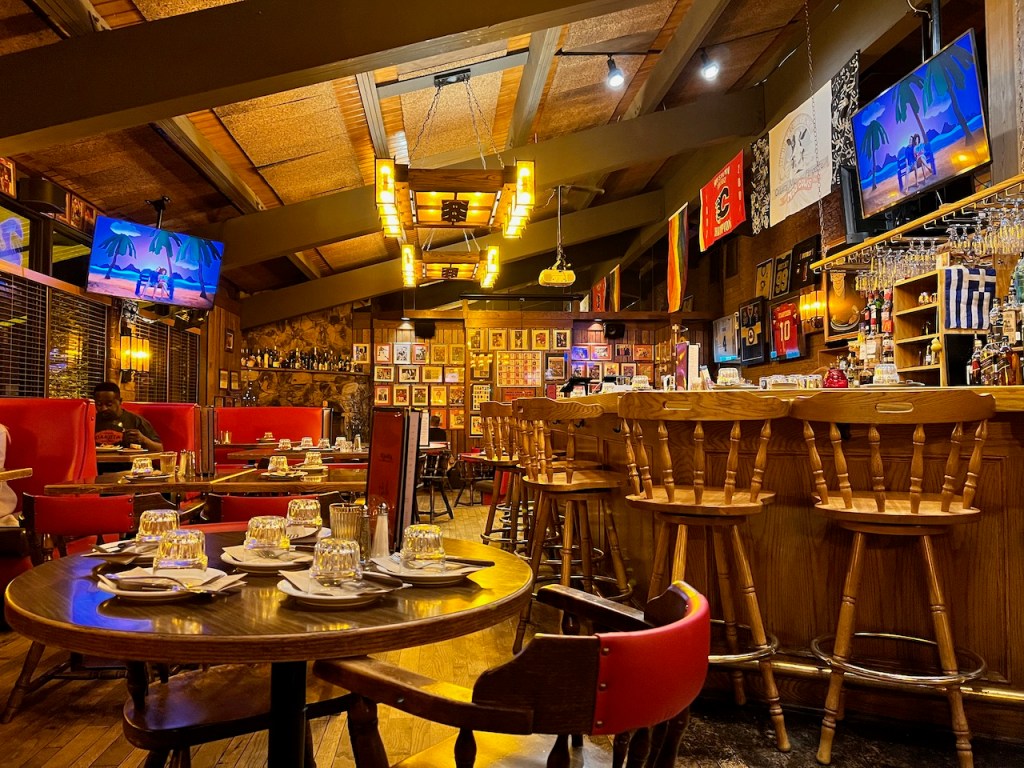
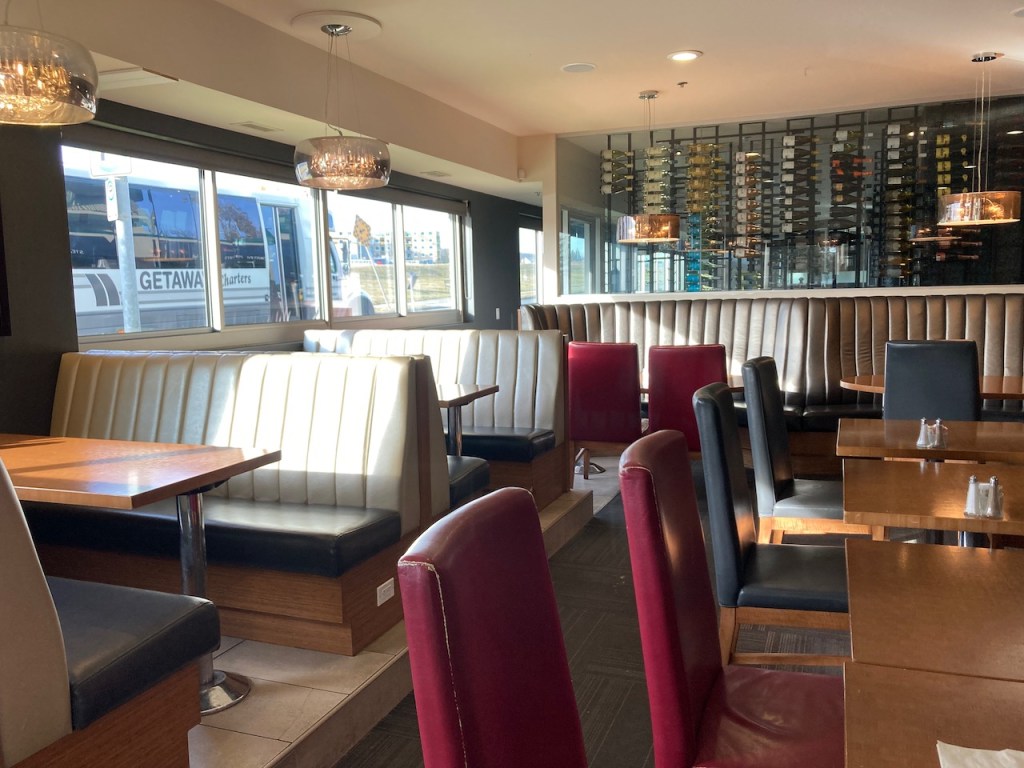
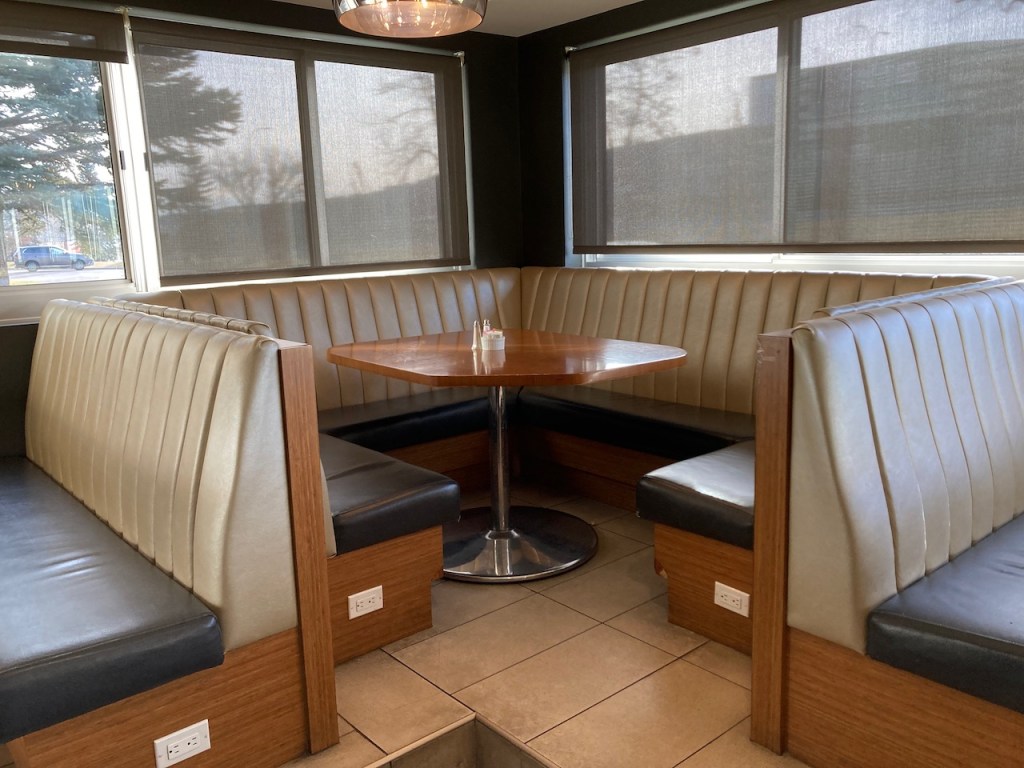
Inside Nick’s Steakhouse and Pizza Restaurant:
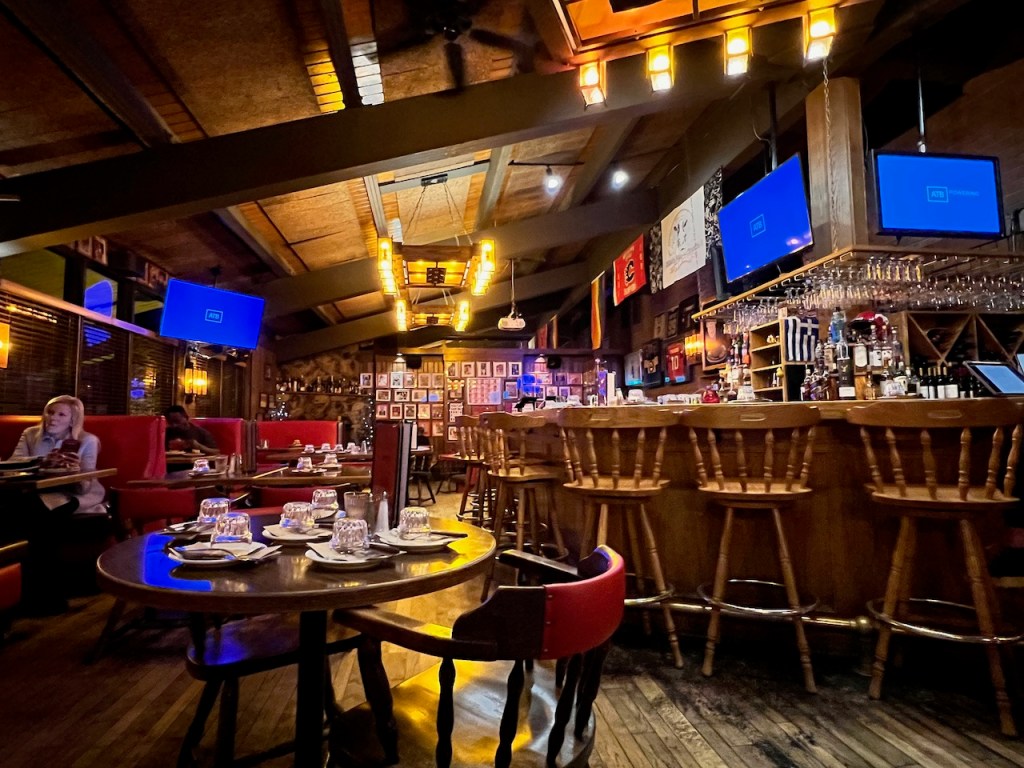
Stepping into Nick’s Steakhouse and Pizza Restaurant is a step into a time capsule of another generation. As soon as you pass through its front doors, you step into another era of a simpler dining time.

The interior is set out with reds and colors that are reminiscent of an American steakhouse. With most casual dining restaurants competing with franchisees that typically have access to a heavy interior decorating budget, stepping into Nick’s was similar to travelling back to a simpler time.
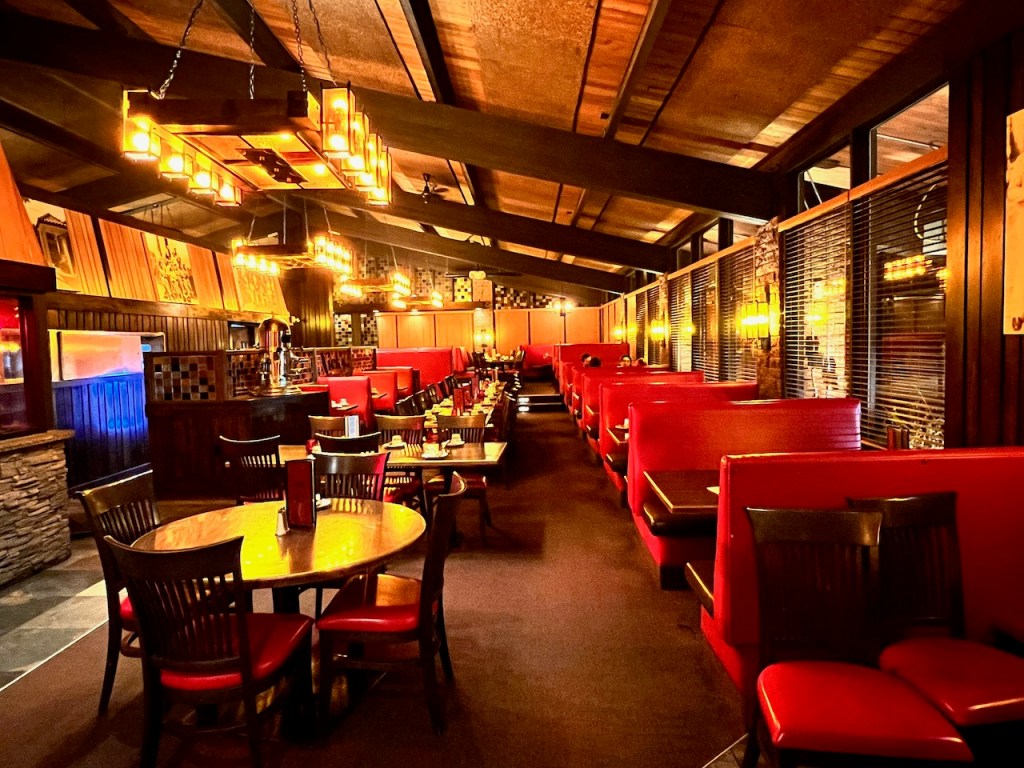
It’s fair to say that the restaurant pays tribute to it’s sporting legacy with a large number of football sports memorabilia throughout the restaurant. Being located next to McMahon stadium, the restaurant has seen it’s fair share of visitors throughout the years. These have included past Canadian Prime Ministers, another sport celebrities.
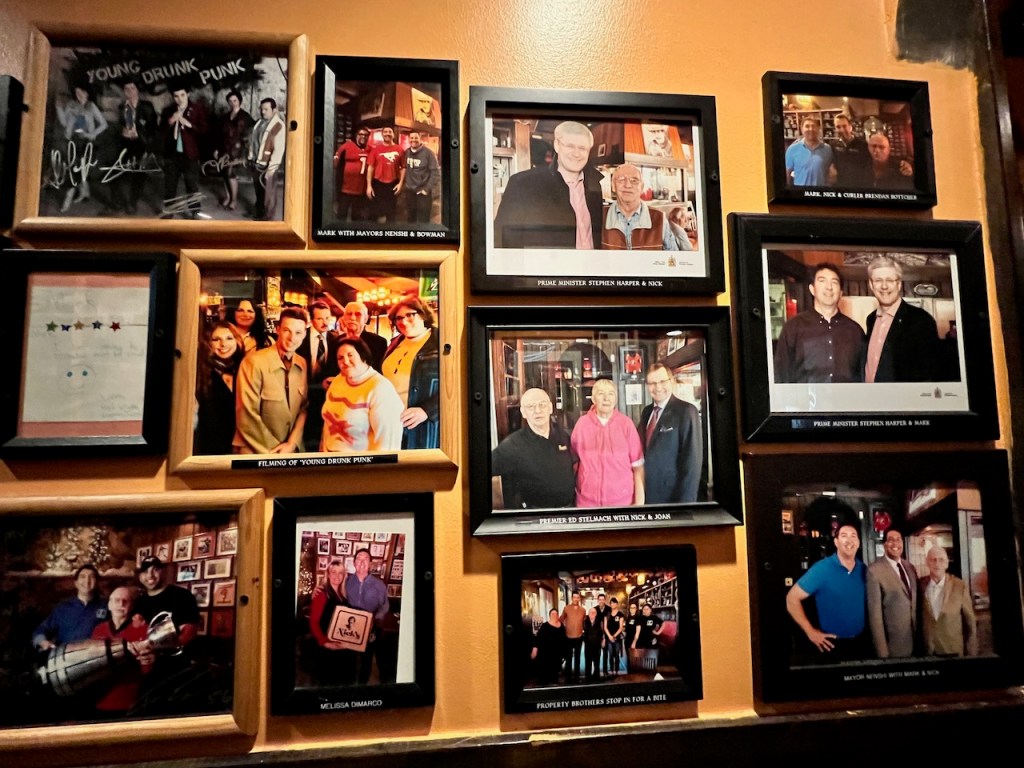
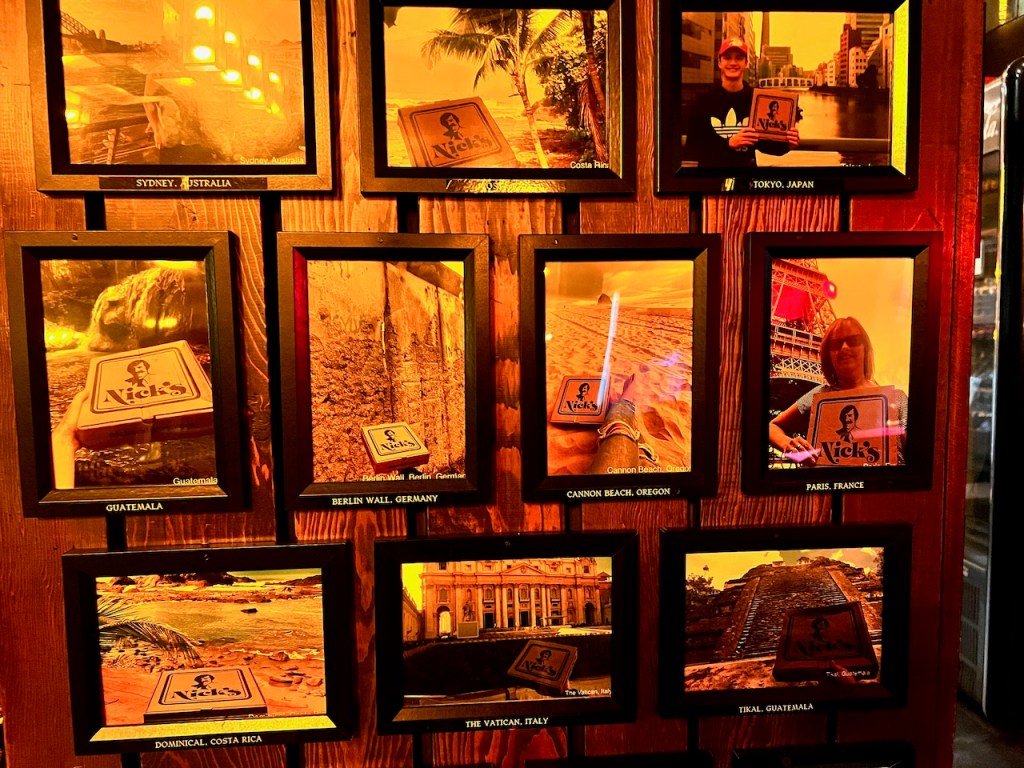
Nick’s also has a small wall that’s represented it’s reach of Nick’s takeway Pizza boxes. Nick Petros has successfully created a legacy of Nick’s Restaurant branding that has passed from the Berlin Wall – Germany, to Guatemala, to Tokyo – Japan to Paris – France.
With both table and booth seating, there are comfortable spaces to sit at each part of the restaurant. On arriving to the restaurant, we were led over to the left side of the restaurant that contained the bar area. The bar area contained those elevated captain chair bar stools that were found in your parents basement; furniture from an era past.
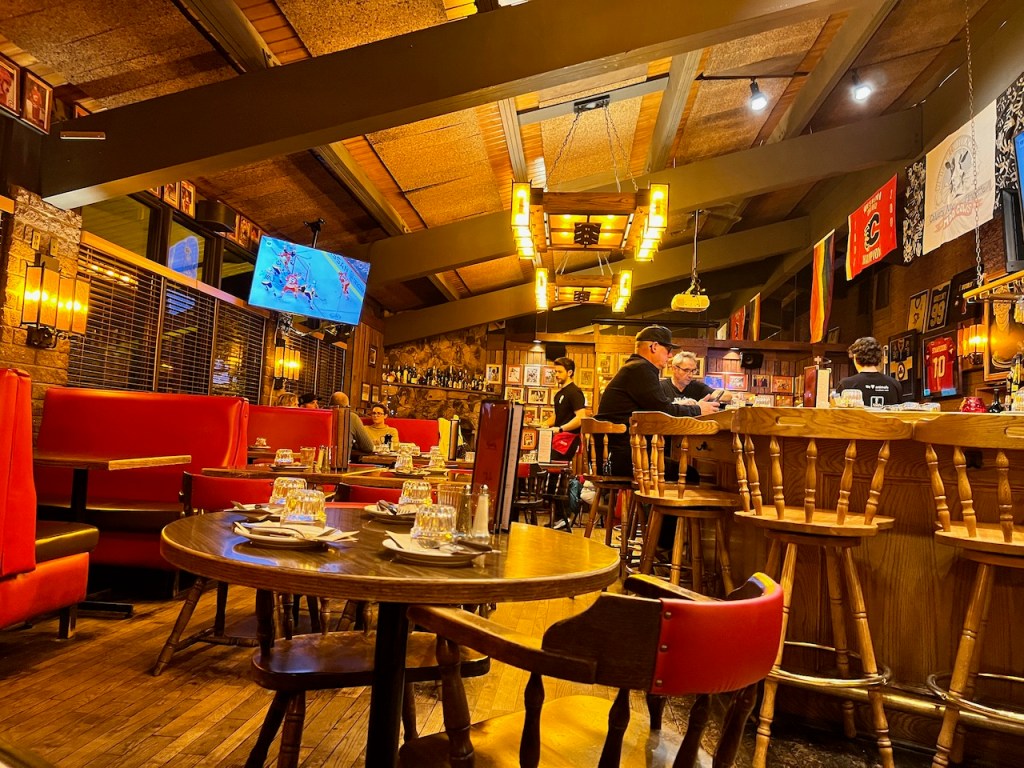
The restaurant clientele consisted mostly of couples looking for a casual dining meal. Along with the usual couples, there were the occasional younger single diner having out at the bar enjoying a beer watching sports, or completing those dreaded university homework assignments.
On Nick’s Menu:
Nick’s menu was filled with traditional favourites consisting of the usual pizza and steakhouse items.
I started off with Malbec wine (9 oz) in an entertainingly themed glass.

MrsWT73 went for an Athenian Pizza. It was absolutely massive with fresh tomatoes , feta and black olives all over the top of it. The pizzas were priced a little on the steeper side at $27 CAD for this greek goodness. Despite this, it looked exceptionally tasty.

I ended up enjoying an 8 ounce sirloin steak, with all the fixings. This was priced at a reasonable $38 CAD with an included starter salad.
At Nick’s, the starter salad is presented as a crisp green salad with house dressing.

A delicious slice of golden brown garlic toast.

An a massive plate of sirloin, with creole butter, a baked potato on the side, and some steamed vegetables. The plate was absolutely overflowing with food. In terms of quantity during these distressed times, Nick’s Restaurant certainly made up for a generous portion.

The steak was well cooked at medium. The food quality was pretty good, but perhaps not what you might expect in some of the finest dining restaurants. Still, I wasn’t disappointed at all at the amount or at the quality of food. The generous portions certainly added to my impression of my visit.
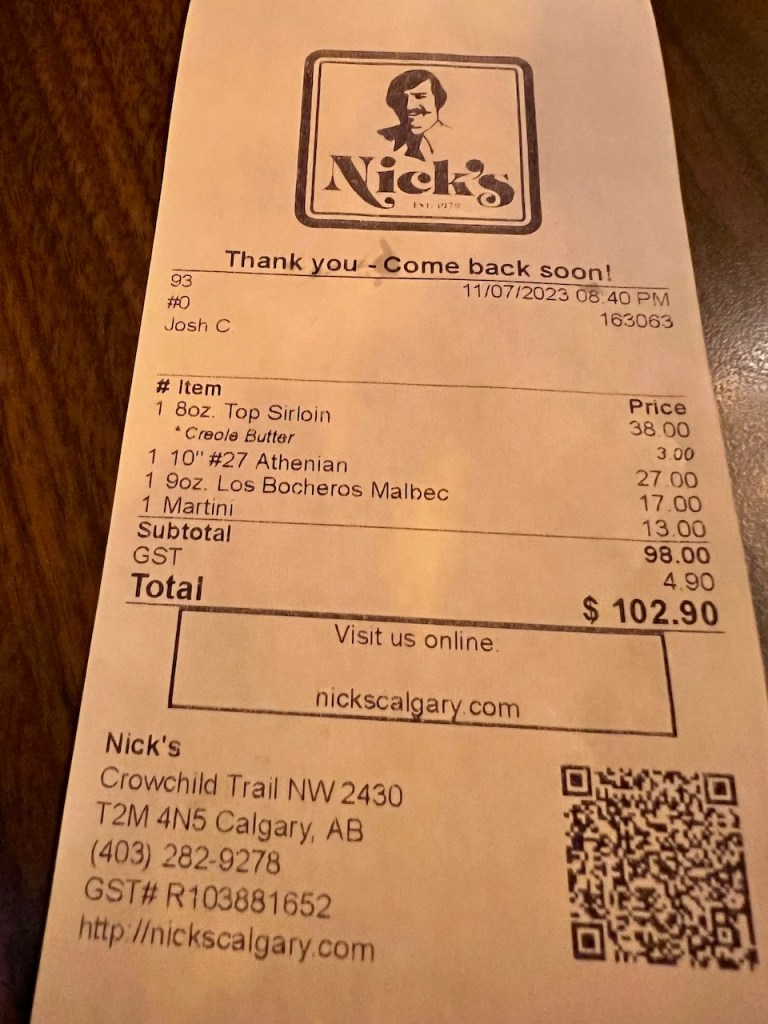
The cheque was a reasonable $102 CAD. This is about “as expected” in these inflationary times.
My Thoughts on Visiting Nick’s Steakhouse and Pizza Restaurant:
Visiting Nick’s Steakhouse and Pizza Restaurant was like going back in time to a simpler generation. The interior decor was reminiscent of a place my family took us when looking for a family meal. The portions were generous and the service was friendly.
Perhaps one of the best celebrations is that Nick’s Steakhouse and Pizza Restaurant has been in operation for over 40 years. That’s the best hallmark of success right ther.
If you have visited Nick’s Restaurant, do you agree with it being a legendary Calgary institution ?

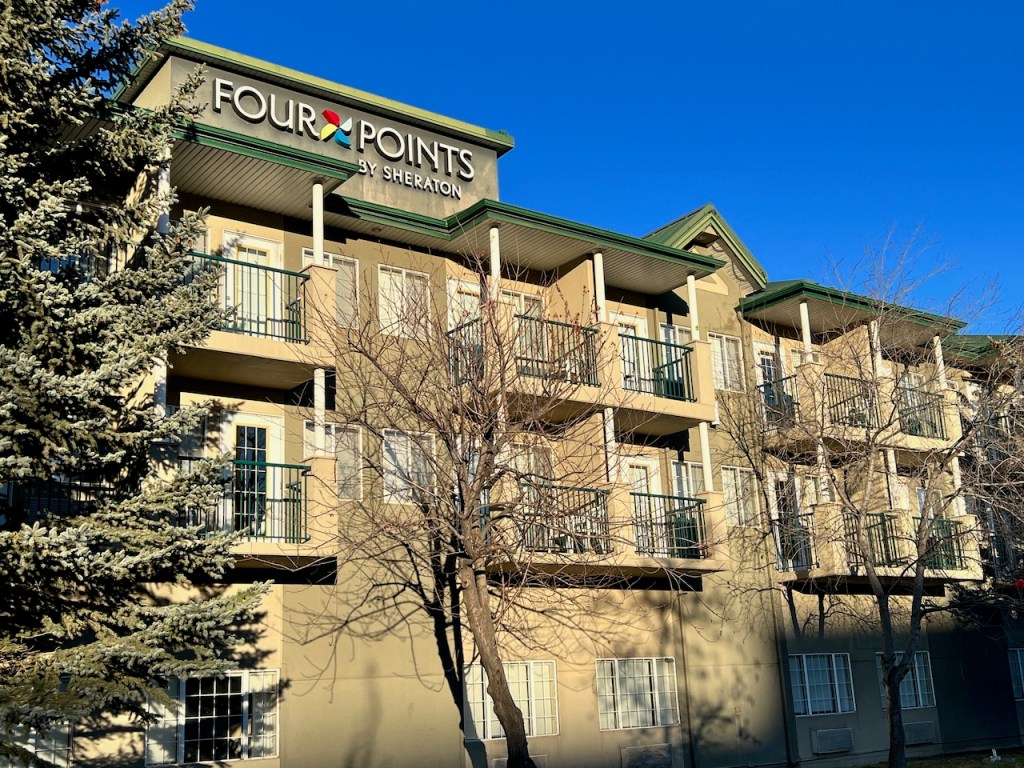
With a recent business trip to the western part of Calgary, I ended up staying at the Four Points by Sheraton Hotel and Suites Calgary West for a five day stay in the region. The Four Points by Sheraton Calgary West represented some straight forward “no nonsense” accommodation that happened to be well located for meetings in the Western Calgary area and its proximity to Canada Olympic Park. How would a week long stay at this property end up being?
Review: Four Points by Sheraton Hotel & Suites Calgary West, Alberta, Canada
“The Four Points by Sheraton Calgary West offers that old Four Points feeling in Calgary mostly heralded by a convenient Western Calgary location”
My travels to the Four Points by Sheraton Hotel and Suites Calgary West was on the occasion of a work trip in the western part of Calgary. I selected the hotel as a result of it’s proximity to the cities highway system, and the relative ease of getting to and from the hotel to locations in the western Calgary area.
The Four Points by Sheraton Hotel & Suites Calgary West was one of the most western hotels in the surrounding Calgary area. As a result, the location of the hotel was ideally positioned for the needs of my particular stay.
Booking The Four Points by Sheraton Hotel & Suites Calgary West:
The Four Points by Sheraton Hotel & Suites Calgary West is generally competitively priced. Since the hotel is situated well out of the way of the regular downtown business traveler circuit, the hotel typically offers discounted rates well under the $200 CAD ($146 USD) a night price point.
Along with other Four Points by Sheraton properties, the suites are often the best value in the property inventory. For as little as ten dollars more per night, you’ll be able upgrade to a suite to get a much larger room with a proper living space.
The rates are often dependent on what is occurring near the hotel during your stay. On our visit, there were a number of hockey teams travelling through the hotel with long motor coach busses. Having three teams stay on the property likely impacted the average daily rate.
As always, I booked through the Marriott Bonvoy website, which as a Marriott Titanium Member, entitled me to a complimentary upgrade to the best available room, including select suites, and a complimentary late check out up to 4 PM.
Marriott Bonvoy Redemption Opportunities:
The Four Points by Sheraton Hotel & Suites Calgary West Kelowna Airport was a Marriott Bonvoy Category 4 prior to the move to variable pricing. As a result, rooms are typically approximately 15,500 – 25,000 points per night, with about 20,000 points a night as an average standard. Similar to other properties, the rates were pretty flat all year round and were lowest on Sunday nights.
If you value Marriott Bonvoy points at $0.008 a point, you’d have to spend more than $160 USD to come out ahead for a 20,000 point redemption. There might be some outsized value redeeming points on a room, if the cash rate is high during summer months.
Getting to The Four Points by Sheraton Hotel & Suites Calgary West:
I arrived to the Calgary area on an Air Canada flight from Vancouver. I had a Hertz rental car and drove over to the Four Points by Sheraton Hotel & Suites Calgary West. It was an easy drive from the airport. With the help of Google Maps, I was easily able to find the complex.
Access to the property was very convenient from nearby Trans Canada Highway, with relatively easy access eastwards to downtown Calgary and westwards towards Canmore and Banff, Alberta.
The Four Points by Sheraton Hotel & Suites Calgary West is located immediately across the highway from the Canada Olympic Park. The neighbourhood is mostly service oriented. It contained a variety of short term lodging options (Sandman Inn and Suites), a few fast and casual food restaurants (McDonald’s, Starbucks, Wendy’s Denny’s), along with a few other charming businesses such as a light industrial car wash, and a series of cannabis and self storage locker facilities. While the neighbourhood had everything needed for a short stay, it didn’t have a whole lot of charm.
After arriving to the hotel, I pulled up to the loading area. The loading zone was broadly marked as “No Parking”, so we ended up self parking near to the front entrance.
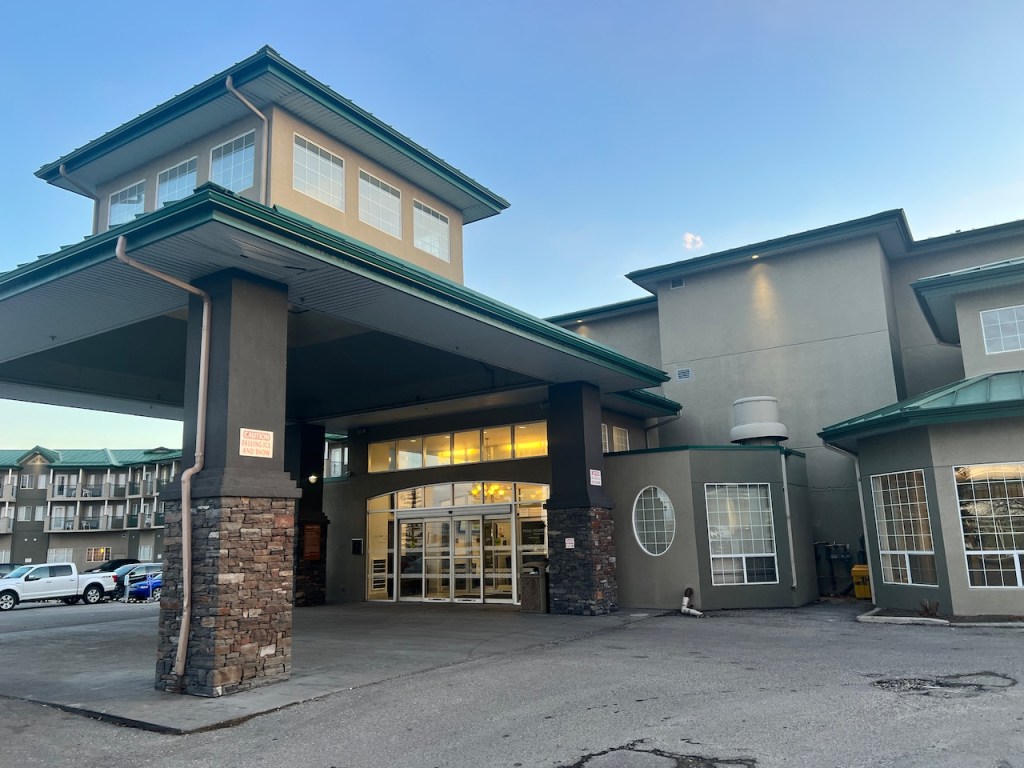
Overall, it was fairly easy and simple to get to the Four Points by Sheraton Hotel & Suites Calgary West. I didn’t have any challenges accessing the property thanks to it’s convenient hotel location. Despite this, the property would be hard to access without your own vehicle, since public transit options are limited to non existent.
Checking into the Four Points by Sheraton Hotel & Suites Calgary West:
I navigated towards the front desk of the Four Points by Sheraton Hotel & Suites Calgary West. The lobby happened to have a water feature that seemed decidedly out of commission for the foreseeable future.
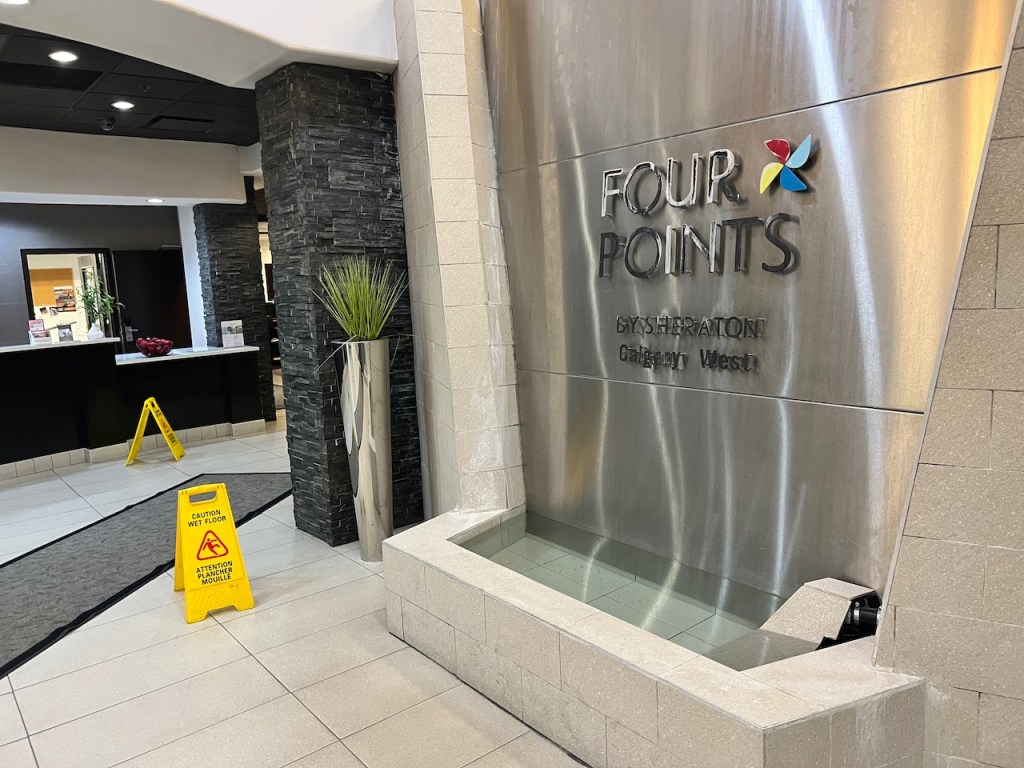
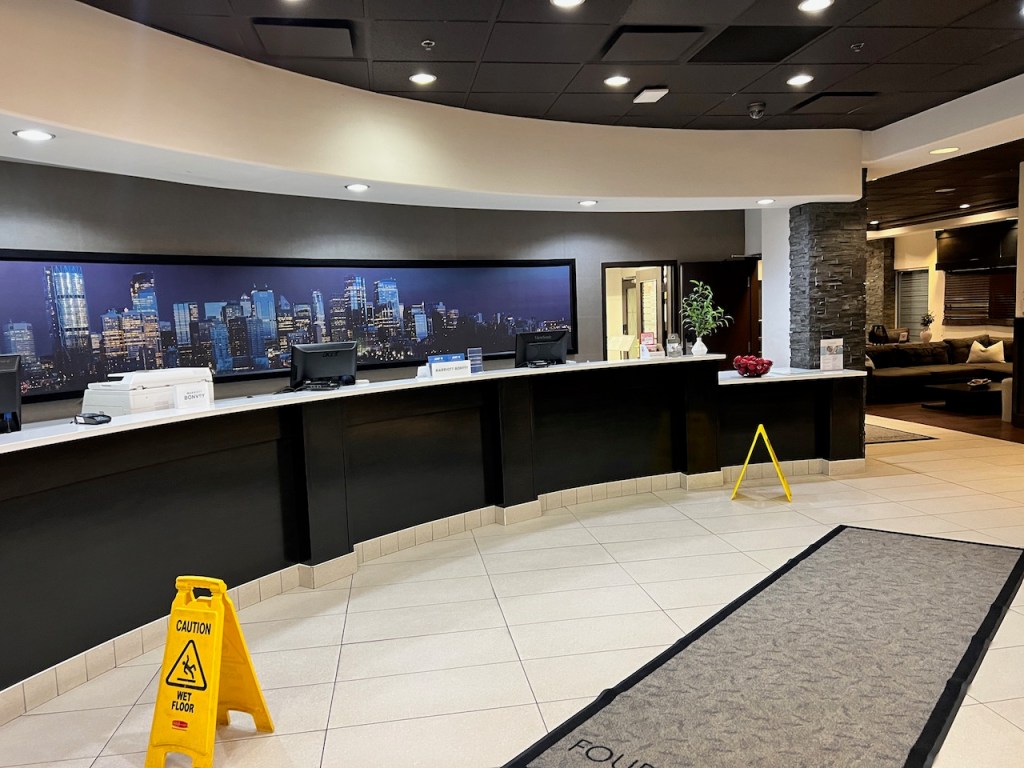
The lobby was decorated in a traditional Four Points style, with a comfortable but modern rustic look. Just off the lobby was a series of televisions, some communal tables and a wall of photographs featuring all the distinguished sports guests that had previously stayed at the property.
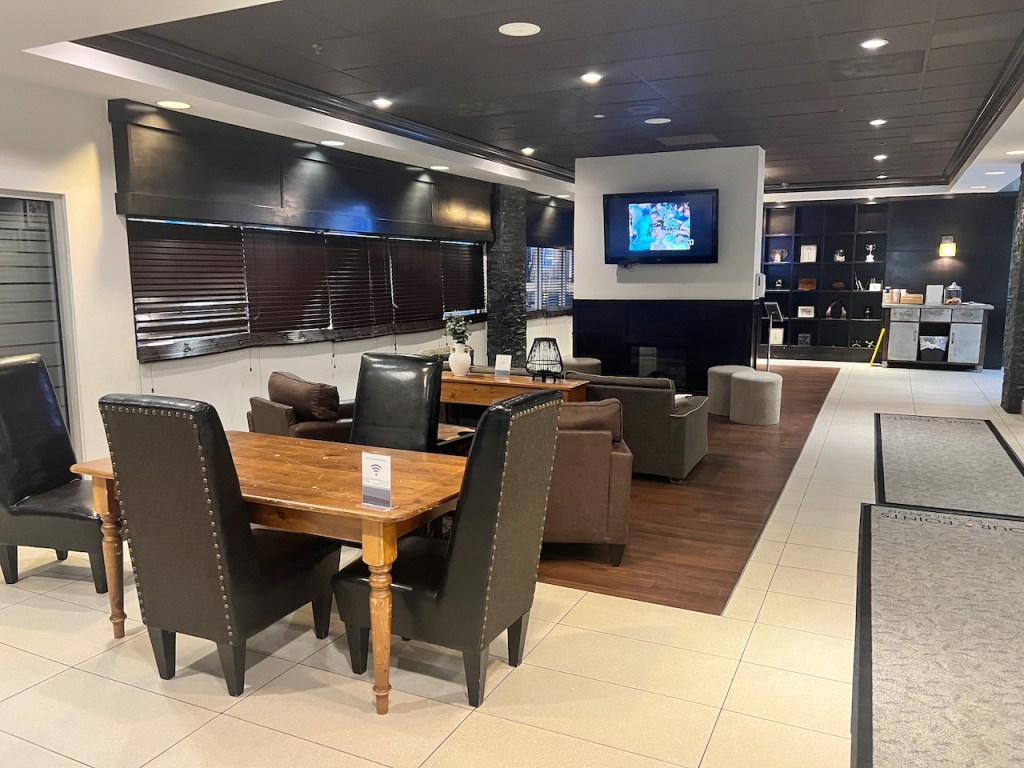
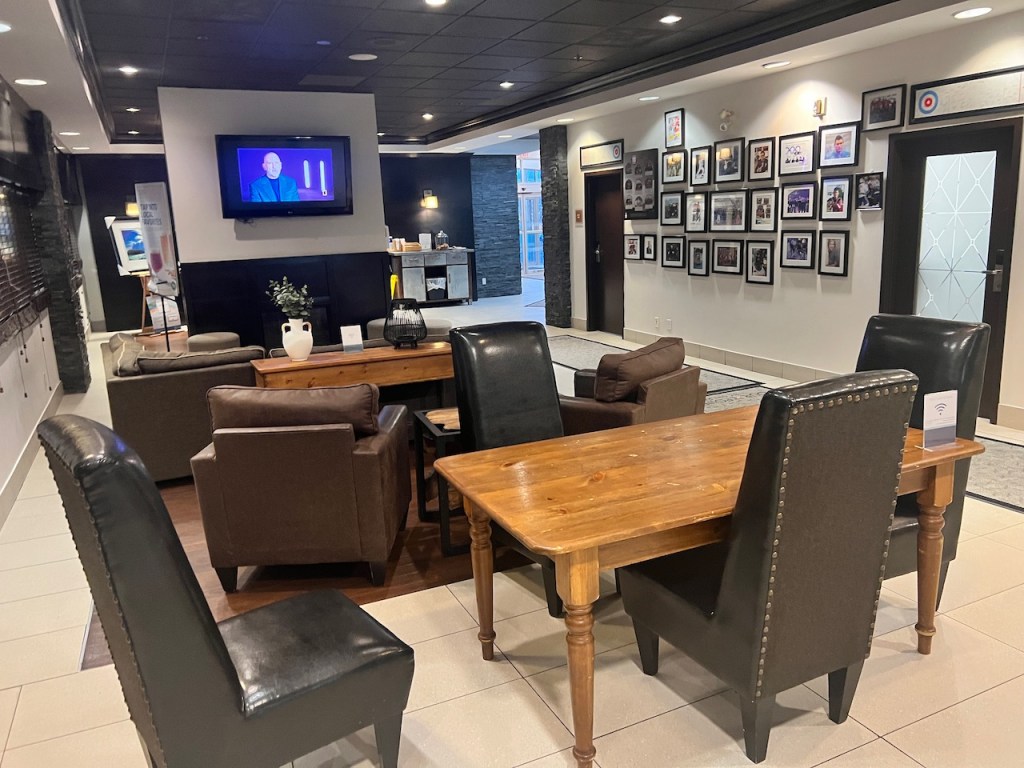
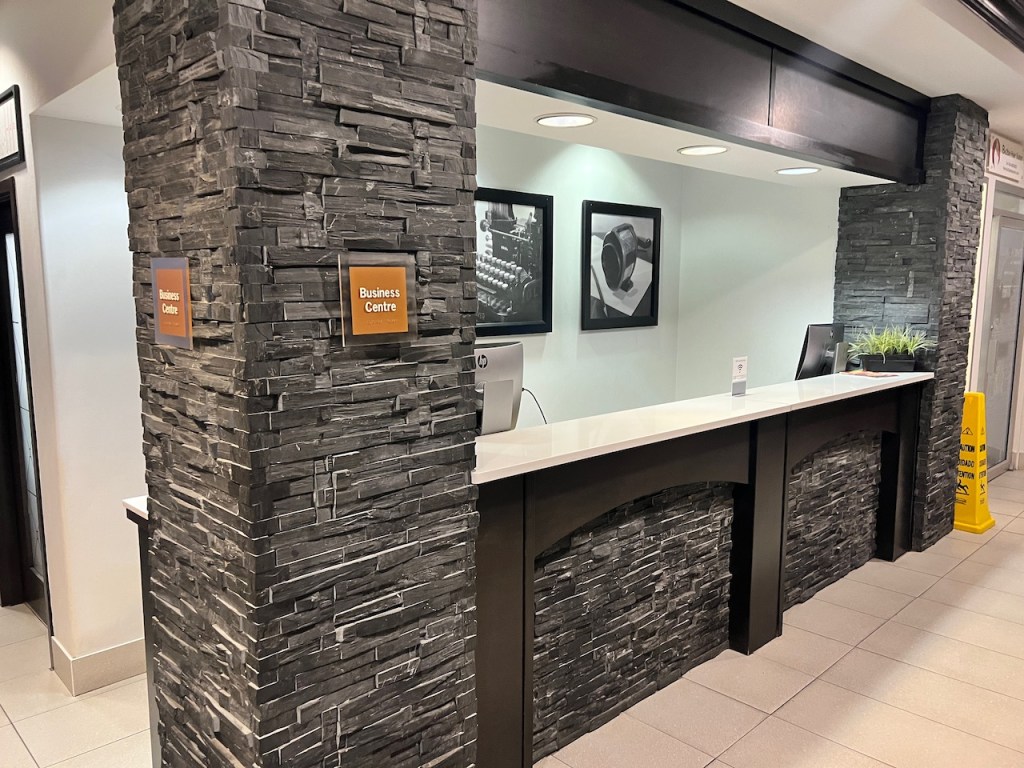
The property also had a “business centre” that was a converted counter that contained two stand up internet terminals.
I had a friendly but functional check in at the front desk for this five night stay. I had completed the mobile check in feature on the Marriott Bonvoy app. As a result, most of everything involved with the check in process was ready to go
After having some less than engaging experiences with the Four Points honouring a Marriott Bonvoy Suite Upgrade, I was happy to learn that I had been assigned a One Bedroom Suite.
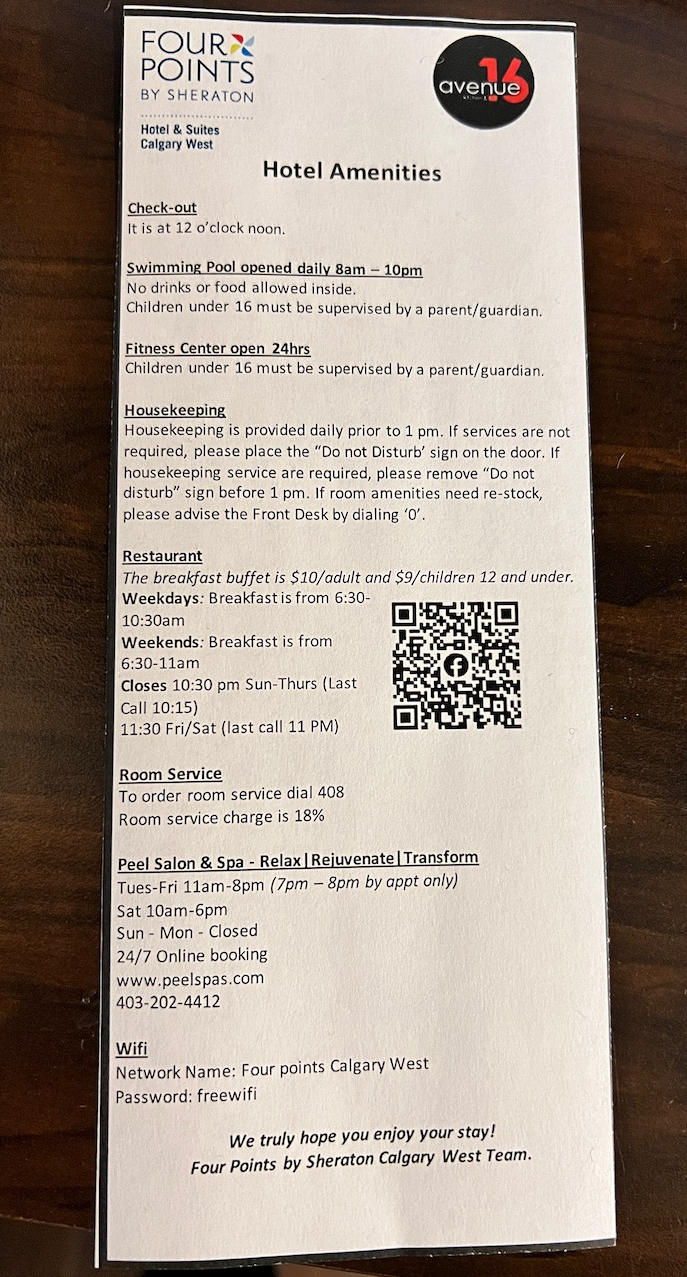
I was also provided a list of hotel amenities that listed the hours of the swimming pool, fitness centre, and Avenue 16 Restaurant information (including the breakfast hours)
The Room: One Bedroom Suite, Queen Bed, Sofa Bed
There are several types of suites at the Four Points by Sheraton Hotel & Suites Calgary West; a One Bedroom Suite Queen Bed, a One Bedroom Suite – King Bed, and a Junior Suite – King Bed. All room configurations offer a small balcony towards the outside.
We navigated the halls over towards Room #202, which was a suite towards the North West corner of the hotel. The hallways of the Four Points by Sheraton Calgary West were a familiar series of Four Points brown and grey.
The Living Room:
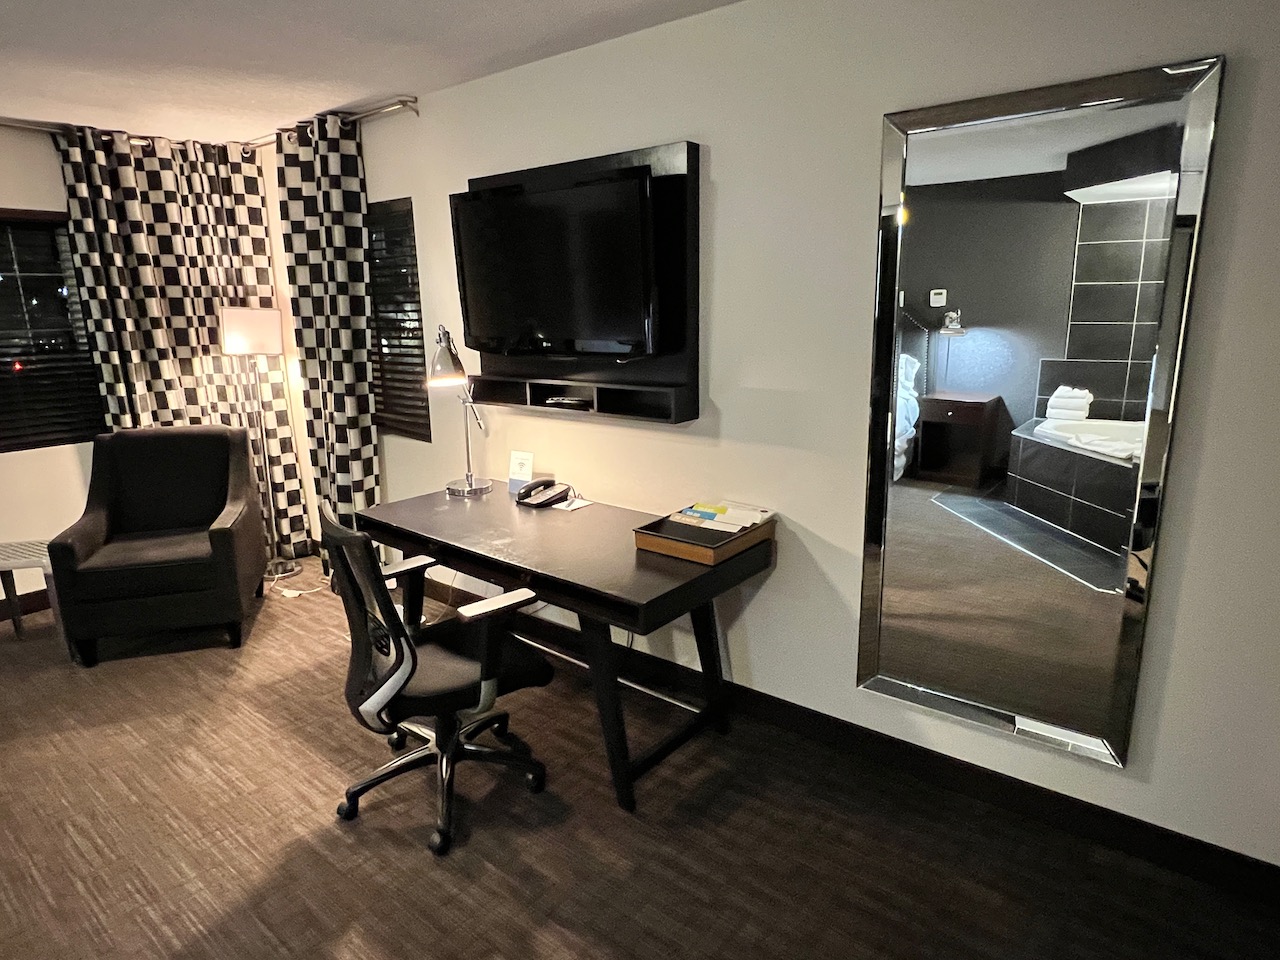
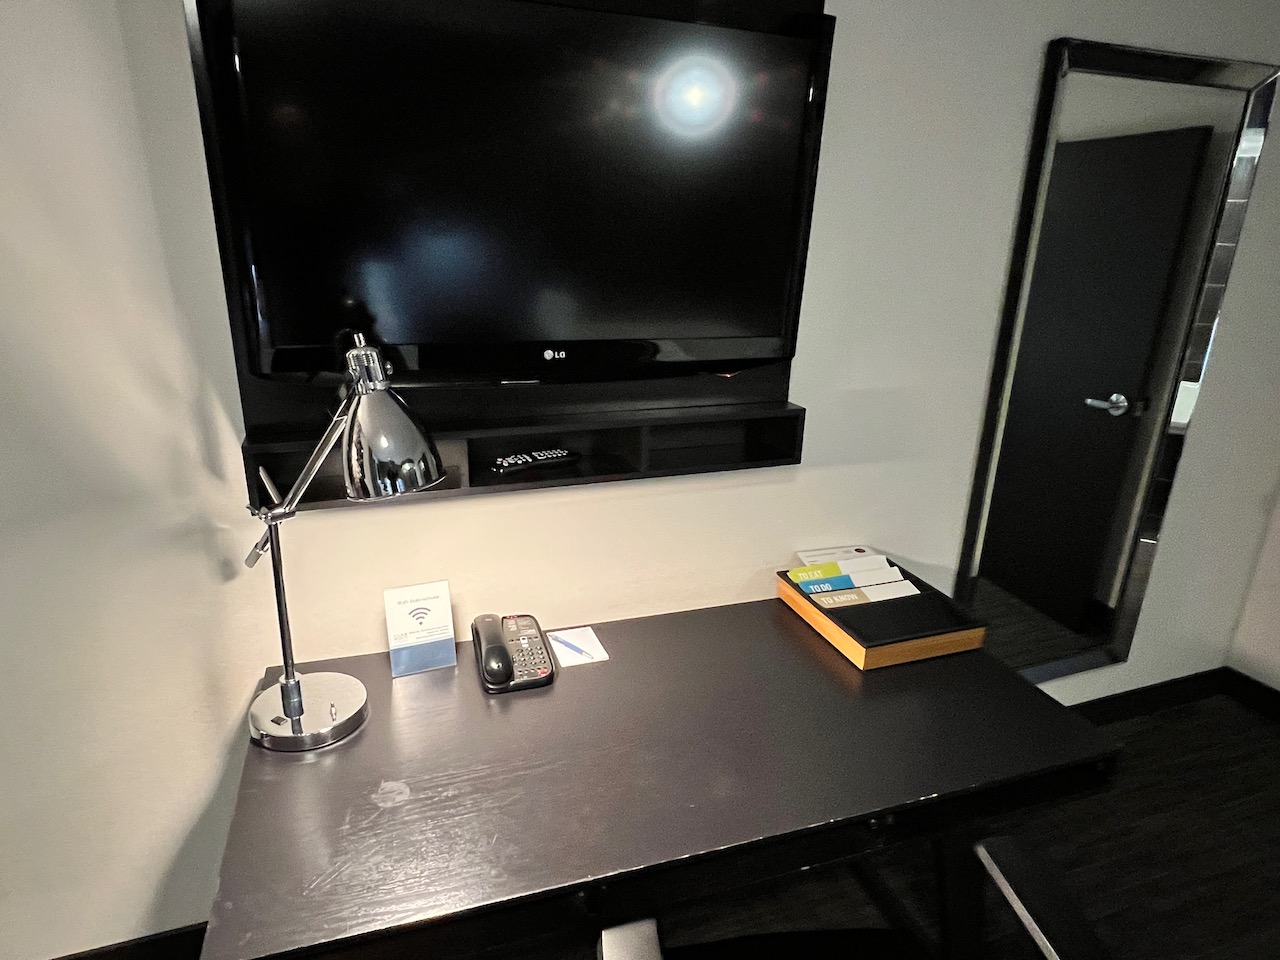
Upon entering to Suite #202, we found ourselves in the suite’s living room. The space was acnhored by a small sofa bed, along with two Plaza Premium styled lounge chairs.

The windowless space offered a small flat screen television at the end of the room. There was also a small fridge and microwave countertop station that also contained the in room coffee maker.

The Bedroom:
The second portion of the room contained the bedroom, which was decorated in a black and white theme that reminded me of a checkerboard. The bedroom contained a smallish queen bed, a jacuzzi tub that was likely in style in the end of the nineties, a small occasional chair and a small desk.
The bedroom offered a second flat screen television that offered viewing from the bed.
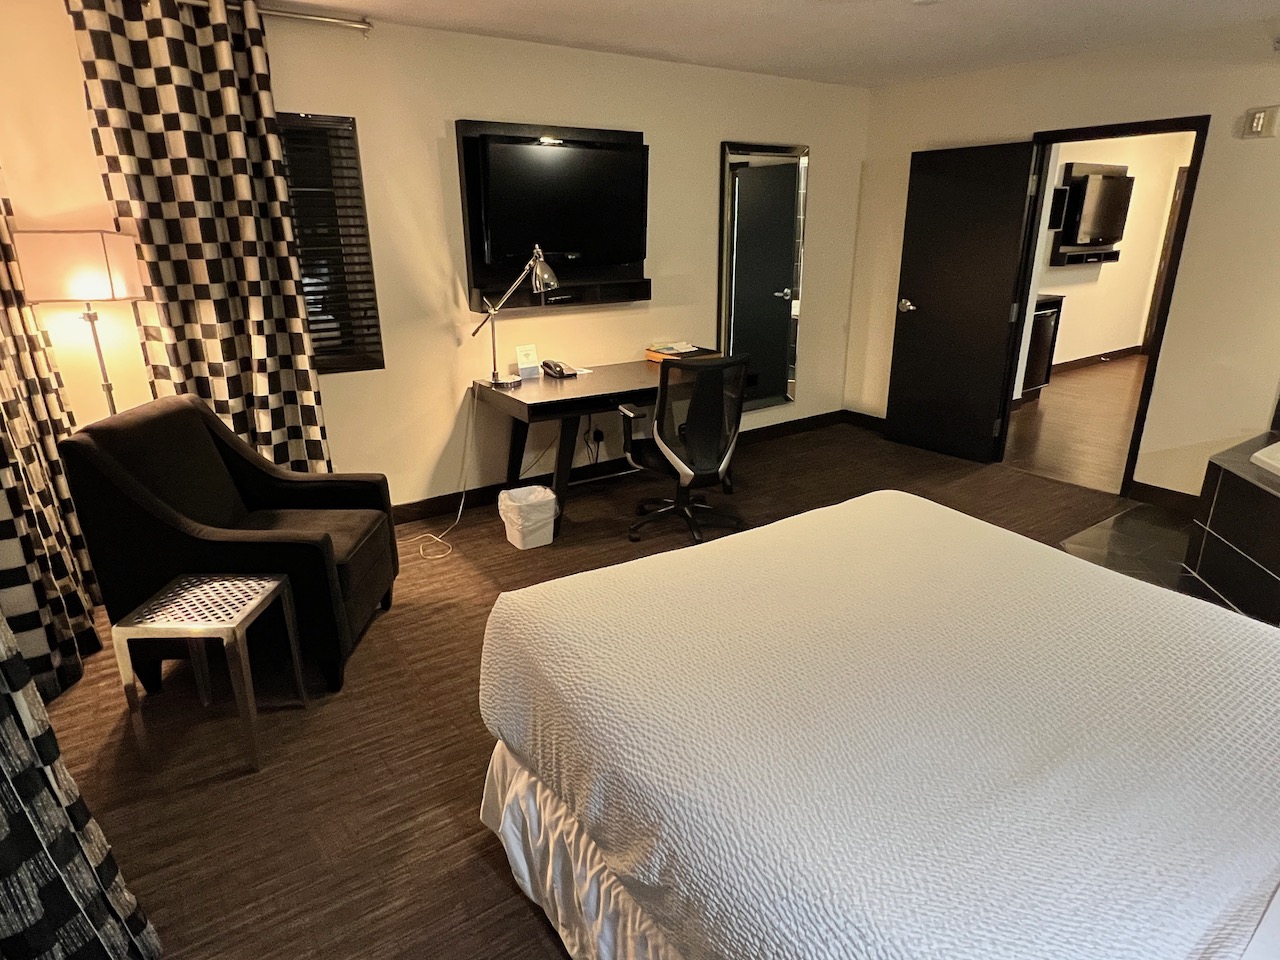
The bedroom offered a small desk area. Although I didn’t to much work in the room, I found the desk area a little small for dropping off devices, charging devices and other work products that needed to find themselves a home for the week.
In terms of sleep quality, the hotel was pretty well insulated. The hotel is immediately adjacent to the Trans Canada Highway. Despite this, there wasn’t too much highway noise. We experienced a peaceful sleep, and we weren’t kept awake by nearby highway noise.
The Bathroom:
The bathroom was of a smaller variety, with a single vanity sink. The bathroom featured an open area shower (without curtain or door) that ended up being a little messy with water spillage.
The bathroom shower head was a little rough around the edges. It sprayed water forcefully with some jets that were a little soft on the targeting.
The bathroom looked a little dated by today’s standards, but it was perfectly functional provided you could avoid the shower water.
Around the Hotel Property:
The Four Points by Sheraton Hotel & Suites Calgary West had some limited amenties.
Pool / Fitness Centre:
The Four Points by Sheraton offers an indoor hotel pool. The hotel pool consisted of a small pool and hot tub. The hotel offered a simple waterslide, which was enough to keep the kids busy.
The hotel offered a small gym, with some small daylight windows. The gym was empty when I stopped by, although it would have fit the trick for working out.
The hotel provides some basic features. While I didn’t use the exercise room on this particular trip, it’s been a welcome addition for past stays at this location.
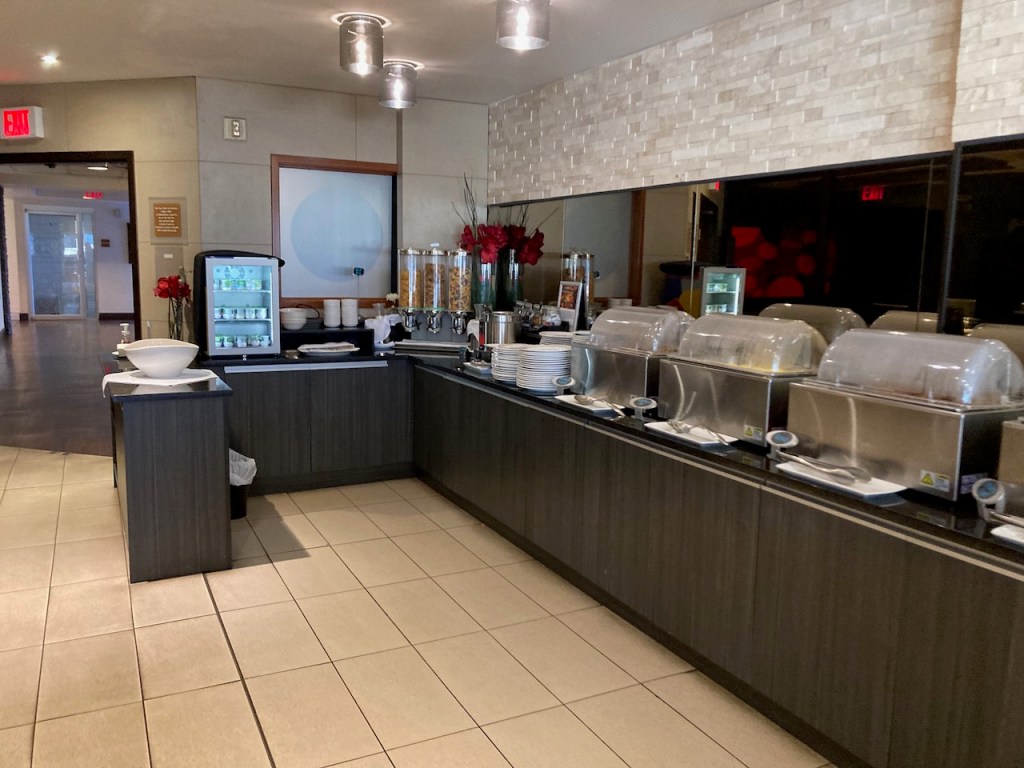
Food and Beverage:
Avenue 16 Restaurant
The Four Points by Sheraton Hotel & Suites Calgary West offers a basic restaurant on site within the hotel. Avenue 16 offers a restaurant facility that is open for breakfast and dinner. While the hotel offers this on site restaurant, it’s worth mentioning that there are many other off site options that are also close by to the hotel.
The restaurant is located on the ground level of the hotel, and just a few steps from the lobby. Large daylight windows offer a lot of light into the restaurant, as a result of the south facing orientation of the restaurant.
While I didn’t partake myself, MrsWT73 enjoyed a Marriott Bonvoy Platinum Breakfast benefit every day of her stay at the Four Pints by Sheraton. During breakfast hours, between 7:00 AM and 10:30 AM, she had a full hot breakfast buffet.
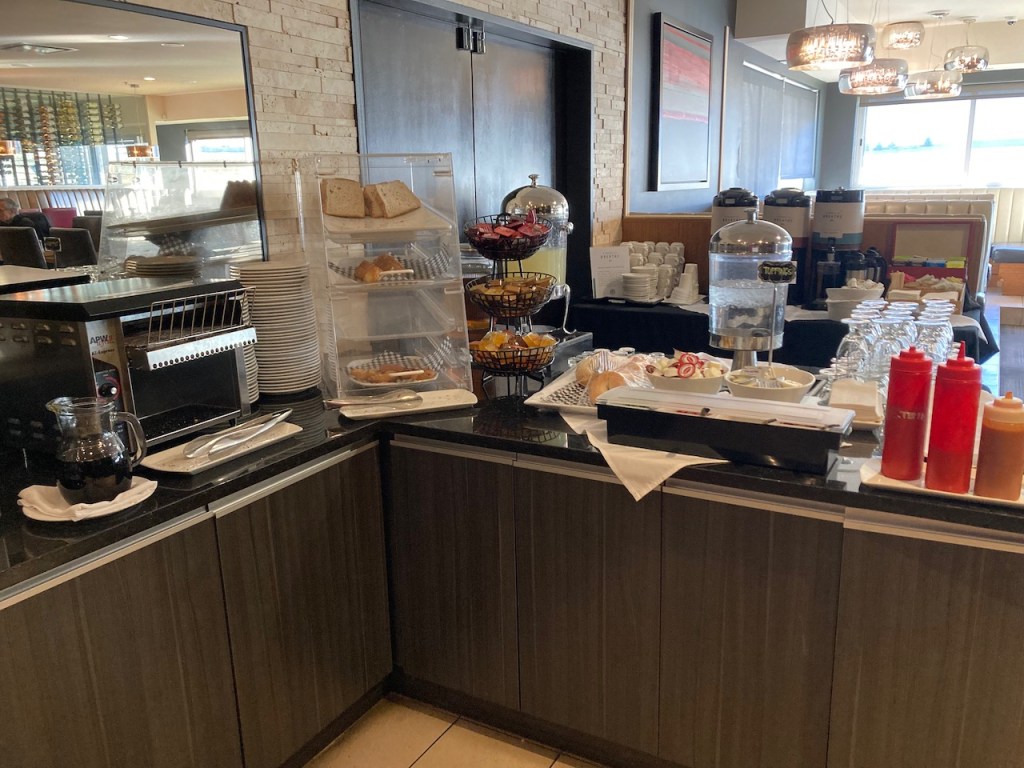
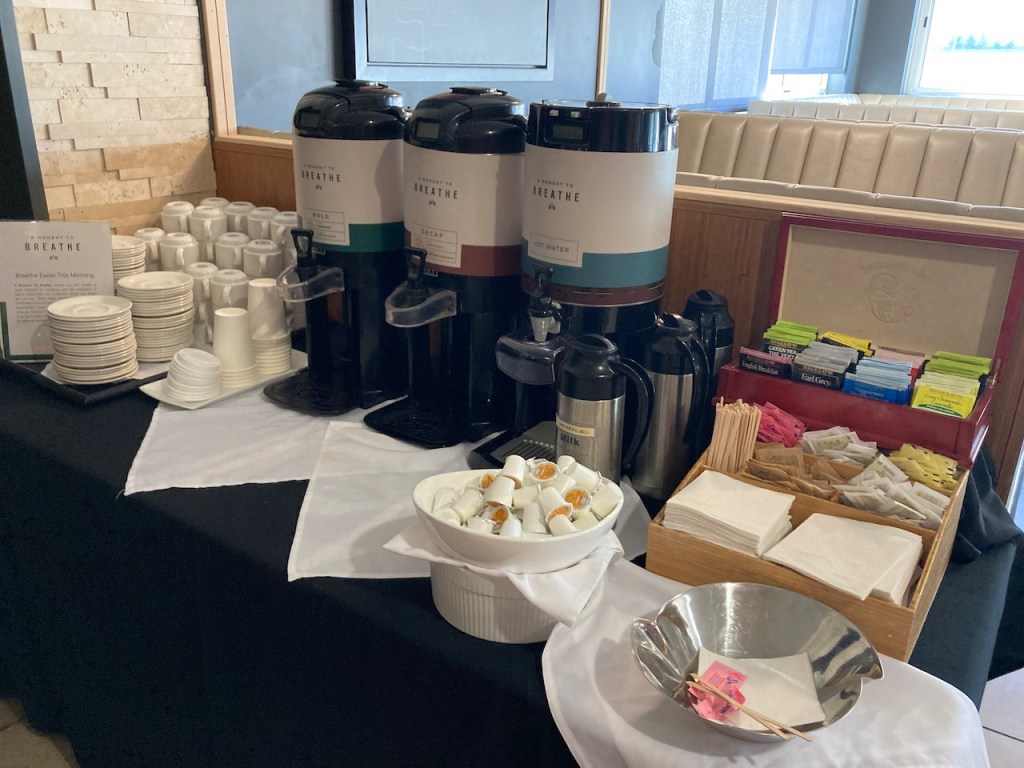
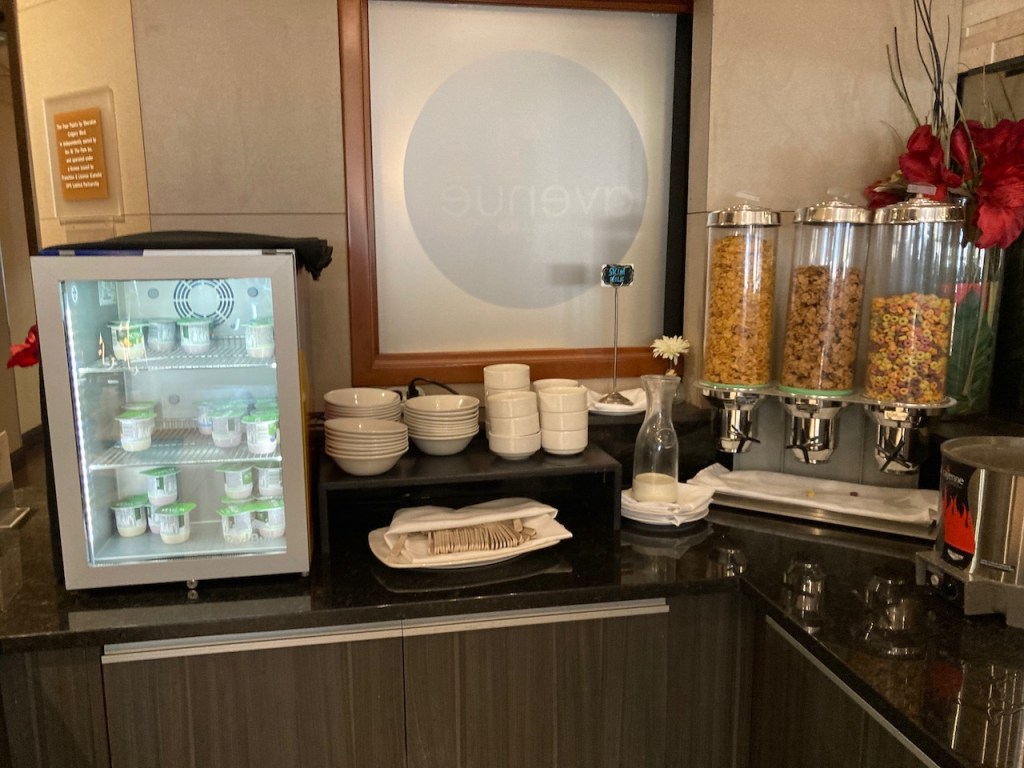
The hot buffet breakfast offered all the usual items in a quantity vs quality featuring hot cakes, scrambled eggs, sausage links and hashbrown potatoes. MrsWT73 had no complaints about the breakfast, describing it as filling although not super flavorful.


Overall, MrsWT73 found the breakfast to be pretty basic, but the staff were exceptionally friendly. Despite a basic breakfast, she returned every day of the stay to fill up before the day ahead.
Checking Out of The Four Points by Sheraton Calgary West:
On departure day, I checked out at the front desk. The bill was settled with no surprises on it.
My Marriott Bonvoy points posted within 72 hours after the stay. Overall, the experience was pretty straight forward and with a minimum of fuss.
The Bottom Line: The Four Points by Sheraton Calgary West
The Four Points by Sheraton Hotel & Suites Calgary West offered pretty basic and institutional like accommodation. Despite this, it remained a comfortable stay.
The hotel offered some suite accommodations, and if you are able to get yourself into a suite offering more space for a few dollars a night, it represents great value.
The hotel was centrally located, and while the room wasn’t the newest, it was well positioned for accessing the Trans Canada Highway for Western Calgary, Banff / Canmore and Cochrane, Alberta.
While I wouldn’t be in an immediate rush to stay again, I’d certainly keep this place on my list of accommodations to stay in, if I found myself in the Calgary West area again.
If you have stayed at the Four Points Sheraton Hotel & Suites Calgary West, did you find the location to be convenient to your needs ?

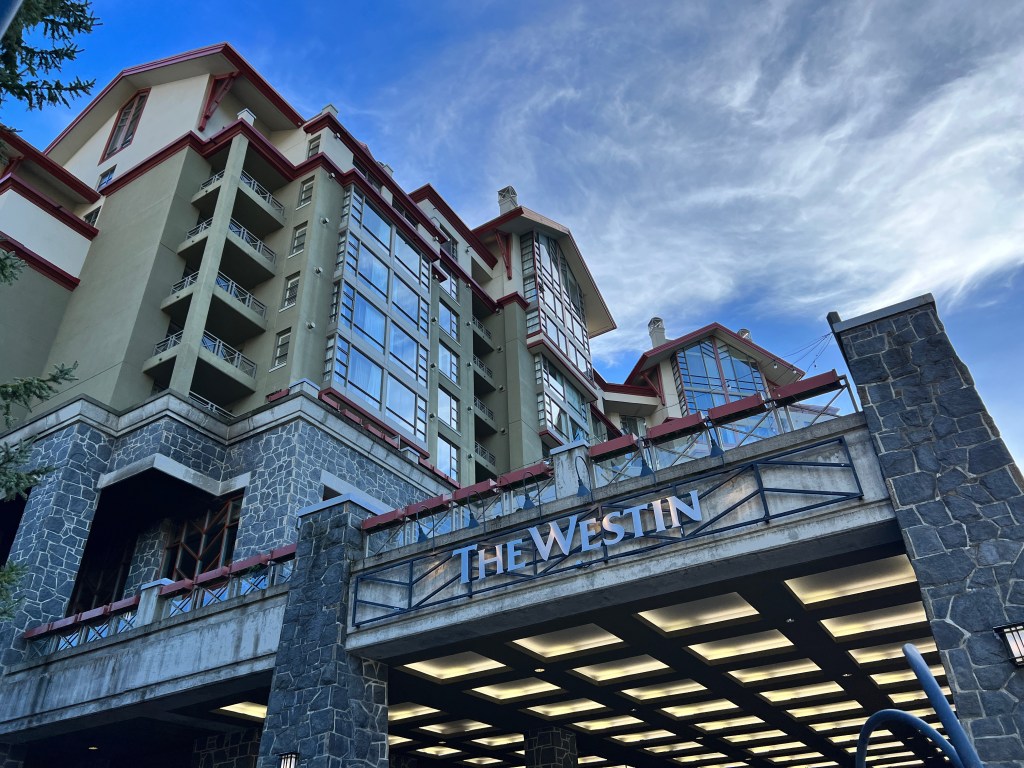
The Westin Whistler Resort and Spa remains one of the most popular options for a Marriott Bonvoy points hotel located in Whistler, Canada. Situated right next to the Whistler Village, the Westin Whistler Resort and Spa offers almost every feature imaginable for a full service hotel at a ski resort. I would get the opportunity to visit the property for a three day stay during off season, being able to test out most of its features during a recent stay.
Review: The Westin Whistler Resort and Spa, Whistler, Canada
“The Westin Whistler Resort and Spa is the best choice for Marriott Bonvoy loyalists in Whistler Village, with a compact full featured resort property that is exceptionally well located to winter skiing and summer activities”
Booking The Westin Whistler Resort:
My visit to this property was during a business trip midweek during low season in November. As a result, the hotel had a lot of inventory available with rooms available as low as $199 CAD ($145 USD).

It’s worth mentioning that as a seasonal property, the rates vary considerably based on demand. During the winter ski season, rates can go from a low of $489 CAD ($345 USD), all the way up to $2,057 CAD ($1,500 USD) a night during holiday periods. If you are looking for a discounted rate, it’s best to book early.
Along with a great deal of rate variability, the hotel does seem to offer some restrictive cancellation policies during high season. At times, the hotel does charge pre-payment of the full value of the reservation, with cancellation policies that may limit cancellation within 60 days of arrival. Please make sure you closely check your terms and conditions of your reservation before proceeding to book, in order to avoid any unpleasant surprises.
Marriott Bonvoy Opportunities:
The mountain resort of Whistler, Canada remains a popular summer and winter destination for many international travellers. Given the cost of getting here, it can be worthwhile exploring your point redemption options for a week long stay in Whistler.
Rooms at the Westin Whistler Resort are typically available for a low of 52,000 points in off season. The room rates jump to between 60,000 – 80,000 during ski season, dependent if you are booking mid week or on the weekend. It’s worth noting that you’ll have to book well in advance if you are hoping to secure a stay during Christmas or new year’s week, as these often completely sell out months in advance.
If you value Marriott Bonvoy points at 0.8 cents per point, it only makes sense to redeem points under the right circumstances. For example, it didn’t seem to make sense to redeem 52,000 Marriott Bonvoy points for a room valued at $416 USD when cash rates were under $200 CAD during my low season visit. During the winter ski season, if a room was available for 60,000 points (worth $480 USD), up to 80,000 points (worth $640 USD), you’ll have to take a close look to see which combination offered the best value.
Marriott Bonvoy members get the fifth night free when redeeming five or more day stay. Keep in mind that by redeeming five nights, and getting the fifth night free, will increase the value proposition by lowering the average number of points per night.
Getting to The Westin Whistler Resort:
I self drove to the property from the Vancouver area. The drive up from Vancouver was approximately two hours and twenty minutes, with a brief stop in Squamish for some supplies.
While I used a car to get to the property, it’s worth mentioning that a car is not needed at all once you arrive to the property. If you were arriving off an international flight from Vancouver International Airport, it’s worthwhile investigating taking a shuttle from the airport to Whistler, versus a self drive which would involve a car rental + parking fee + gas expense + the related traffic aggravation.

The hotel is very conveniently located on the edge of Whistler Village. The hotel could not be any closer to the Whistler Mountain ski slope, and is tucked against the mountain. This leads to a variety of different views from each hotel room.
On arrival to the property, I left my keys with the valet and walked inside to check in. The valet explained the parking options; $34 CAD ($24.90 USD) a night for self parking and $38 CAD ($27.85 USD) a night for valet parking (a bargain premium over self parking). I ended up self parking my vehicle as a result of my company’s travel expense policies.
Checking into The Westin Whistler Resort:
The lower lobby space at The Westin Whistler Resort makes a great first impression. The arrival’s hall features a large waiting area with a massive fireplace; just the thing to set you into the mood of a mountain resort. Based on the hotel’s design, this area was pretty much only used for arriving and departing by vehicle, since access to the Whistler Village is through a different part of the hotel.
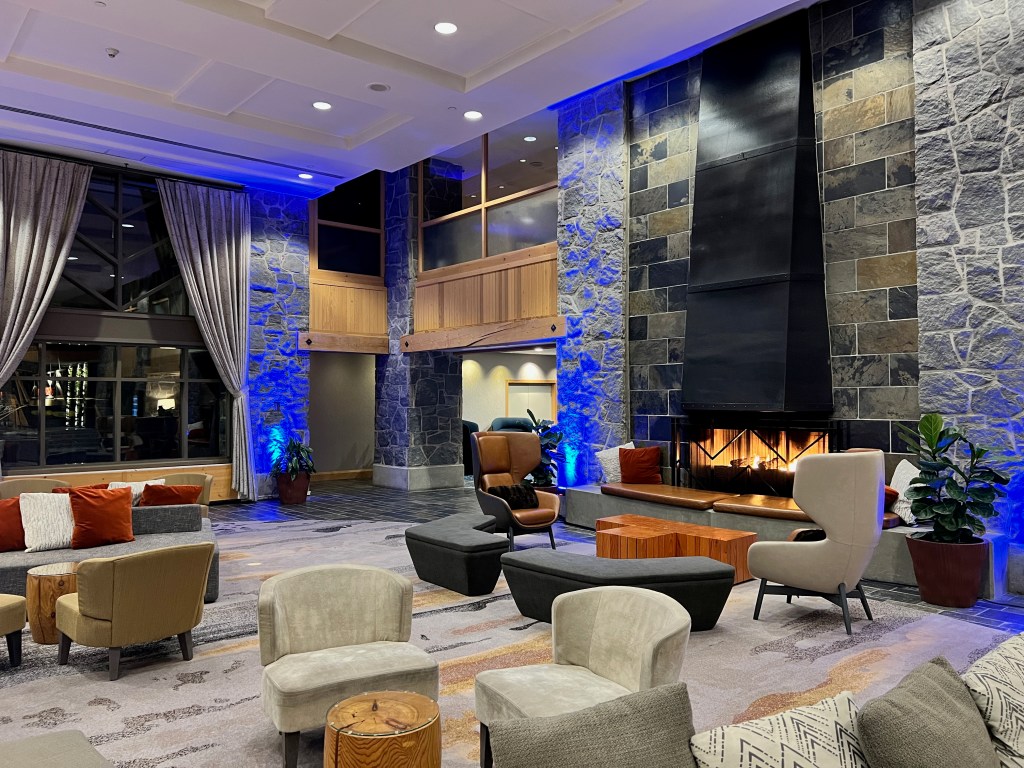

I walked over to the front desk. I passed by a pleasant looking green wall, and a master staircase to gain access to other parts of the hotel. The lobby was pretty deserted during a mid week arrival at about 5 PM.
There was no wait to be served. During check in, I was thanked for my loyalty as a Marriott Bonvoy Titanium Elite member. I would end up selecting breakfast as a breakfast benefit. The check in service was typically pleasant and efficient.
As a Marriott Bonvoy Titanium level member, I was pro-actively upgraded (without asking) from the base “One Queen Bed – Deluxe Studio” to a “One Bedroom Suite, Mountain View”. The upgrade was provided in advance about forty eight hours in advance of checking into the property through the Marriott app. This was a multi category upgrade past several versions of the Deluxe Studios with Balconies, Village and Mountain Views into a Suite Category. I was also given the highest floor possible. There was no further upgrade on arrival to the hotel.
Despite having great upgrade success at this property during off season, I would caution Marriott Bonvoy elites that the hotel is often fully booked during winter (and summer weekends). While I had a great upgrade success story during my off season stay, I probably would manage my expectations during a winter stay, as often the hotel is completely sold out, resulting in less upgrade opportunities.
Being a resort property, the hotel is technically excluded from offering a late check out benefit under the terms and conditions of the Marriott Bonvoy program. When I asked for a late check out during the check in process, I was asked to come back on the day before departure.
Fortunately, I was able to get a late check out to 3 PM on the day before departure without any issues. Despite the low occupancy, it was still a little inconvenient having to arrange your plans the day before travel, when you’re trying to find a place to manage calls and not knowing whether you’re going to be stuck in a lobby or in the comfort of your room.
During the winter season, there is ski valet fee of $25 CAD ($18 USD) that is levied for skiers. The rate is included for those staying in (or upgraded to) Suites, as the hotel discourages guests from taking ski equipment into hotel rooms. This fee includes ski valet with a slope drop off. During my stay, the ski valet was not in operation. There was no other “Resort Fee” applied to room rate during the off season.
I was assigned Room #975 in the West Tower. The elevators were located a short walk from the lobby. I ended up going to self park my vehicle in the attached underground parking garage and self navigated up to the room without further baggage assistance.
The Room: 1 Queen Bed, Mountain View, Balcony, 1-Bedroom Suite
After ascending into the hotel lobby via the parking garage elevator, and changing cars into the tower elevators, I ended up in the hallway of the top ninth floor. The hallways were nicely decorated, although the doors of the rooms were showing a little bit of wear and tear.

The rooms at the Westin Whistler are a little on the compact side. While nicely appointed, they won’t remind you of a super luxury ski resort hotel. Instead, I find that they are closer to compact contemporary convenience, despite the heavy prices that you might find staying here in high season.
I entered into the One Bedroom Suite. I immediately found myself in the kitchen and dining room area.
The Dining Room:
The dining room featured a small round table with seating for four people. The table was fairly small, and you won’t be setting up any elaborate dining meals with this limited amount of real estate.
It’s worth mentioning that, being a resort hotel, there is no actual desk located in the hotel room. I ended up dropping most of my electronics and laptops on the dining room table, to set up for work during my visit.
Mini Kitchen:
The dining room featured a mini kitchen. The kitchen was complete with tableware for four people. The kitchen featured a microwave, an oven, a full refrigerator and freezer. There was also a two element cooktop.


While I wouldn’t call it a gourmet kitchen with Sub Zero appliances, I would really appreciate having access to cooking facilities for a longer stay.
The Living Room:
The living room offered a modern looking sofa bed couch and gas fireplace. Being a sofa bed, the seating area was a little firmer than I might have liked. With two accent throw pillows, I was able to sit on an angle quite comfortably.

The room offered a large flat screen television over the fireplace. It was comfortable viewing the television from the couch with a head on view without any crooked angles.

The living room offered a gas fireplace that was temperature controlled through the thermostat. It’s not often you get a hotel room with a gas fireplace. The gas fireplace added a great ambience to the room.
While I didn’t have any ski equipment or clothing with me, I would imagine that it could be a little compact staying in the living room when wet gear was set out to dry.
The living room offered a small balcony. Access to the balcony was via a door next to the fireplace. The balcony was pretty small, and aside from taking view photographs, I couldn’t imagine spending much time seated outside in this small space.
The balcony did offer some pretty nice views. As a result of being on the ninth floor, and higher than many other Whistler hotels, I had a pretty nice view over the village hotel rooftops and Rainbow Mountain across the valley.

The living space of the one bedroom suite was as comfortable as I could have asked for. It would be especially comfortable for a longer stay. However, it’s likely less compact with a couple, and even less compact if you happen to have children staying with you on the sofa bed, or perhaps ski equipment and gear in your room.
The Bedroom:
Being a proper One Bedroom Suite, the room offered a private and separate bedroom. Generally speaking, The Westin Whistler has some compact rooms. The One Bedroom Suite offered a Queen Size bed with limited room to maneuver around the bed.

The room featured a Westin Heavenly Bed, with a USB charge port on one side of the bed.

The bedroom offered a second flat television in the bedroom. While I am not a television in bed sort of person, it was a nice feature for those that prefer to watch television in bed.
Aside from the smaller nature of the bedroom, I didn’t spend much time in here other than sleeping or changing.
The Bathroom:
The One Bedroom Suite offered a single vanity sink bathroom. The bathroom was on the smaller size for a hotel room that could hold up to four people.

The bathroom featured a combination tub and shower combo. The shower was a tight squeeze but was functional with reasonable water pressure for a Westin hotel.

In terms of sleep quality, I had a really good sleep at The Westin Whistler Resort. The room was absent any noise. The area surrounding the hotel was peaceful and quiet.
Around the Hotel Property:
The hotel is cut into the side of a mountain slope at the base of Whistler Mountain. As a result, the hotel offers a different access point other than the lobby front door in order to get out to Whistler Village.
After getting off the elevator on floor #1, visitors will have access to the shopping concourse located inside the hotel. There are quite a few art galleries, the independent from the hotel Kaze Japanese Restaurant, and access to the properties’ concierge desk and ski valet facilities.
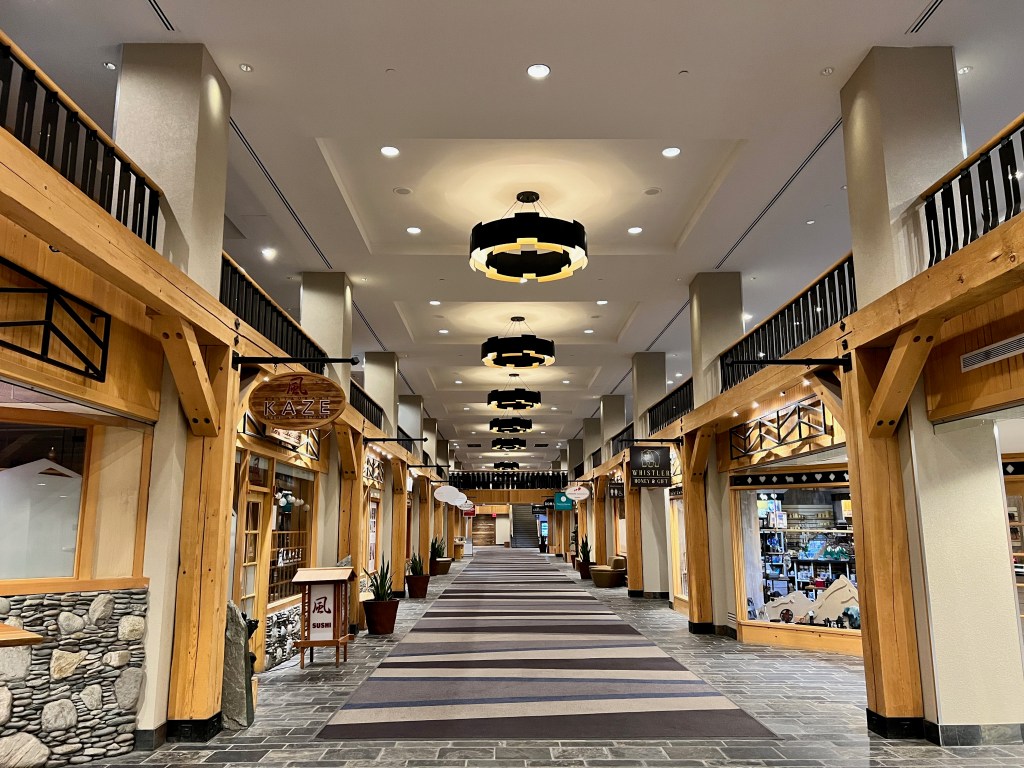
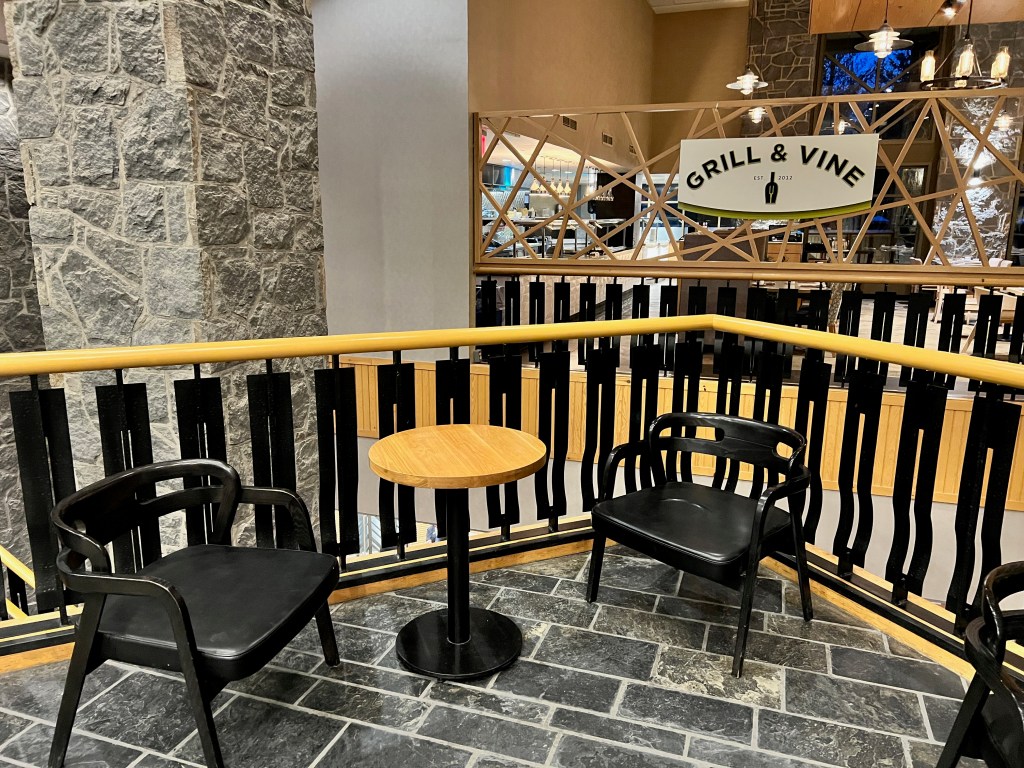
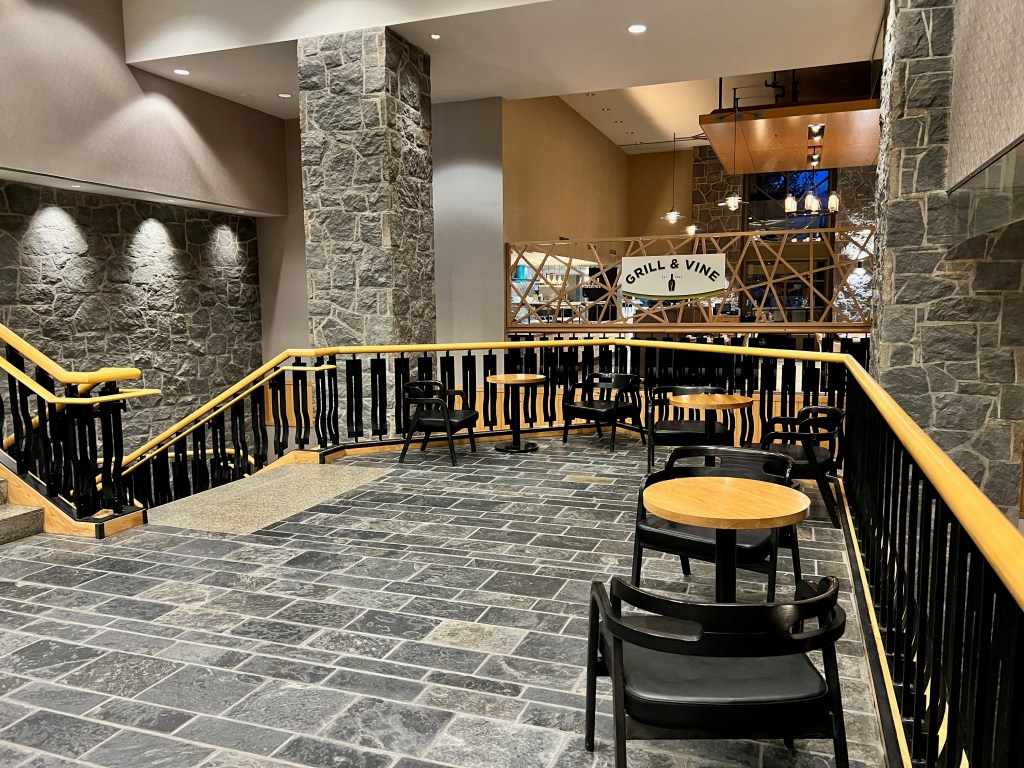
The first floor also features access to the hotels’ affiliated food and beverage outlets; Grill and Vine and The FireRock Lounge. There was also a descending staircase to the hotel’s lower lobby where I had arrived by vehicle.
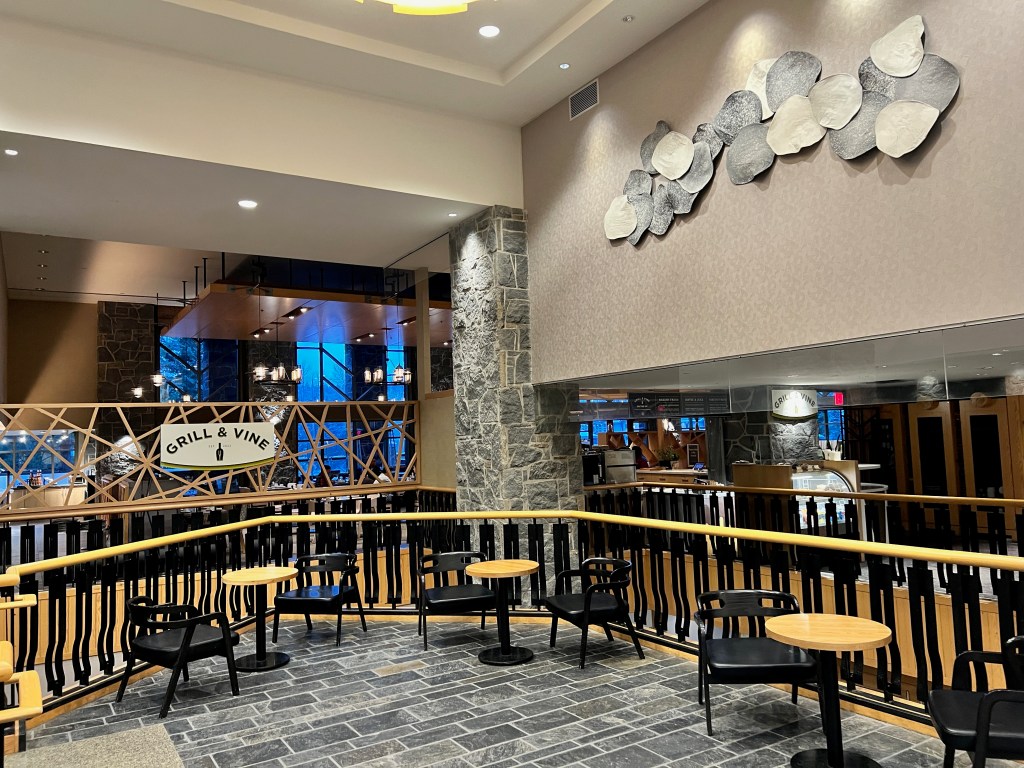
The First Floor was the place of where I would end up spending the most of time during the stay, as a result of it’s village access and food and beverage outlets.
Whistler Village / Whistler Mountain Access:
The hotel offers convenient foot access to Whistler Village in a location described as ski in and ski out. From immediately outside the Grill and Vine restaurant, you can access the pedestrian oriented Whistler Village.
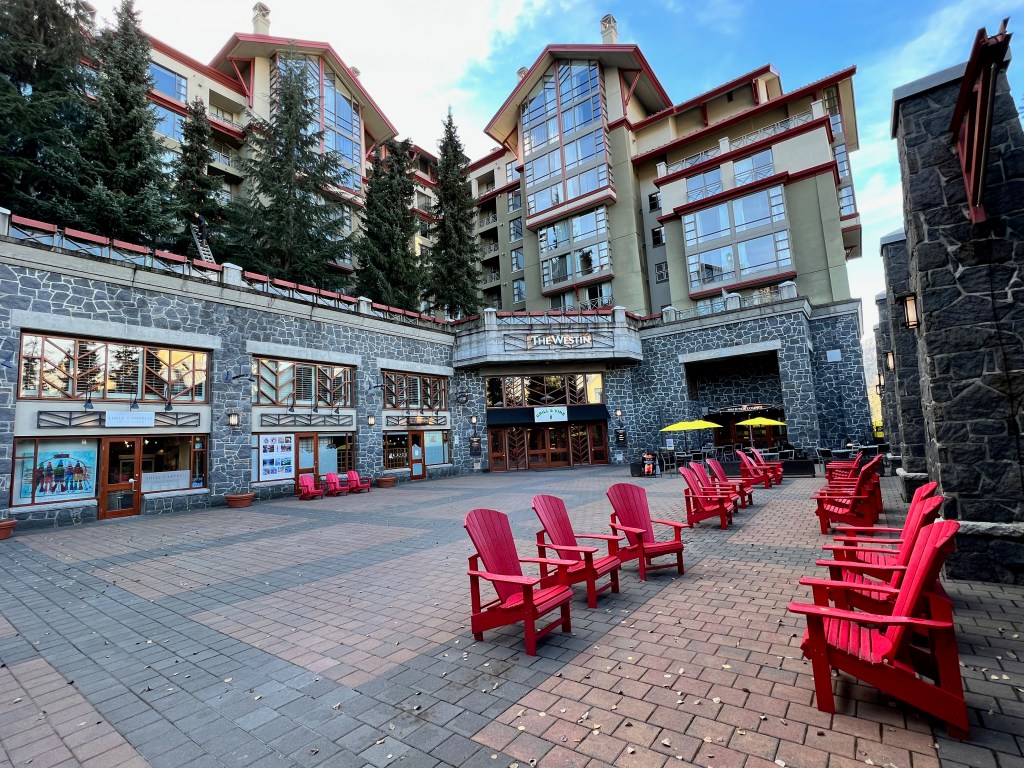
From the steps of the Westin Whistler Resort deck, it is a very short 4 minute walk to Whistler Village. After a short walk across the deck, and across a traffic circle that is closed to public traffic, you’ll find yourself at the base of the Whistler Mountain Gondola. Given it’s excellent access to Whistler Village, a car is not needed to access all restaurants and entertainment.
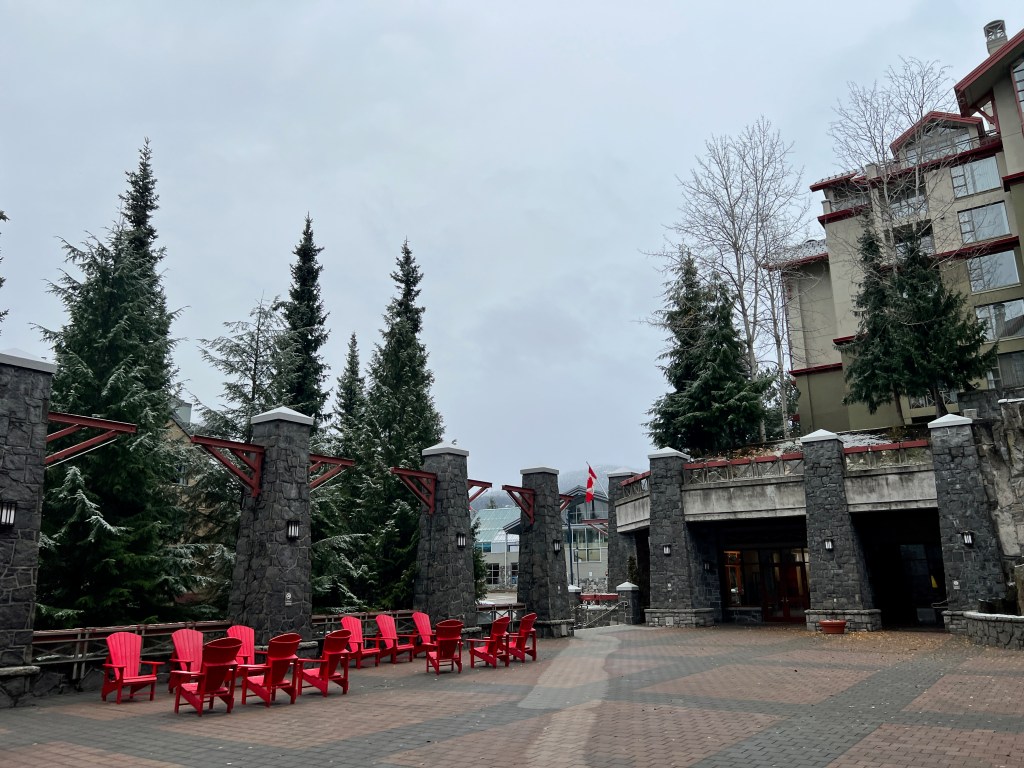

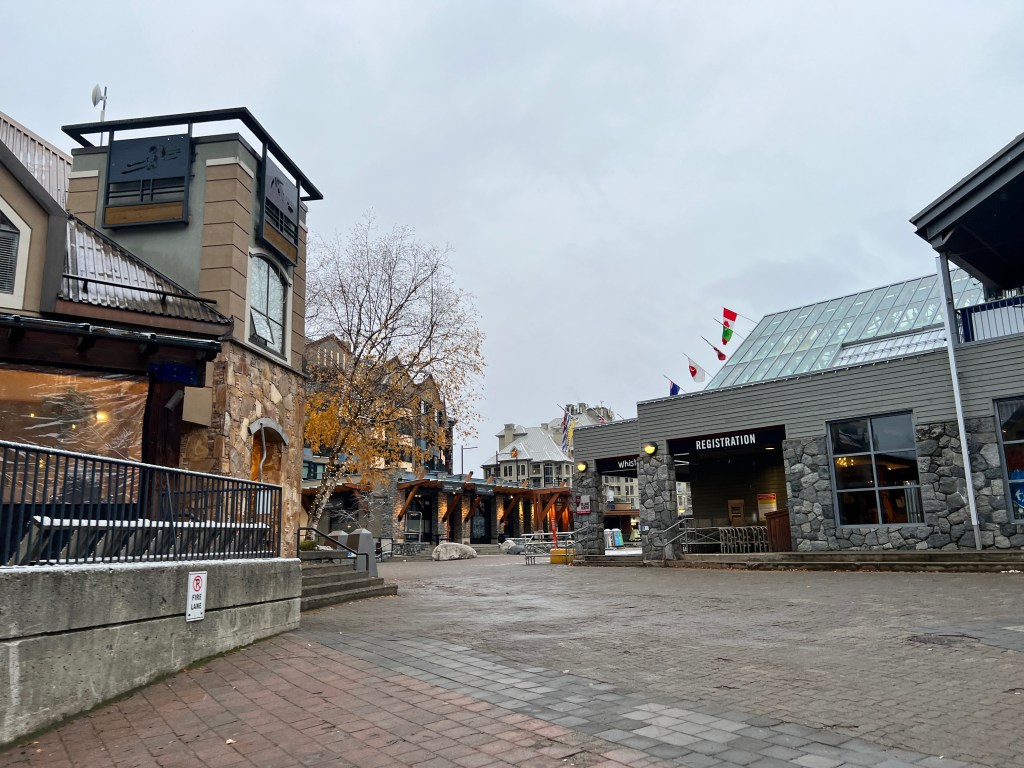
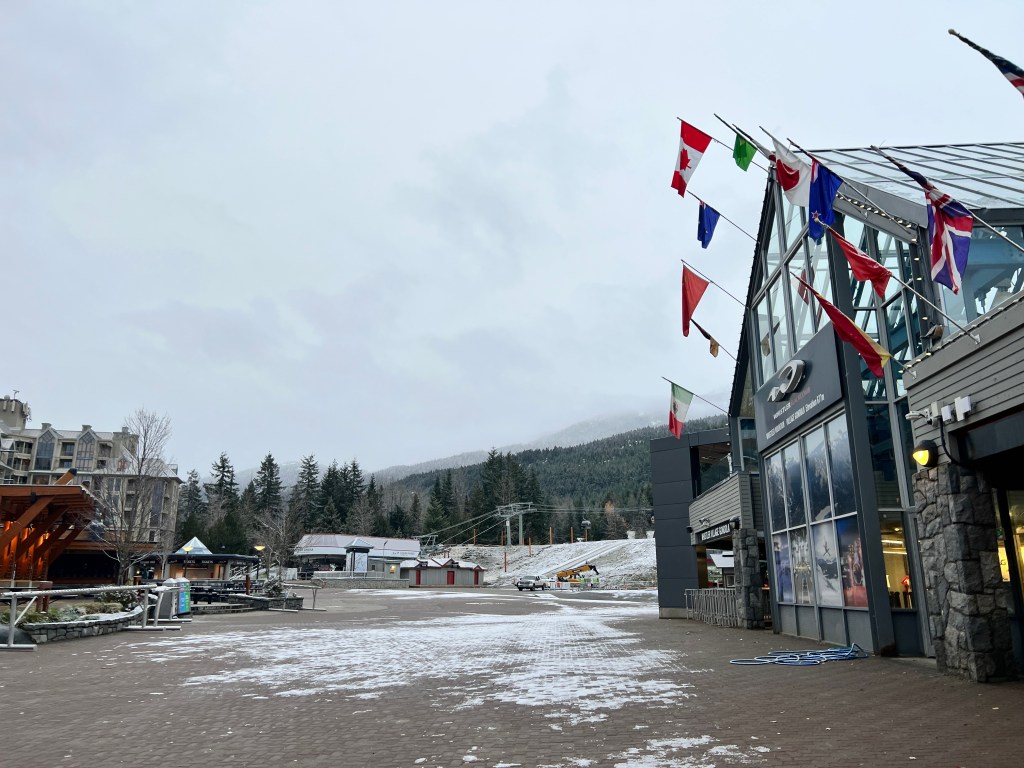
If you’re questioning whether you could walk this distance in ski boots, the walk is across the traffic circle and around the corner. Of the Whistler Village hotels, the Westin Whistler offers among the shortest walks possible in Whistler, to the Whistler (Whistler Village Gondola & Fitzsimmons Express) and Blackcomb Mountain (Excalibur Gondola) ski lift access points.
During the winter months, there is a ski valet that is featured at the hotel. After paying a fee, guests have access to a ski valet that allows skis to be dropped off hillside after the end of a day of skiing.
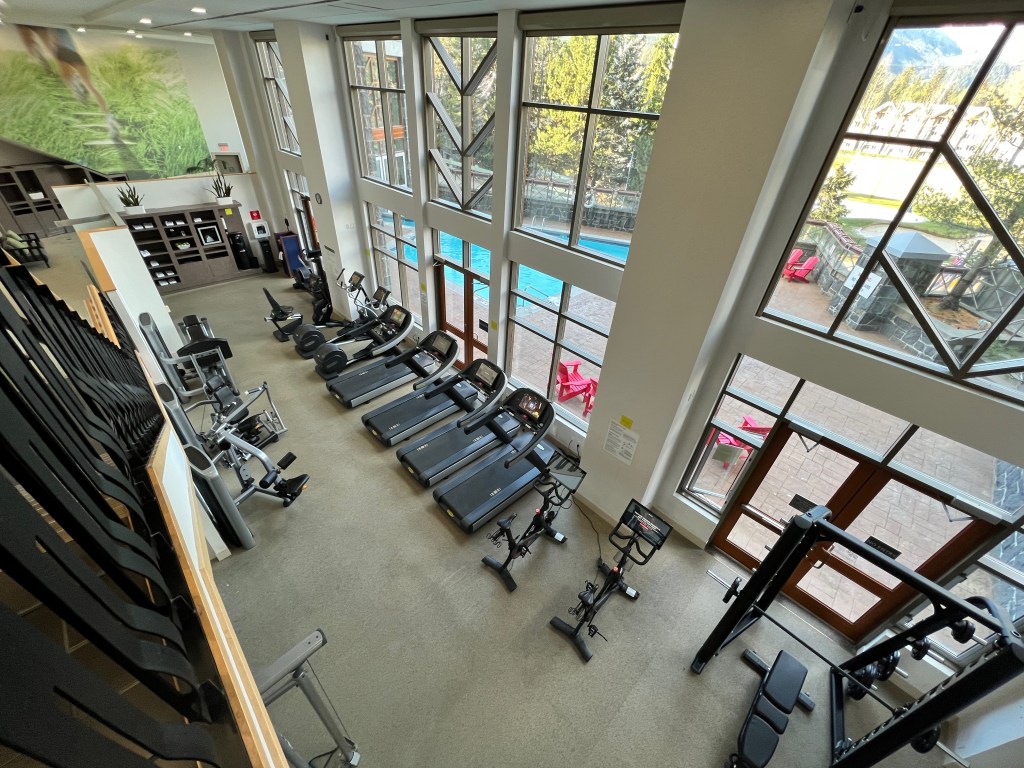
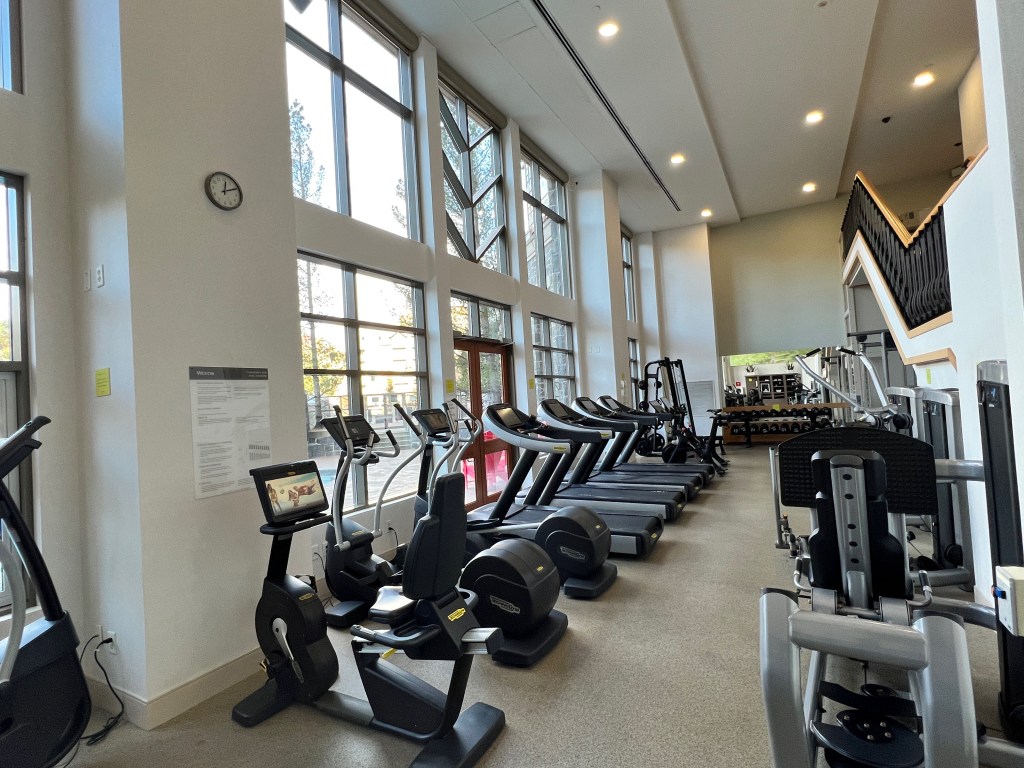
Westin Workout Fitness Studio:
It may seem a little strange to have an indoor fitness studio when surrounded by the beauty of Whistler. However, the Westin Whistler Resort offers a pretty good facility when it comes to exercise.
The Second Floor offers access to the Westin Workout Fitness Studio without paying a resort fee. Access is gained using your key fob. The access point also happens to be where the Westin Spa is located.
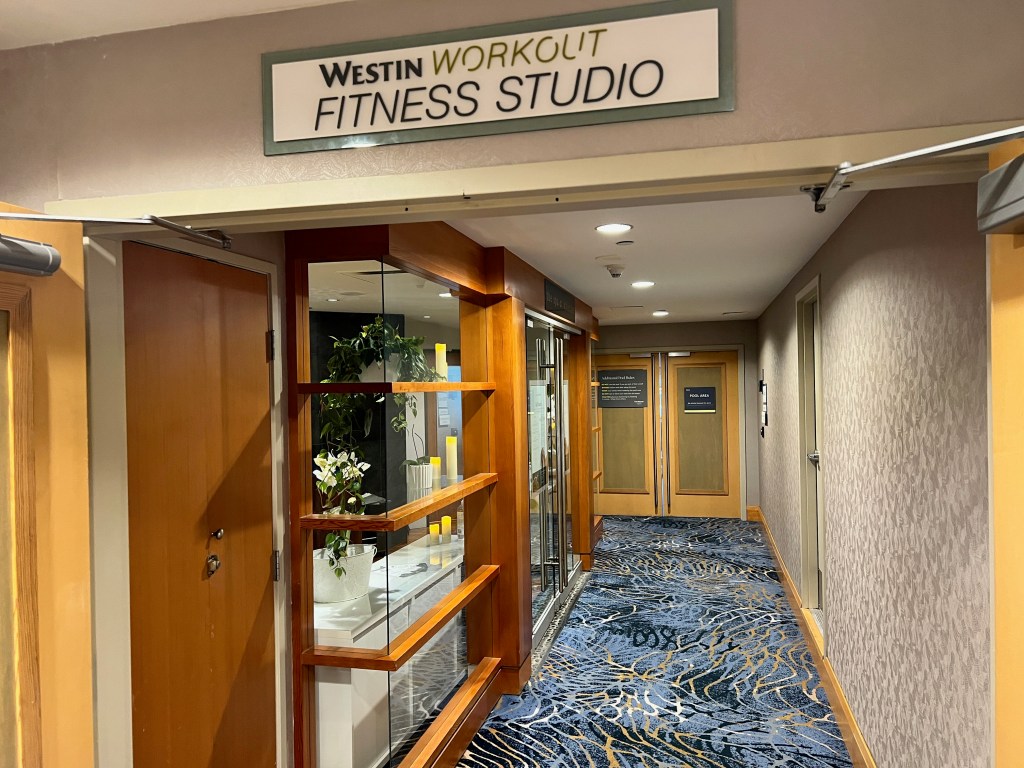
After entering the Westin Fitness Studio, it was a short walk down to the First Floor to access the Health Club Facilities.
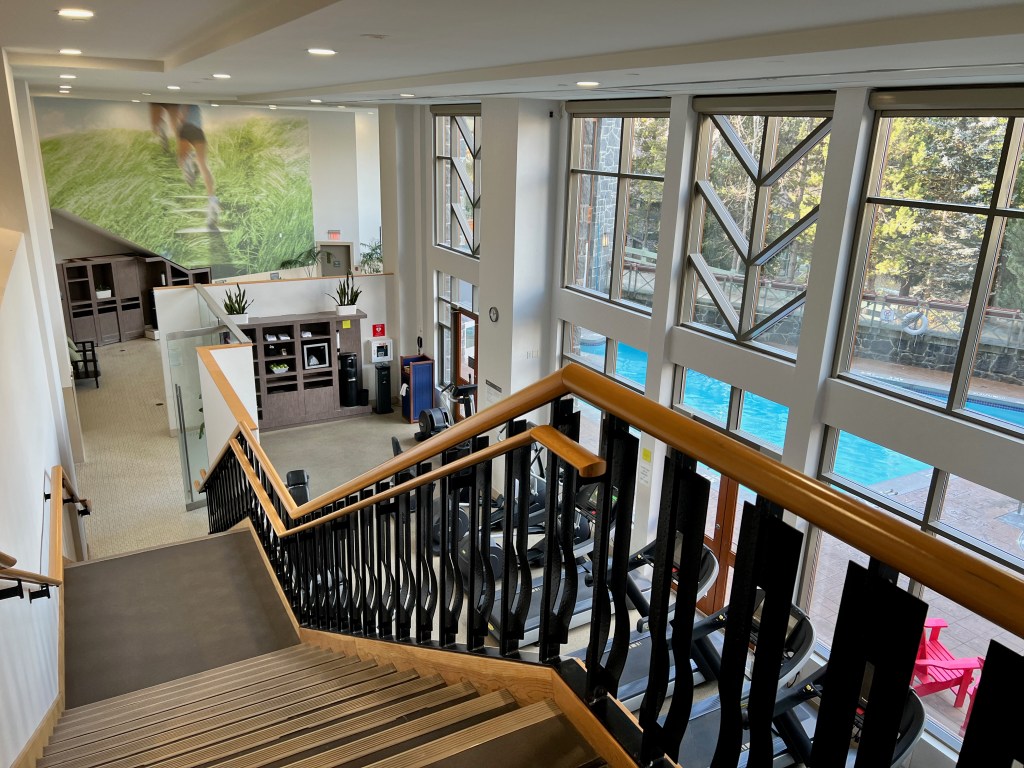
The Westin Fitness Studio offered a number of treadmills and exercise equipment that was situated against a large glass window. There was excellent daylight in the gym, making for a great workout environment.
Immediately next to the gym was the indoor hot tub, and passage way to the outdoor pool.

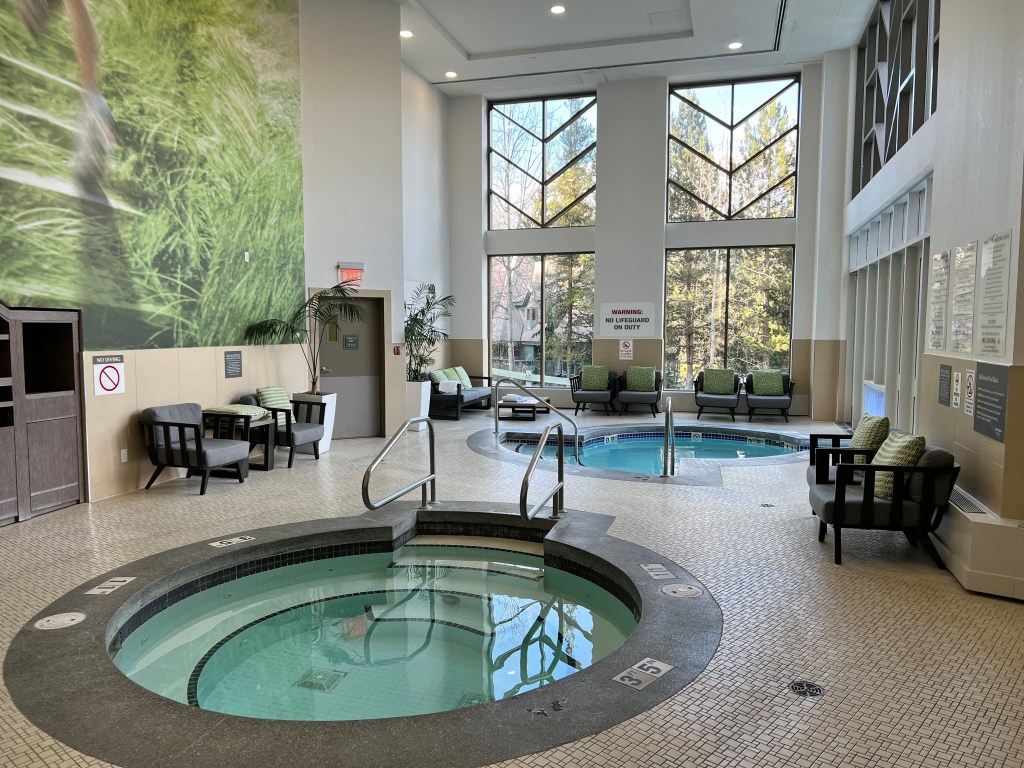
The hotel features an outdoor pool and a small outdoor hot tub.

In perhaps the only negative feature for this particular hotel, the outdoor hot tub is too small to accomodate the hundreds of skiers seeking a little muscle relief after a day on the ski slopes. If you happen to be visiting during the winter season, I would manage your hot tub time expectations accordingly.
The Mountain Club:
Hidden away on the first floor of the Westin Whistler Resort and Spa is the Mountain Club. While some visitors may confuse this for a hotel lounge, this is actually a private club accessible through a $15,000 CAD ($11,000 USD) initiation membership fee that is run independent from the hotel by Gibbons of Whistler.
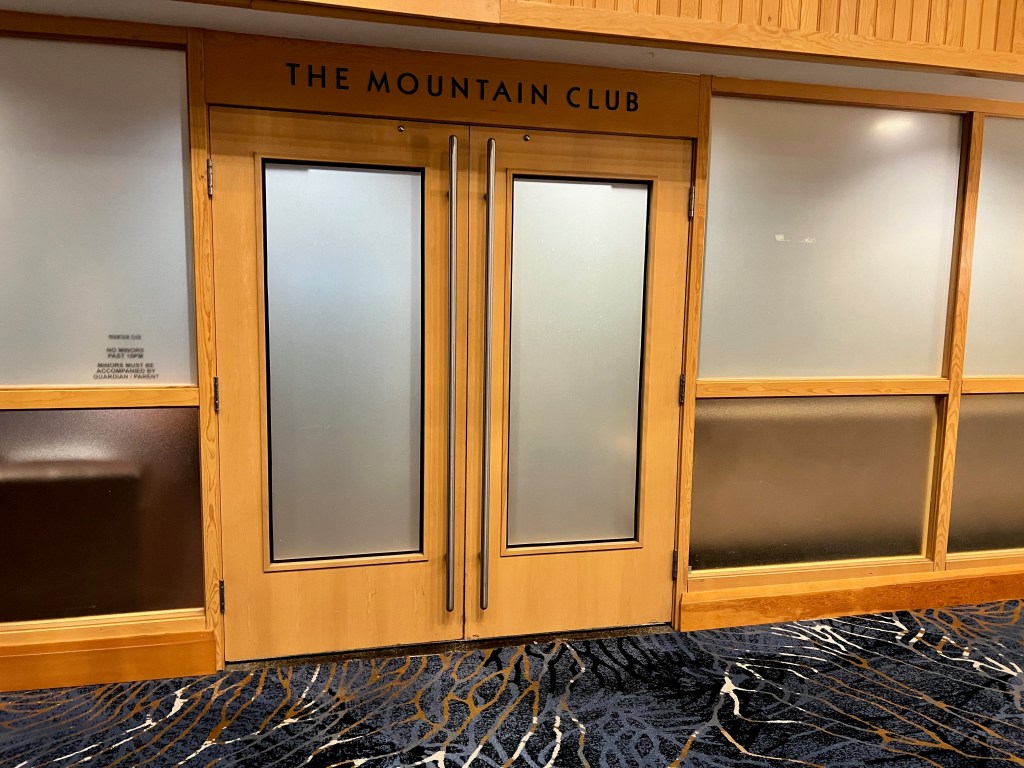
The Club offers patrons access to covered parking, club and ski locker rooms. There is no access feature for this amenity for guests of the Westin Whistler Resort and Spa, regardless of Marriott Bonvoy Elite level.
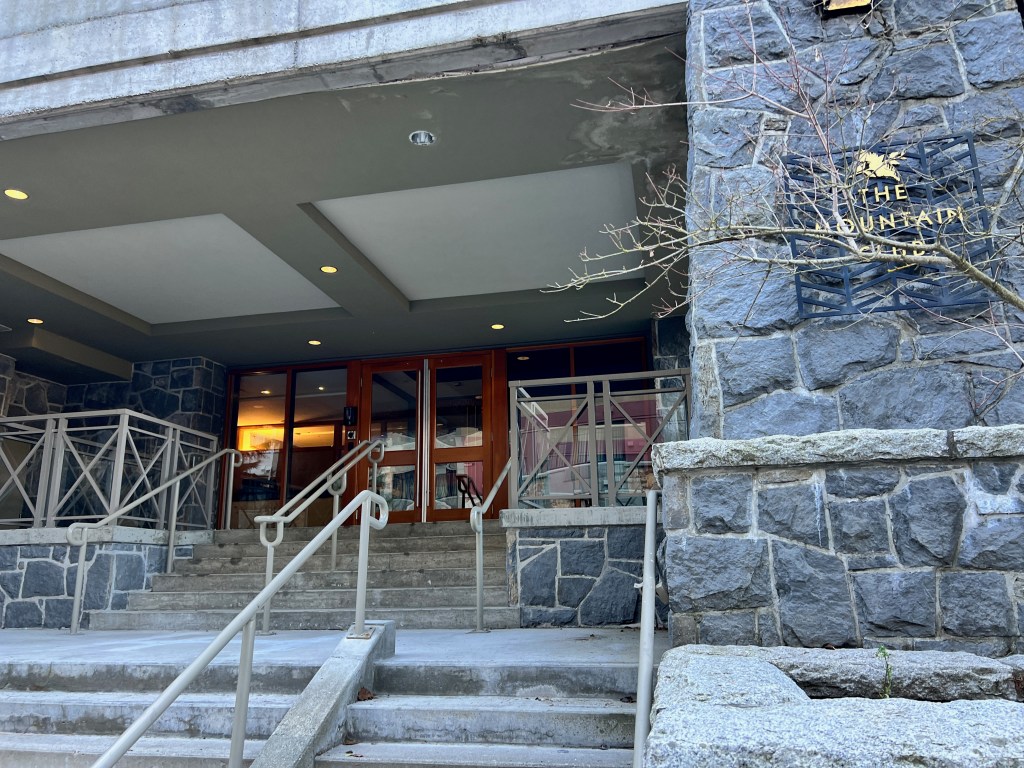
It is worth mentioning that the hotel has been known to operate a temporary “pop up” Platinum lounge in a hotel conference room on the second floor during the winter months. The temporary lounge is solely to manage elite breakfast traffic in the Grill and Vine Restaurant. This feature wasn’t in operation during my off season visit. If your stay is during the busier winter months, you may find yourself being directed to a pop up room for the breakfast benefit.
Food and Beverage:
The Westin Whistler Resort and spa features two primary restaurants that are affiliated with the hotel. These are the Grill and Vine restaurant and the Fire Rock Lounge.
If these two restaurants aren’t to your liking, Whistler Village is steps away from the resort and contains dozens of restaurants located just off the property.
Grill and Vine:
Marriott Bonvoy Platinum Breakfast
Grill and Vine represents the hotel’s primary food and beverage outlet. It’s worth mentioning that the restaurant is also bookable through Open Table reservations system, for those looking to maximize their point earning opportunities.
Grill and Vine offered a large dining room, with high windows that let in a large amount of natural light.
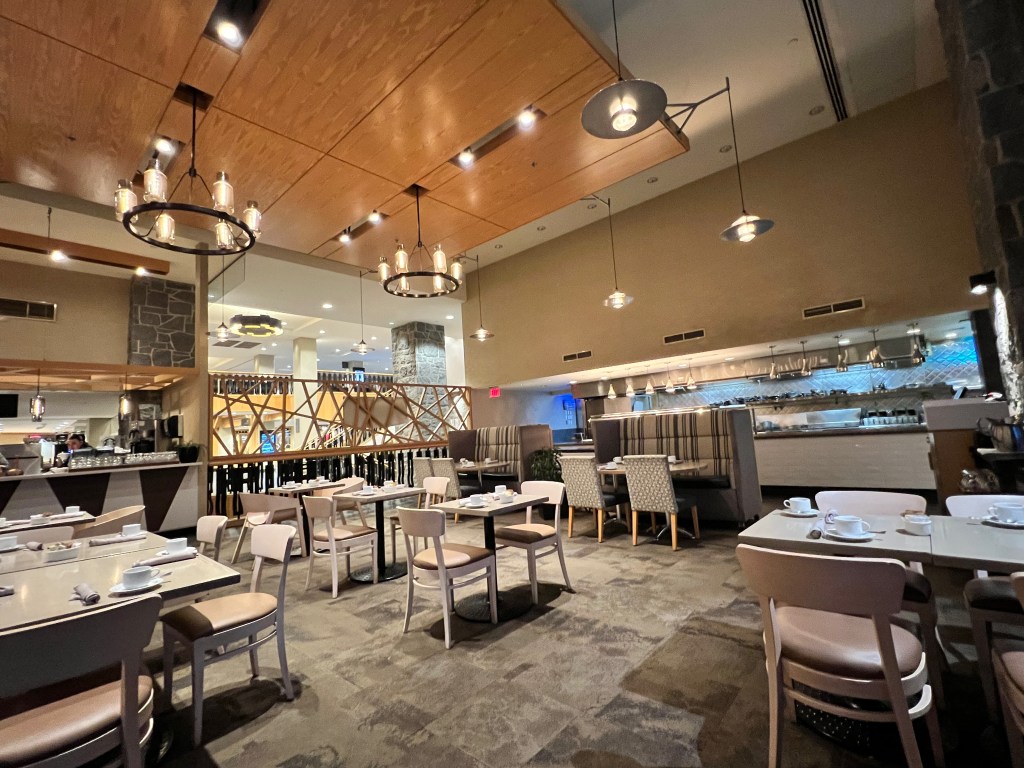
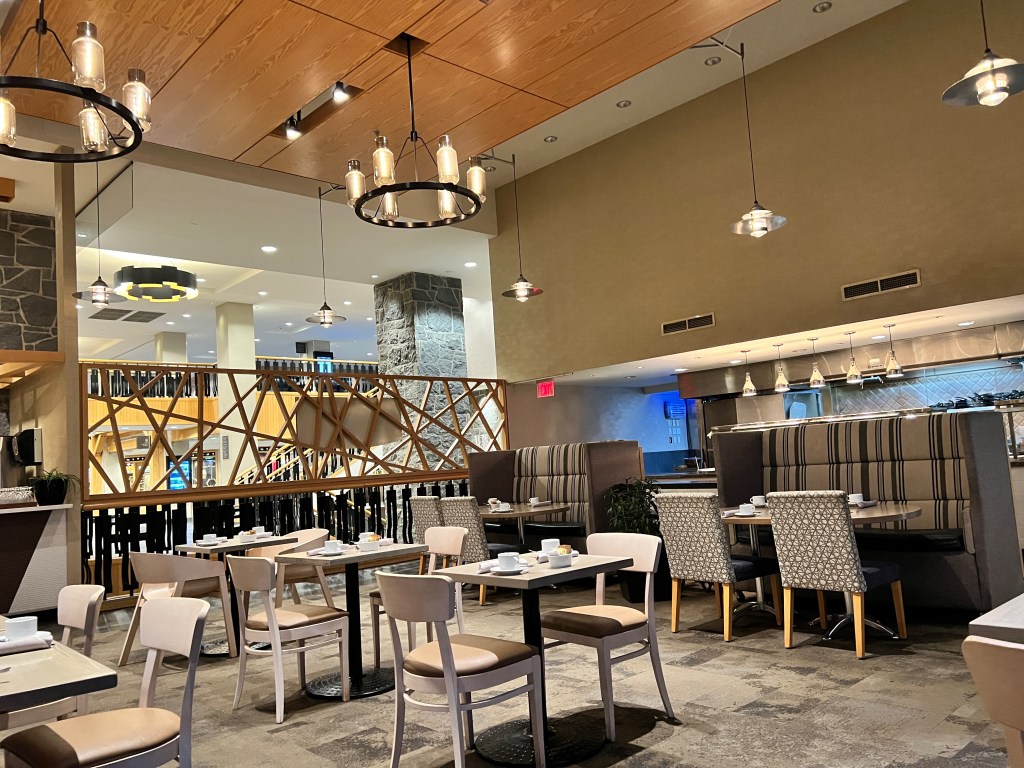
The hotel, like many others, seemed to offer some menus with tiny font. I’m not sure why they aim for such small type, but it’s certainly a challenge to read.


Marriott Bonvoy Elite members that select breakfast as their elite welcome benefit are given access to the full breakfast buffet valued at $41 CAD per person per day.
As a result of slow occupancy during my visit, the buffet was not set up. Instead, those seeking breakfast were offered the opportunity to order anything off the menu.
The first day, I enjoyed a continental breakfast. The continental breakfast featured banana bread, fresh cut fruit, along with a yoghurt parfait.
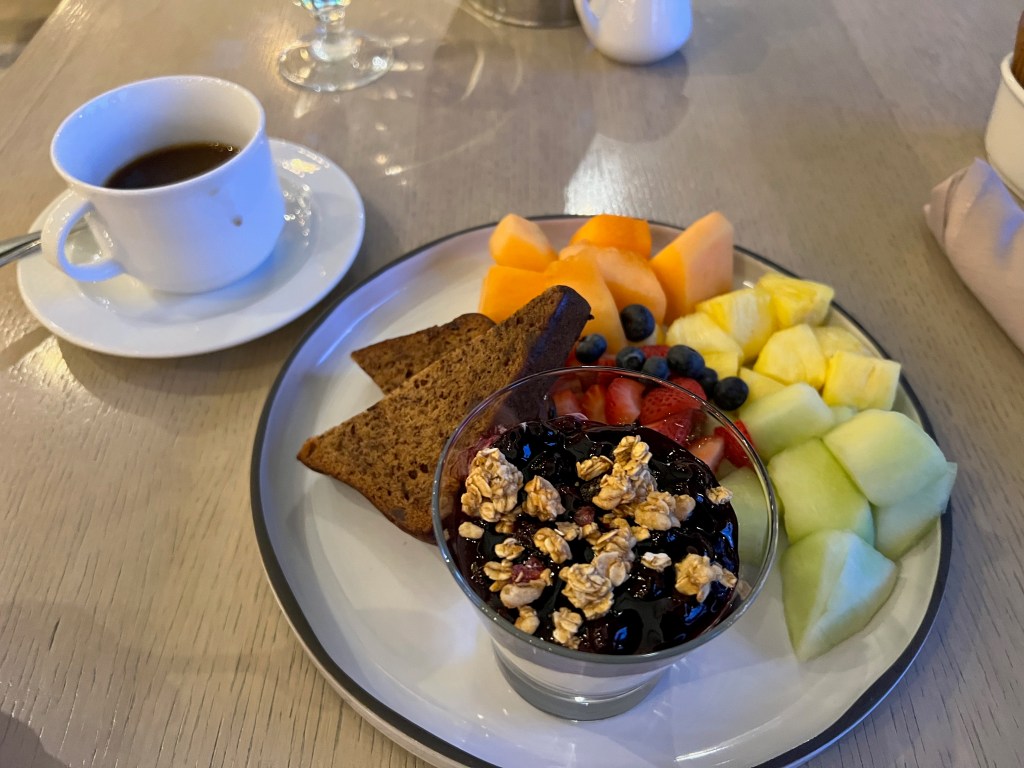
The second day, I was ordered Eggs Benedict with smoked salmon and micro-greens. The Eggs Benedict was well presented with hollandaise sauce that didn’t break.
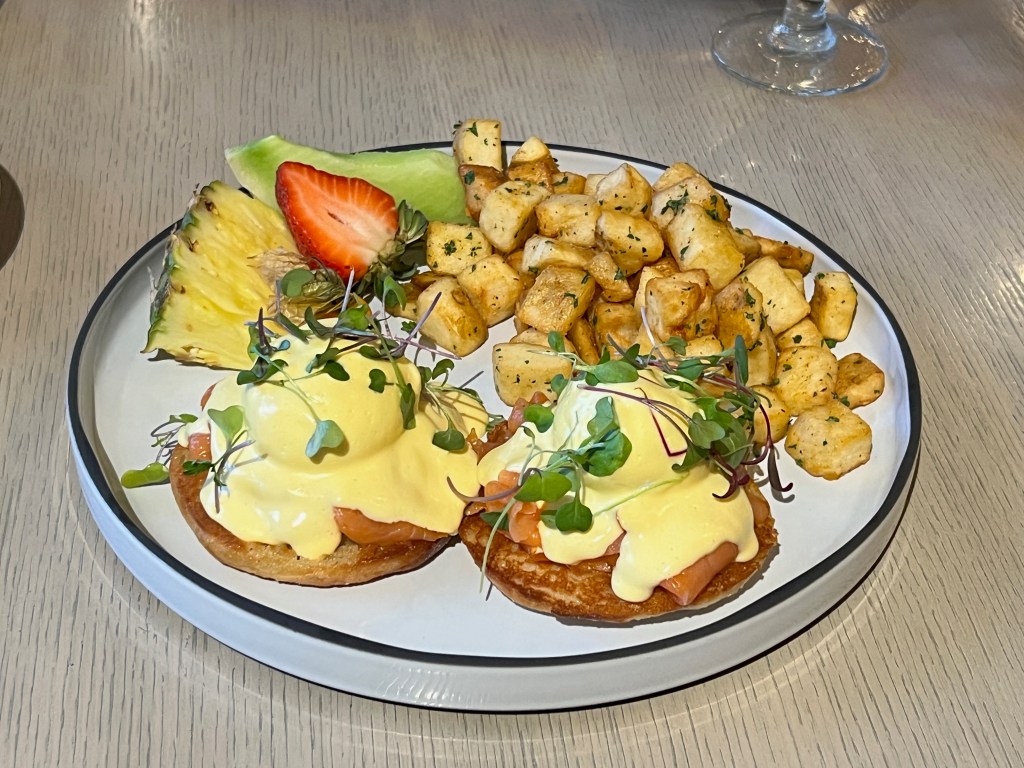
The last day I enjoyed the Grill and Vine’s version of Avocado Toast with two poached eggs, tomato, olive oil and multigrain bread. In Westin style, this was served with a generous portion of fruit.
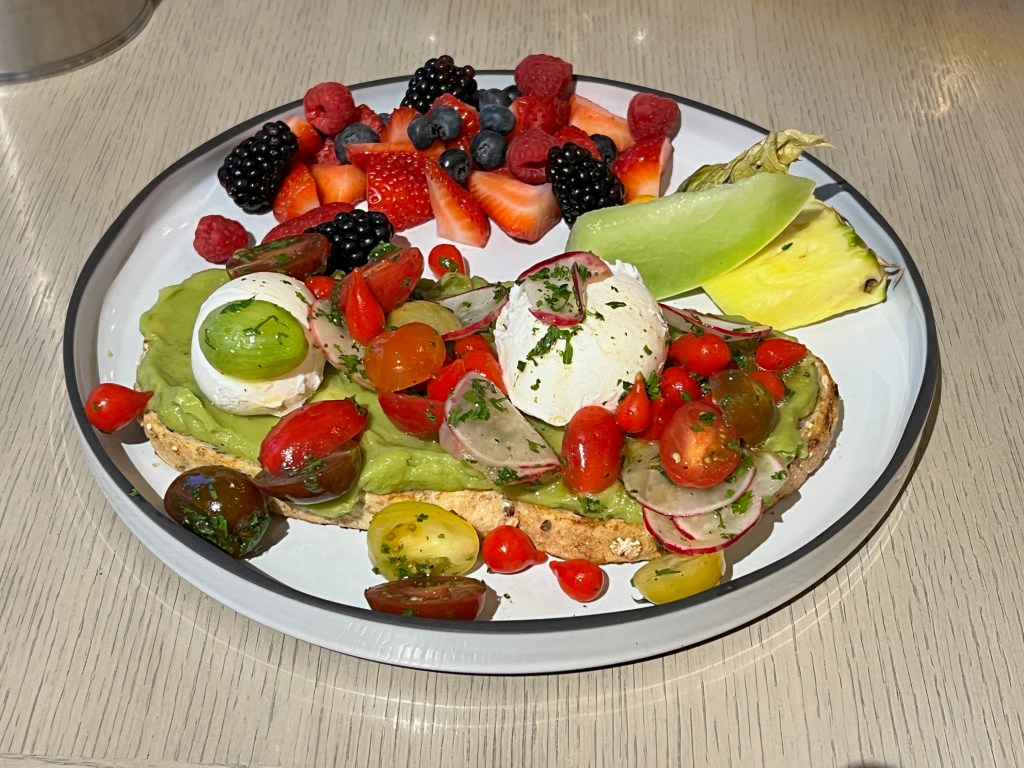
There was no bill to sign at the end of breakfast. Service was prompt and friendly with food quality that was great and “as expected” for the Westin brand.
Grab and Go:
The Grill and Vine offered a Grab and Go counter. The Grab and Go Counter was located near the Grill and Vine entrance.
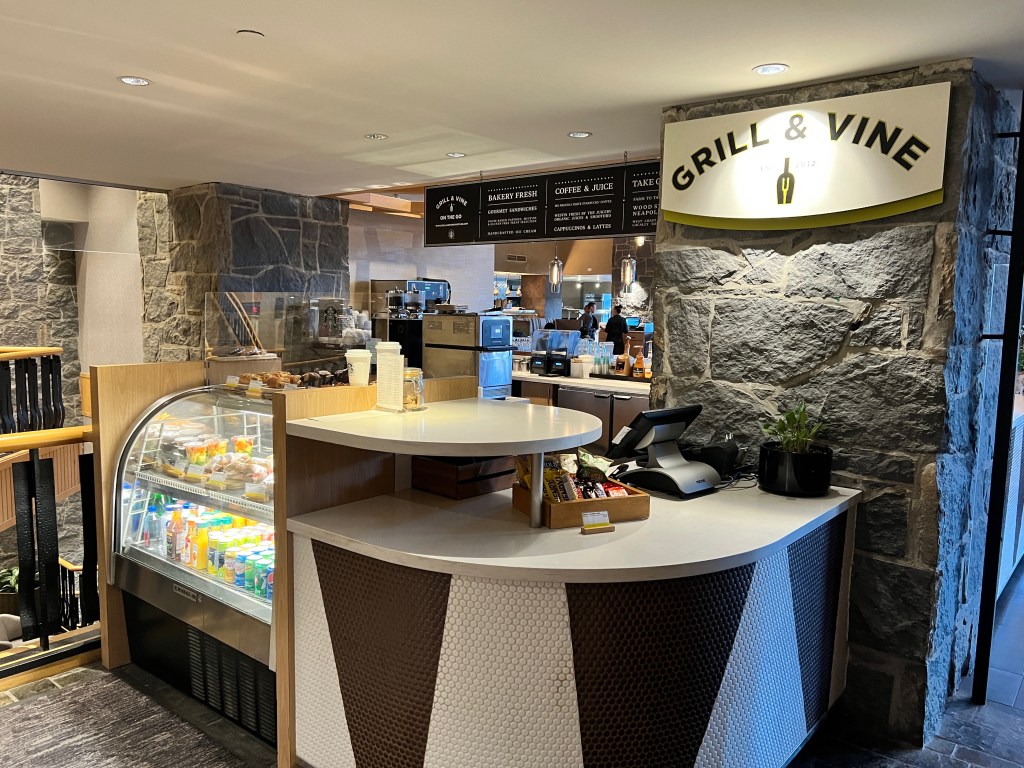
The Grab and Go counter offered Starbucks Coffee and morning pastries. While it is the only Starbucks Coffee available near the hotel, I’d also recommend the nearby Lift Coffee Company that’s located on the direct route to the ski hill.
The FireRock Lounge:
The hotel also featured the FireRock Lounge. The FireRock Lounge was marketed as offering artisanal cocktails and delicious tapas, this contemporary restaurant is the perfect place to warm up after a day on the slopes or a day of hiking through the backcountry.

The FireRock Lounge was mostly empty during my visit, although it is usually much busier during the winter season. The FireRock Lounge was a dark space that I personally didn’t find to be super appealing as a result of its emptiness. Perhaps visiting with a number of people, or relaxing after a day of skiing would change my impression.
Bottom Line: The Westin Whistler Resort
The Westin Whistler Resort will certainly please Marriott Bonvoy loyalists with a great property.
The Westin Whistler Resort features a great location that is located in the best possible postal code for Whistler Village. It’s spot just next to Whistler Mountain will be convenient for all types of visitors.
While the pricing can be over the top expensive during ski season, the hotel room itself doesn’t deliver the same value in terms of space or size. The rooms are slightly compact and would be even more tight if I had a family staying with me.
Despite this, the Westin Whistler Resort and Spa would easily be a number one choice for those loyal to the Marriott Bonvoy program, and is arguablely the best franchised hotel to stay at in Whistler.
If you have stayed at the Westin Whistler Resort, did you find the property met your expectations ?

This week’s travel had me travelling to the northern part of Vancouver Island in South West British Columbia. Departing from Vancouver, with limited flight availability, and some labour issues impacting the BC Ferries service resulting in many cancellations, I ended up deciding to fly over through Nanaimo, making the Courtyard by Marriott Nanaimo the logical choice for a hotel stay in this particular region. The Courtyard by Marriott Nanaimo is the only Marriott property around for miles, so I was interested to see how this would impact any possible future hotels stays in this region.
Review: Courtyard by Marriott Nanaimo, British Columbia, Canada
“Another brand new property, the Courtyard by Marriott Nanaimo marked a familiar Courtyard attempt in the downtown Nanaimo revitalization”
This particular trip was marked with a lot of travel drama and it didn’t go all that smoothly. While my stay at the Courtyard by Marriott was fairly smooth, there were a few areas of improvement that I would note for my next visit time.
Booking The Courtyard Nanaimo:
The City of Nanaimo is located partway up Vancouver Island. As the primary ferry down servicing access to the Northern part of Vancouver Island, the town of 106,000 people is one of the larger centres in Northern Vancouver Island.
The hotel opened in March 2023 as a brand new construction build in the older downtown district of Naniamo. It marks one of the first new build properties in this area that consists of older commercial shops and businesses.
The hotel generally offers rates between $149 – $196 CAD ($108 – $146 USD) during the week, with some softening rates on the weekend as low as $144 CAD ($105 USD) rates on some Saturday and Sunday nights.

I booked my a base standard Guest Room – 1 King Bed, Sofa Bed, Guest Room for approximately $180 CAD ($130 USD) on my stay. I booked through the Marriott Bonvoy website, which as a Marriott Titanium Member, entitled me to a complimentary upgrade to the best available room, including select suites, complimentary access to the Marriott Executive Club Lounge (of which there wasn’t one at this property), and a complimentary late check out up to 4 PM.
It is worth mentioning that there are no suites at this particular property, so any Marriott Bonvoy Elite upgrades offered will be a soft upgrade into a higher floor category, a better view or quieter area away from the elevator.
Marriott Bonvoy Redemption Opportunities:
The Courtyard by Marriott Nanaimo offers competitive room redemptions with the new variable redemption rates. While I can’t imagine many wanting to redeem points at this hotel, rooms are typically around 22,000 points per night, on a fairly constant basis.
If you value Marriott Bonvoy points at $0.008 a point, you’d have to spend more than $176 USD to come out ahead for a 22,000 point redemption. While this represents reasonable valu,, I can’t actually imagine anyone redeeming points at this particular property, nor can I imagine the rate ever being higher than $176 USD making redemptions worthwhile, since most travellers here are likely on the business travel circuit.
Getting to The Courtyard Downtown Prince George Hotel:
I arrived into Nanaimo through the Nanaimo Airport, which is located 15 kilometres south of downtown. I picked up a National car rental to conduct my business on the island for the day, and self drove to the hotel. As I was working up the island, I had a fairly long drive back to Nanaimo, and I arrived to the hotel at around 8 PM.
The hotel is located in the older downtown area of Nanaimo. It would mark my first exposure to staying in downtown Nanaimo, as this was often a place I just passed through by car, on my way to other parts of Vancouver Island.

I made my way to the hotel by car and parked out front and headed inside to check in. I ended up parked in a 15 minute timed loading zone that appeared to be enforced by the city.
Checking into the Courtyard by Marriott Nanaimo Hotel:
After parking my rental car in the front loading zone, I went to check in to the hotel. As expected with a brand new hotel, everything was sparkling and shiny new.
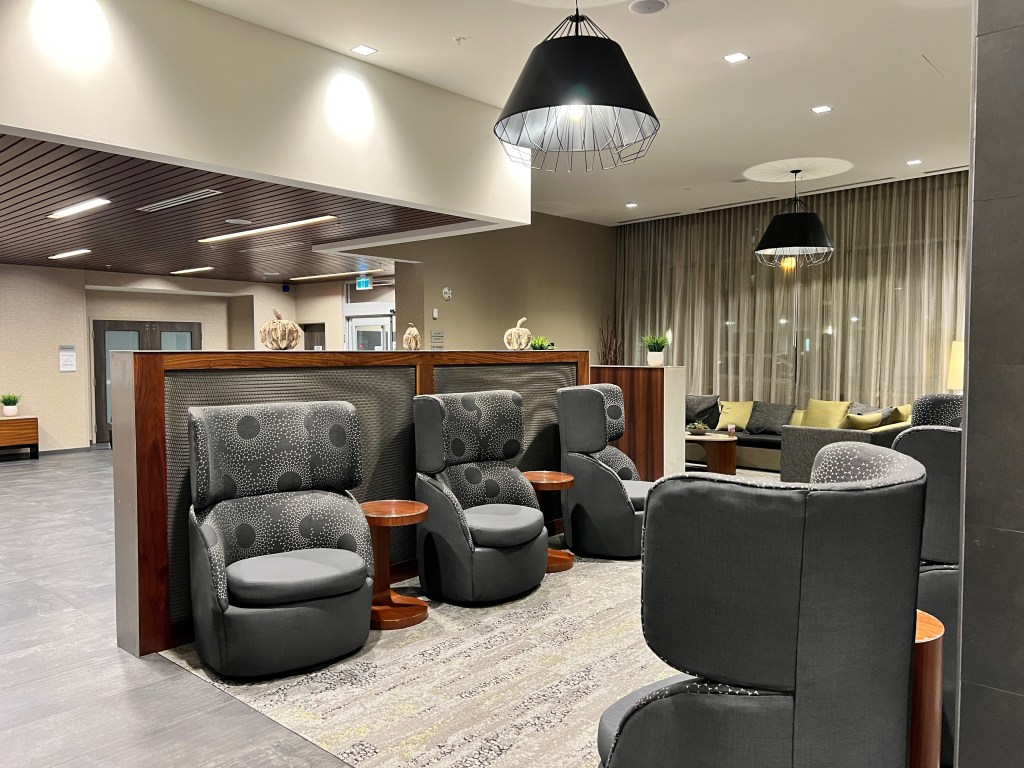
I had a friendly check in at the front desk. Having completed a mobile check in through the Marriott Bonvoy App (selecting paid self parking option at $9 CAD a night), everything was pretty much ready to go when I arrived.
I was thanked for my loyalty. I was offered 500 Marriott Bonvoy points as a Marriott Elite Welcome Amenity, and explained parking options. This was where my first hiccup occurred.
I was very politely informed, that due to a local concert event occurring in the area, that the hotel did not have any parking available to offer. I was politely asked to see if I could attempt to self park the car at 9:30 PM, some 90 minutes after I arrived.
I hadn’t eaten dinner by this time, and was keen to get out of my suit for the day, so I opted to find some self parking on my own. As a result, I didn’t complete the hotel registration form for the parking that would have involved providing my licence plate.
After dropping my bags at the room, I ended up hunting down some local parking. As the hotel is in a inner city district, there isn’t much parking available in the area. I navigated across the street to a parking garage that had several “full” signs.

The parking lot had street directions to an alternate parking location. However, being from out of town, the street address meant nothing to me; in terms of directions.
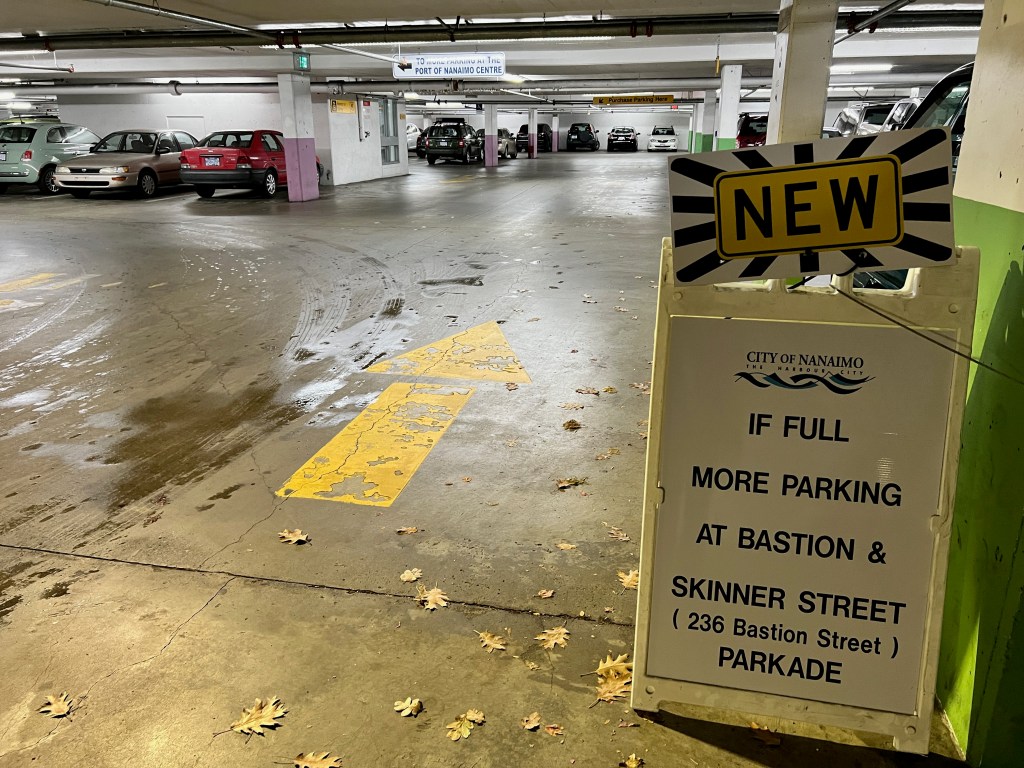
I found a compact but full parking garage, as described on the sign. After performing several long reverses and three point turns, I ended up waiting for other visitors to leave and getting a spot that was recently vacated. This added an inconvenient twenty five minutes of time to my arrival experience.
Getting back to the hotel, the lobby contained a small market with sundries available for purchase. This was located immediately beside the front desk. While didn’t get the opportunity (or need) to purchase any additional items, it was nice to find things available for purchase if needed. Given Canadian alcohol licensing regulations, there were no alcoholic drinks available in the market.
The Room: Guest room, 1 King, Sofa bed, City view:
After I had located parting, I headed up to the room. The hotel featured modern indigenous art, as recognition of the unceeded indigenous territories in the local area.

The hotel offered the usual printer stations, which are always convenient for on the go work projects.
After getting off on the eighth floor, I located my assigned room #809 which was located right across from the elevator bank.
The hallways of the Courtyard Nanaimo offer a modern design consistent with the property being a brand new build that’s recently opened.

The Bedroom:
I booked a standard Guest Room – 1 King basic level room. As a Marriott Bonvoy Titanium level member, I was entitled to an upgrade to the best available room on arrival, including select suites.
I wasn’t provided any room upgrade except to a high floor that was one level below the very top ninth floor. I entered into the room and found a comfortable and modern design for a hotel room.

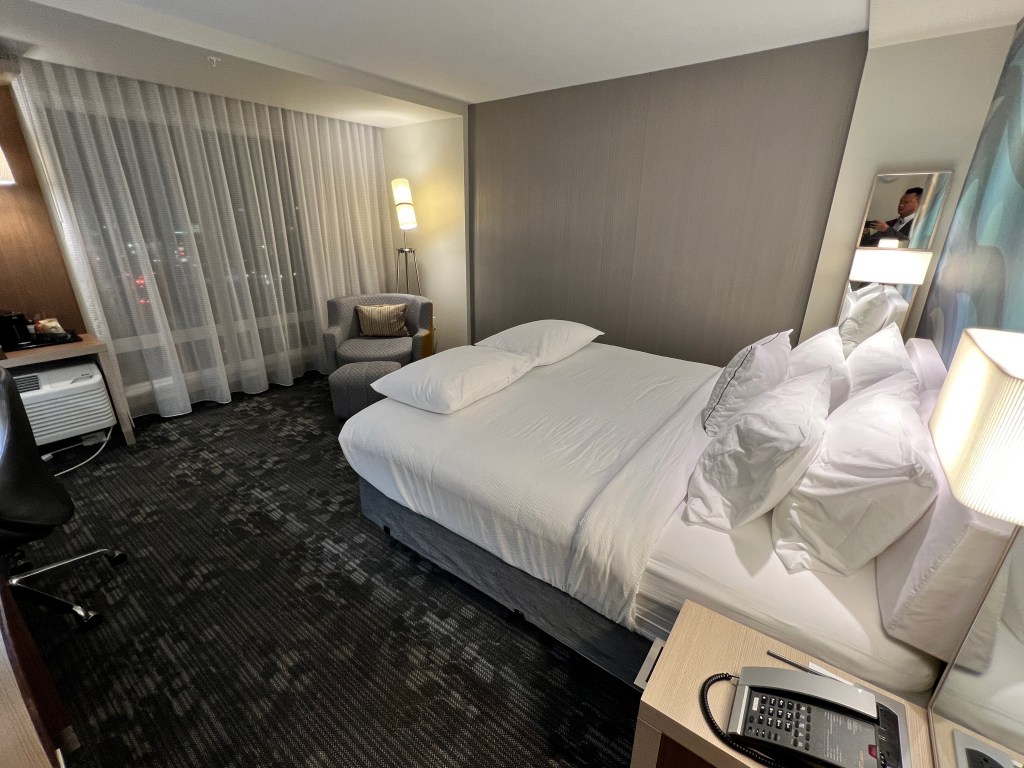
The Standard Guest Room was nicely decorated with modern greys, and a soothing indigenous inspired head board.

The room offered the standardized Courtyard couch chair, along with a short leg rest. The chair was typically comfortable, and convenient for getting shoes on.
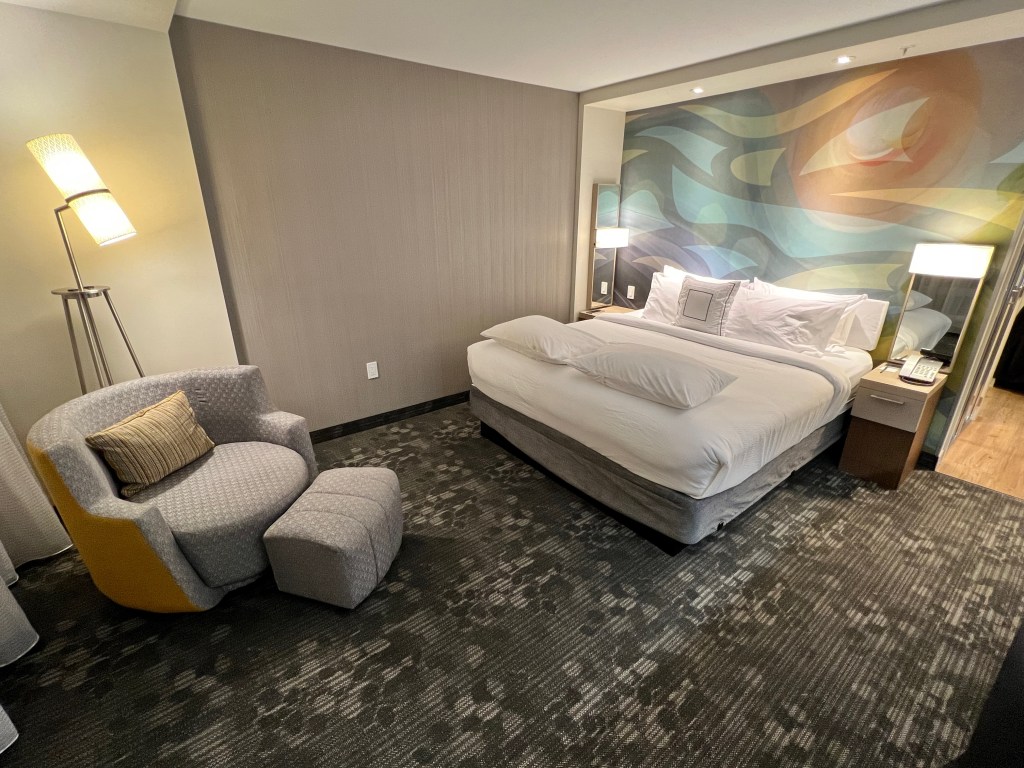

The functionality of the room was updated with modern conveniences, including bedside USB charge ports, reading lights and a large work space for working. Having USB ports by the bed, is always something that I miss whenever I’m in a hotel room that doesn’t happen to have them. In this case, it was a super convenient way to charge devices.


The television viewing angle from the bed was at a ninety degree angle. For those that enjoying watching television in bed, this wasn’t the most convenient angle. Given my short stay at the property, I didn’t spend any time watching television.
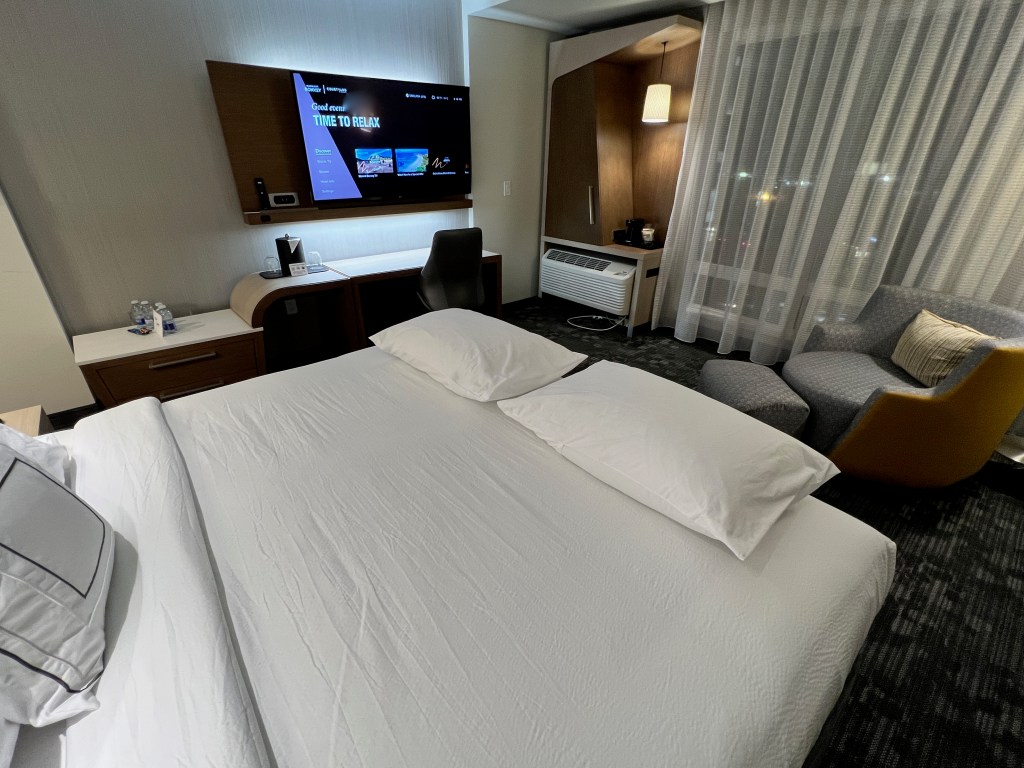
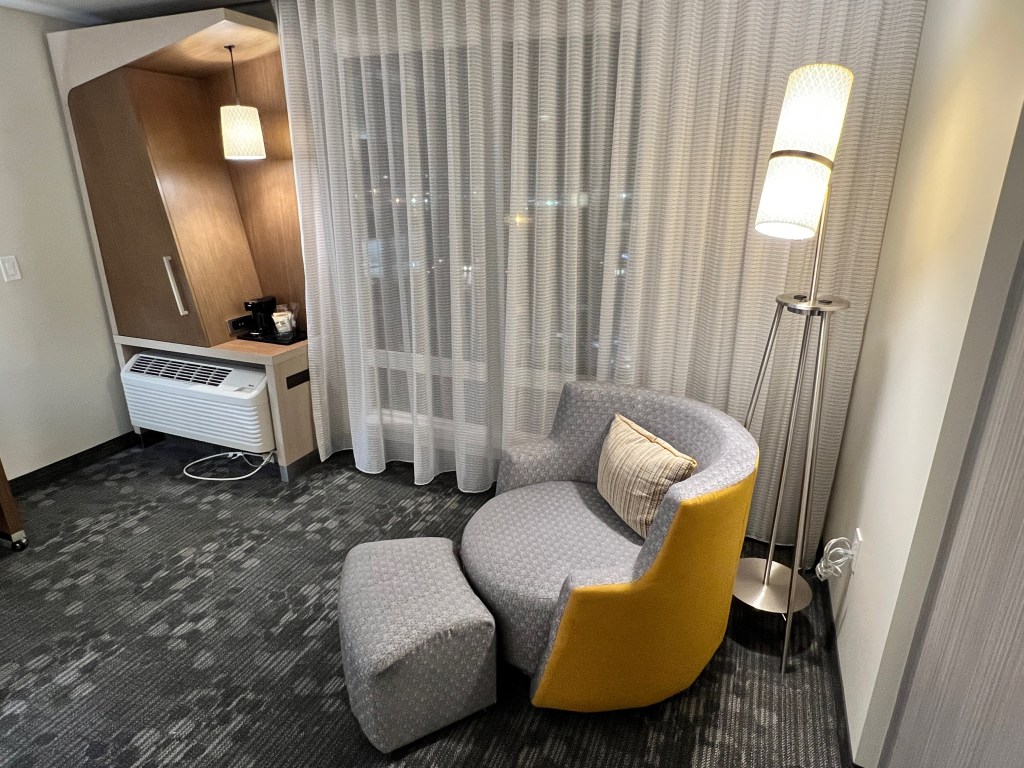
The room offered a rail desk and television workspace. As a result of under television lighting, the workplace was really well lit. Unlike some other desks, the work space was a little light on power ports.
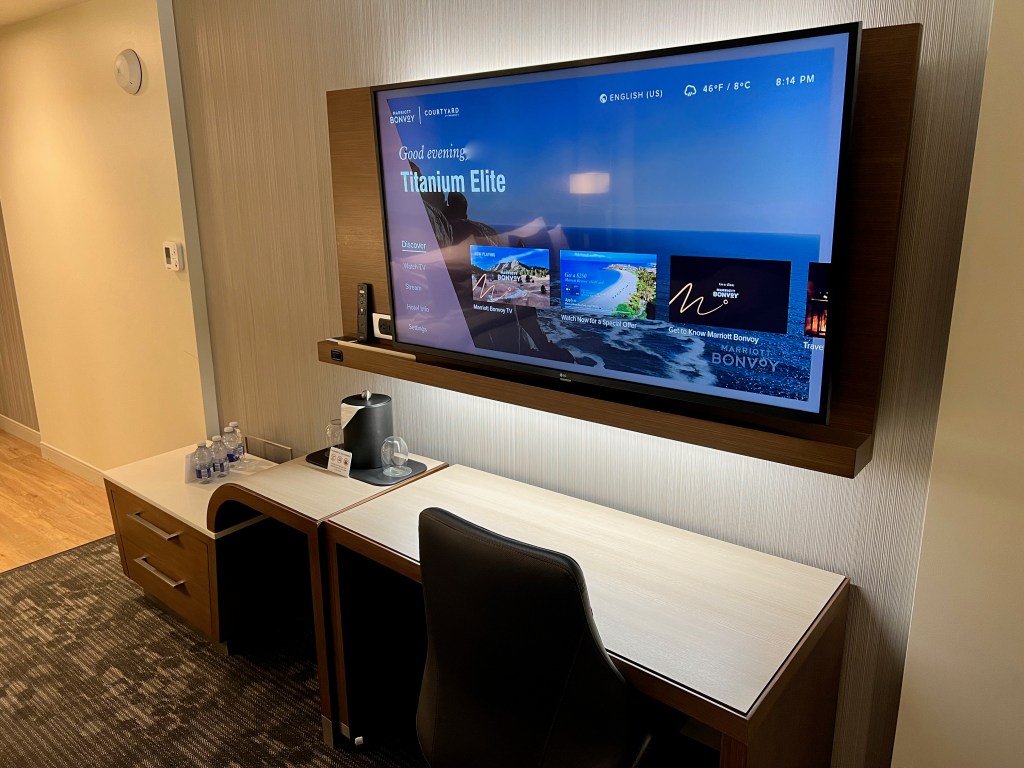
The room featured the typical microwave, un-stocked (empty) mini fridge and an in room coffee maker.


Surprisingly, the room actually featured proper glassware, which is a nice touch for a business traveler hotel. I’ve usually come to expect plastic cups when I stay at the within brand “Four Points by Sheraton” hotels.

While it’s getting more and more unusual for hotels to offer Marriott Bonvoy elite welcome amenties, in contrast to this I received an exceptionally nice note in the room. The note referred to offering a Cedar Bark Rosé, although they must have run out, as all I could locate was two bottles of Eska bottled water.

Still, it was a nice touch for a later arrival.
The Bathroom:
The bathroom was of the standard Courtyard variety. The bathroom featured a single vanity and a half shower without a door.

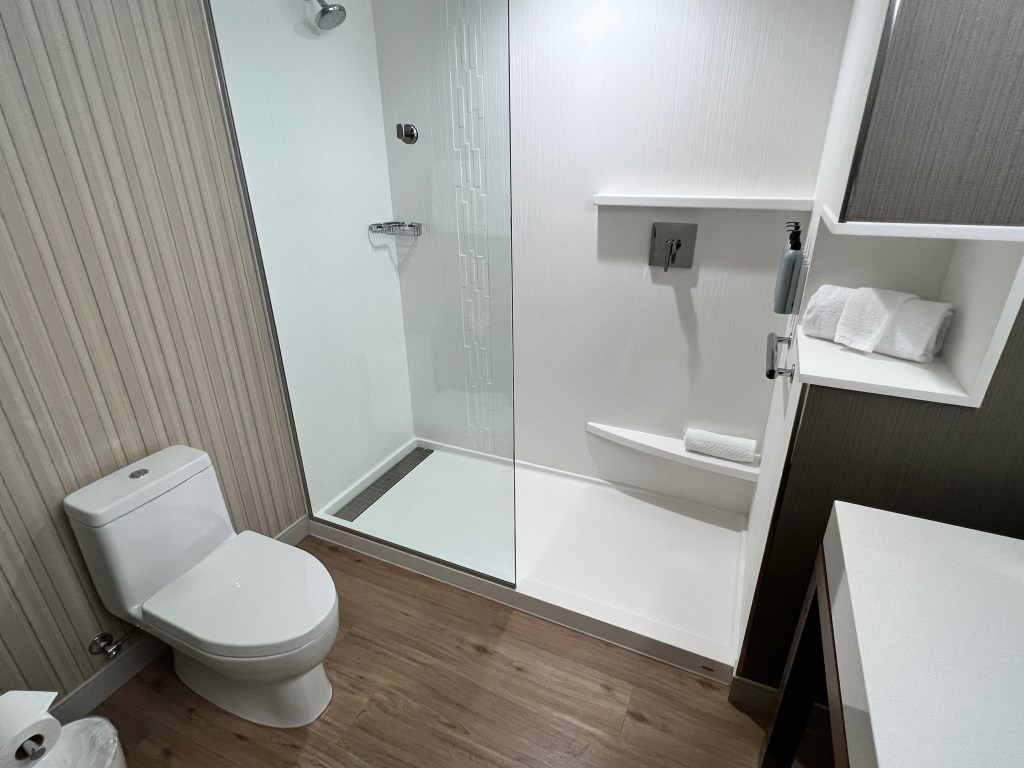
The hotel offers 39 degree north bulk toiletries dispensers in the shower. In the usual business traveler style for middle aged men like myself, it is exceptionally hard to read the contents of each of the toiletries dispensers in the shower as a result of the tiny 12 point font. The contents of these containers isn’t as obvious as it could be. I wish the type was a little larger.
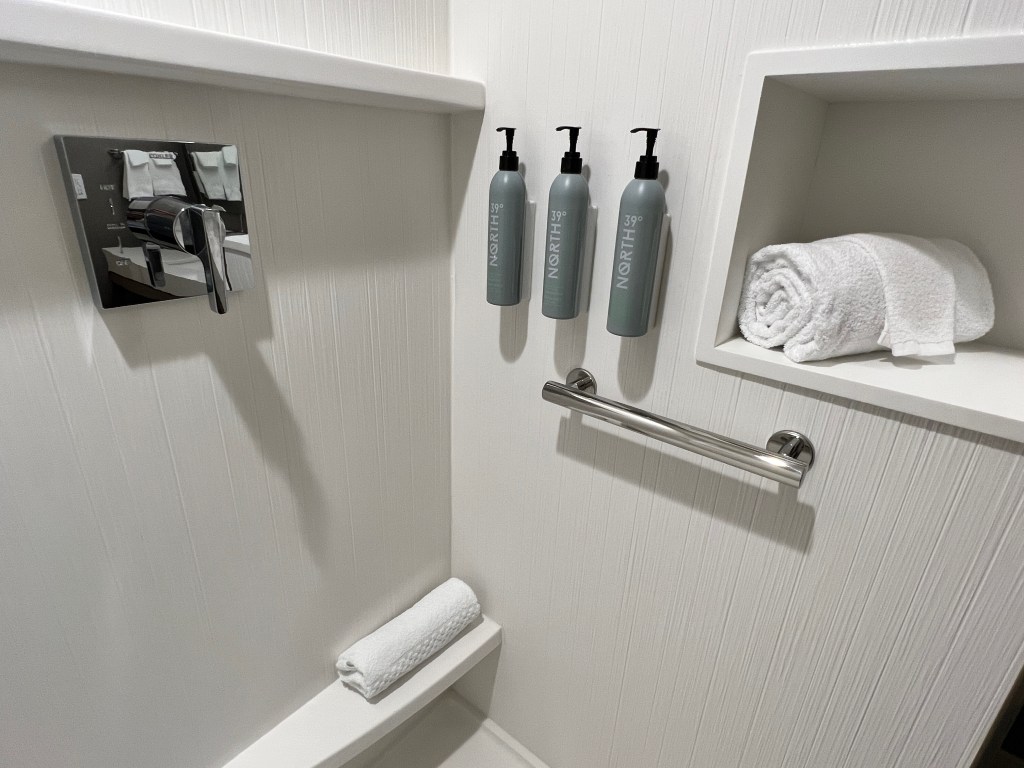
The property floor plan itself is on an “L” shaped design. All rooms have almost the same square footage with a variety of city views. As indicated, there are no suites at the property.

The room itself offered a city view over the rooftops of nearby adjacent Nanaimo casino. The view itself wasn’t super exciting, and was actually pretty dark and dismal. A parking lot view is never usually very exciting.
In terms of sleep quality, I have to say that I had probably the worst night’s sleep I’ve ever had in a Marriott hotel encompassing over 700+ nights. The bed quality was excellent, the neighbourhood was mostly peaceful for an inner city location, but I seemed to have a room that was possessed by a noisy air conditioner that wasn’t aligned with the thermostat.
I always ensure the temperature is set to a comfortable level before I head off to bed. Initially, I set the dial to 22 degree celicus. However, the noisy air conditioner unit was uncomfortably loud. It was loud enough to interrupt a sound sleep.

After about twenty minutes, I ended up turning it off completely. After ensuring that the thermostat was set to “off”, the air conditioner engaged multiple times throughout the night. The noise of the air conditioner was loud enough that it constantly interrupted the sleep quality.

I was up at 2 AM and 3 AM attempting to fiddle with this thing in order to get it shut off, experimenting with different variations of “off” and “auto”. I should have disconnected the power cord to the unit, but I wasn’t thinking that straight in my groggy 3 AM wake-ups before an 8 AM flight home.
Because of the air conditioner, I had a pretty terrible sleep at this property. If I had to stay next time, I’d either test this out several hours before bed, or I’d make sure to unplug the air conditioner unit prior to going to sleep. Neither situation was ideal for time constrained business travellers who are just looking for convenience.
Around the Hotel Property:
The Courtyard by Marriott Nanaimo isn’t considered a full service hotel. As a result, it offers limited amenities.
Fitness Centre – Indoor Pool:
The Courtyard by Marriott Nanaimo offered a small indoor pool. The pool was a little dark. Despite this, it offered a small hot tub area and was modern in appearances.
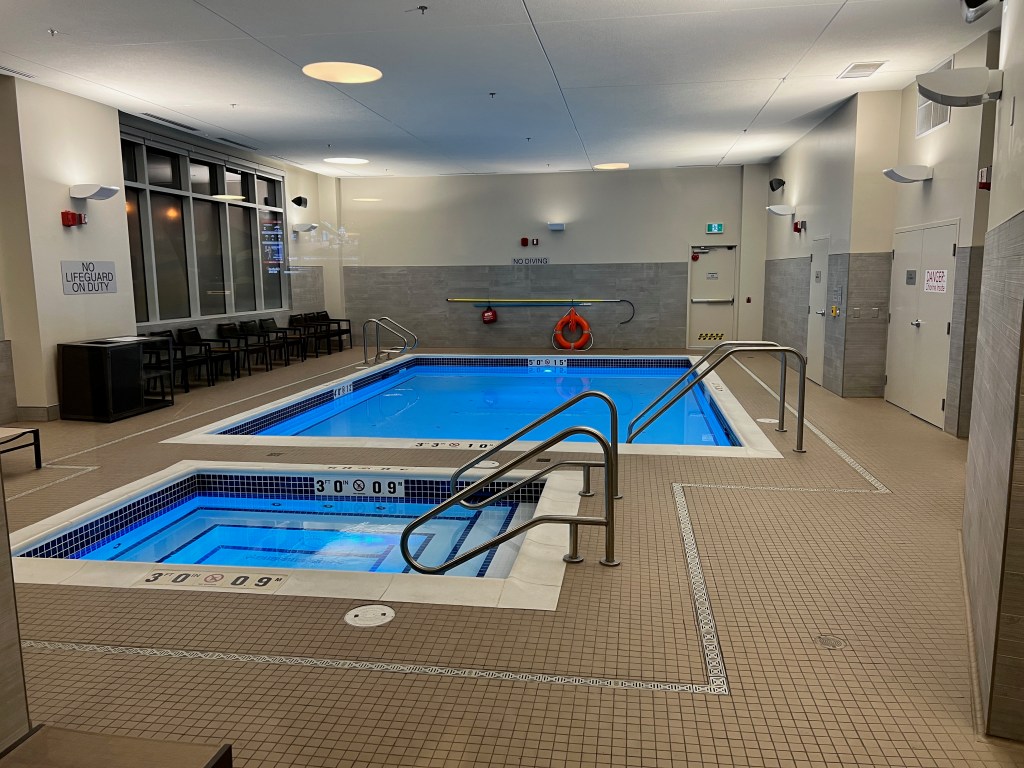
Fitness Centre – Gym:
The hotel also offered a reasonably sized gym and workout space. There were at least four treadmills available, which limited the need for waiting for equipment. I was surprised at the size of the gym, and it was actually larger than what I was expecting for a hotel of this size.

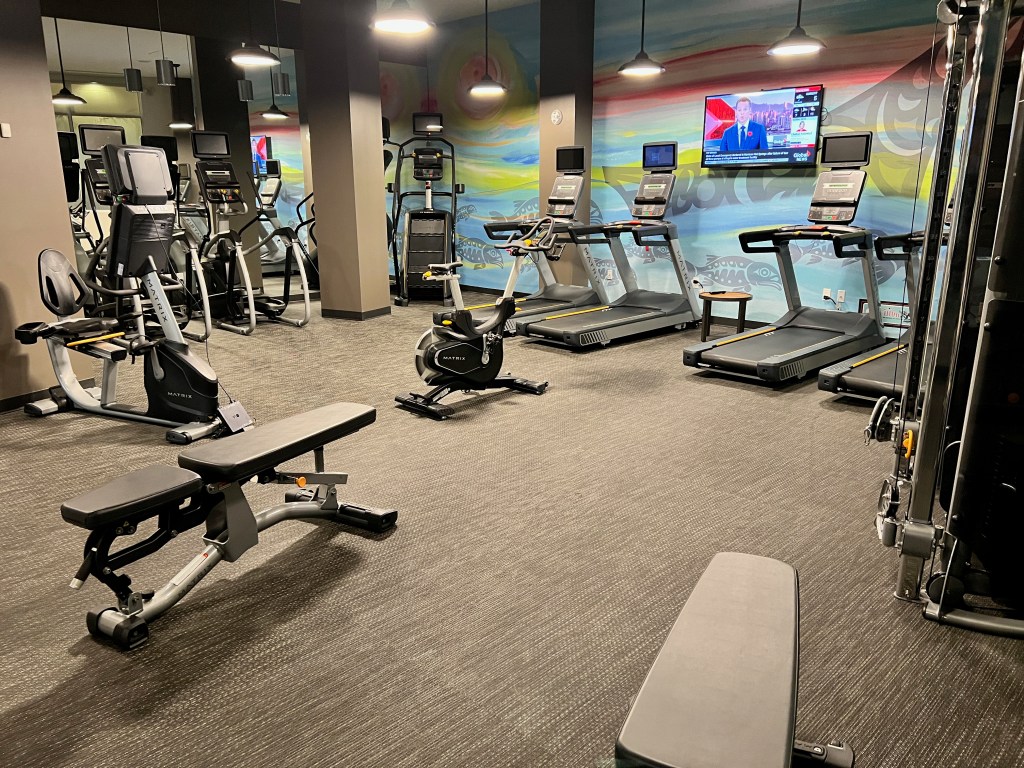
While I didn’t use either the gym or the pool, it’s nice to have an option available to guests.
Food and Beverage:
The Courtyard by Marriott Nanaimo offers a limited Bistro restaurant. The hotel is situated a short walk from a few downtown restaurants, but it’s always appreciated to have an on property restaurant option. I had quite a few issues getting off property food, so I’d strongly recommend the Bistro Restaurant by virtue of convenience.
Bistro Restaurant:
The Bistro Restaurant operates only during meal time hours. During our visit, it was advertised to operate between 06:30 AM and 10:30 AM Monday to Friday, and 7:00 AM to 11 AM on Saturday and Sunday. Evening service is advertised between 4:00 PM to 10:00 PM Monday to Friday and 4:00 PM to 11:00 PM on the weekend. There is no lunch service.
During my Wednesday night visit, the restaurant closed at 9 PM; an hour earlier than posted on the hotel website. This seemed to be a general theme around downtown Nanaimo. Whether dealing with a hotel restaurant that doesn’t align with website timings is only something that you can decide for yourself.
The Bistro Restaurant is located just off the lobby. It is in a bright and contemporary space that is designed for communal gathering.

I do generally find that the Bistro Restaurants in Courtyards by Marriott are over the top expensive for what you get. Even though I was travelling on expense, and having done a little local dining research on google. I ended up deciding that I would attempt to find food located off the hotel property.

The Bistro offers a licensed bar. It was fairly popular amongst business travellers during my week day visit.
Around the Neighbourhood:
Having arrived at about 8 PM, and spending twenty minutes locating parking, I ended up setting out looking for dinner in the neighbourhood at about 8:40 PM. I had researched a number of places nearby the hotel on google, so I figured I would have no issues.
Unfortunately, I was way off on that assumption. Out of about five restaurants in the area, three of them were completely closed on a Wednesday night. I walked over to nearby Melange Restaurant. Melange was advertised on Google as being open until 10 PM. When I arrived at 8:50 PM, I was completely turned away for dinner.
I then tried to hit up nearby Modern Cafe Nanaimo. When I hit up the front door, I actually had the staff member throw the closed sign up on the door when he saw me approaching. I had a brief chat with him but he said the kitchen’s closed; despite google having a 10 PM close sign.
I am really empathic to restaurant owners after having gone through the shock of restaurant ownership during the pandemic, but when you’re turning away business, my sympathies run out.
Knowing that the hotel Bistro restaurant had closed by this point, I had struck out of two out of two restaurants tried, and the three others I had looked at online were also showing as closed, and knowing that I couldn’t get my car out of the garage as I couldn’t get another parking spot, I ended up walking up the block to Wendy’s for dinner. I barely got in there and actually got told to leave from the dining room at 9:20 PM because they too were also closing.
For a hotel that caters to business travellers, it was really inconvenient to get a meal in the nearby neighbourhood. I’d report that if you happen to be arriving here late, don’t expect to find anywhere nearby open to get a meal off property after 9 PM.
Checking Out of The Courtyard by Marriott Nanaimo Hotel:
On departure day, I visited the front desk to check myself out of the hotel.
I had no surprises on the bill with everything “as expected”. The check out was instant and exceptionally pleasant.
I was asked about my stay. I did report to the front desk my challenge with the air conditioner. The front desk did not seem surprised by this comment based on his reaction. However, there was no alternative remedy or good will offered; and nor was I expecting any.
My Marriott Bonvoy points posted to my account within 72 hours as promised.
The Bottom Line: The Courtyard by Marriott Nanaimo Hotel
The Courtyard by Marriott Nanaimo mostly met all my expectations for a business stay.
The Courtyard by Marriott Nanaimo offered brand new accommodations that were located in central Nanaimo. The room condition was brand new and everything was as you might expect for a stay at a Courtyard by Marriott property.
However, the stay wasn’t without its issues. Not having any parking available to guests and having them have to fend for themselves isn’t anything I’ve ever experienced before at a Marriott property. The “in room” air conditioning kept me up most of the night, even though it was “off”. There isn’t much food around the property if you happen to arrive late. While the food availability isn’t within the hotels’ control, it does impact on how convenient a stay is.
As a result, I’d probably give this place a miss next time unless I had no other choice. Either that, or I would arrive much earlier to allow for parking, climate control tweaks and the sourcing of a restaurant.
If you have stayed at The Courtyard by Marriott Nanaimo, did your stay run smoothly ?

Admittedly, this space isn’t really about video games. However, with a mostly welcomed downturn in travel on the road over the past few months, I’ve been spending more time at home; which is always a treat. Inspired by one of my last business work trips that had a family tag on portion to it, I ended up purchasing an Arcade 1Up video arcade game for my house. How would my venture into retro gaming work out?
If you enjoyed this post, please follow us here or on social media through Facebook, Twitter “X” or Instagram for more travel tips and hacks on how to “Upgrade Your Travels”.
Review: Arcade 1Up Class of 81 Deluxe Arcade Game – Ms. Pac Man / Galaga
For something completely different, I decided to step into the world of retro gaming. Since I’ve had the summer mostly at home, and not constantly on the road in hotels, I’ve decided to slowly wander into the world of retro gaming.
What is Arcade 1Up:
Arcade 1Up has developed a replica video game concept that gives people the ability to replicate a miniature arcade game in their homes. The company has developed computer hardware that replicates video games with modern components.
The company is a subsidiary of Tastemakers and was developed to address the retro-gaming market. Although the Arcade 1Up company has only been around since 2018, the company has reportedly sold almost four million units of these games. With numbers like that, they are likely around for a foreseeable future.
Getting Interested in Arcade 1Up:
This story all started when I ended up visiting my brother in law in London, Ontario, Canada. During that time, we ended up visiting The Tilt Arcade Bar in downtown London. His son, who was fifteen at the time, ended up being a retro arcade gamer. Over a few visits, I really got immersed in re-visiting all the old legacy arcade games from the nineteen eighties.

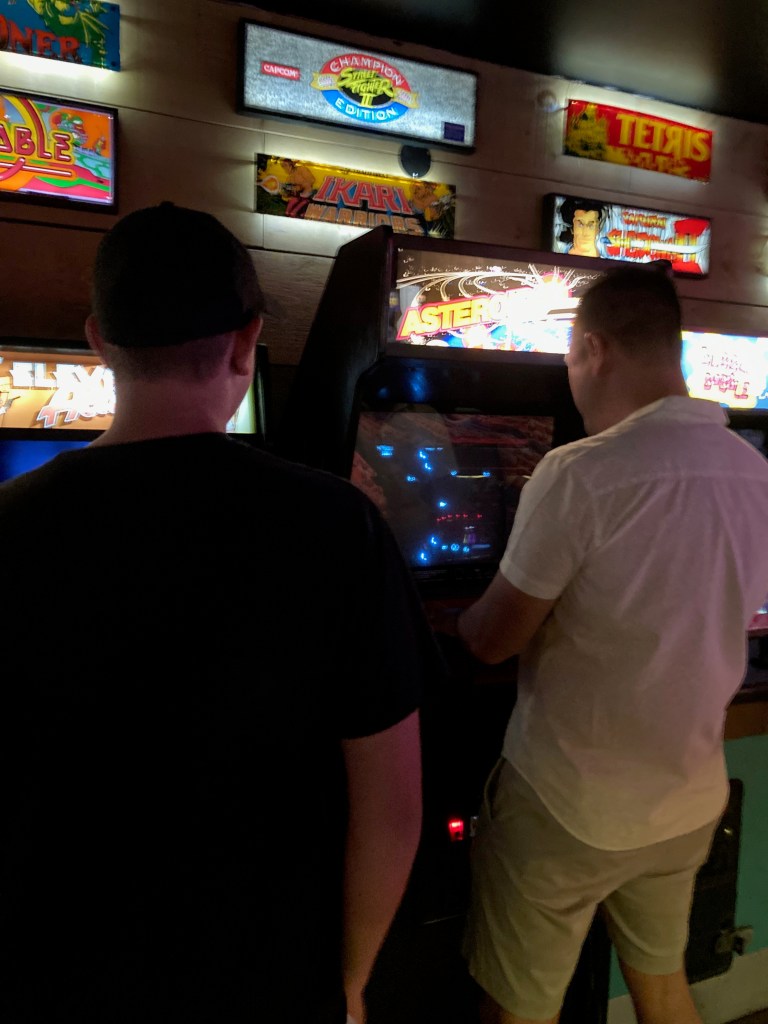
It is quite a feat to manage a modern arcade and I wholly took it for granted while I was there. Most of these machines are almost forty years old, with components that are almost completely obsolete. Most of the cathode ray tube monitors that were initially installed in these machines have long past their useful life. Any arcade manager would have to be an expert electrician handy man in order to keep these games running.
It’s fair to say that I spent a little time at The Tilt Arcade Bar. I don’t think MrsWT73 actually got to see me at all during the two and a half hours that I was there.

When we finally got over to nephew in law’s his house for a family visit, I was a little surprised to see brother / nephew in law had an Arcade 1Up Mrs Pac Man Classic machine in the basement. I tried. it out and I was pretty hooked from that point on.
Buying Arcade 1Up:
Finding a Store:
After some intensive research on You Tube and Reddit, I decided after a few months to go ahead and pull the so called “arcade trigger”. The Arcade 1Up distribution channels are pretty strong; games are available directly from its website, or through retailers across Canada, the United States, the United Kingdom and Australia. Retailers in North America include Target, Walmart, Amazon, BestBuy and Costco (on a limited basis).
Based on my experience, retailers in Canada did not have many display models up for testing. Rather, you’d have to order online and have the items shipped directly to house or shipped to store. I was able to see some comparable models at the Brick furniture warehouse under different titles.
I also found that Canada also received titles about six months after they were launched in the United States. For example, the Class of 81 which launched in April 2023, was only making it to Canada retailers in September 2023; over 6 months later. Arcade 1Up doesn’t always give love to this smaller market.
Getting the Best Price:
The price point of these items is between $600 CAD and $800 CAD, depending on the make and model of the games. Pricing in the United States was actually more expensive in terms of a value proposition, with games at around the $499 USD price point (works out to about $675 CAD).
I found the price point to be relatively stable for the most part with the same pricing across the stores. I did notice that theArcade 1Up website priced in USD, but had a floating conversion to Canadian dollars making for a little bit of variable pricing happening if purchased from Arcade 1Up directly.
There were many reports in the United States of consumers being able to get these cabinets on sale after they had been sitting on shelves for a while. With an almost non existent supply chain in Canada, this wasn’t my experience. There seemed to be so few units for sale that getting anything on sale wasn’t all that likely. However, you may have an opportunity if there exists a lot of stock in your particular neighbourhood, so waiting for a sale is always a good idea, assuming your patience allows for it.
Lastly, there have been complaints about the rising price of these video games from when they were initially introduced. Each game requires Arcade 1Up to supply a LCD monitor, a small computer, a cabinet and pay the arcade licensee a licence for each game. As a result, it’s not a cheap experience and there are some fixed costs on the part of Arcade 1Up.
Deciding on a Classic / Deluxe or / XL:
In a confusing product line up, Arcade 1 Up offers Classic, Deluxe and XL models. The Classic version are about 4 feet tall, and may or may not be sold with a shoe box riser. The riser creases the side profile of the game, as it appears that the game is sitting on a cardboard box. The newer version(s) are marketed as “deluxe” that offer a full five foot in height, and look more like a 75% scale video game. The Deluxe models do not feature a riser. At the time of writing, there is only one XL version out exclusively marketed through Costco under the Pac Man title. It remains to be seen whether this expands into other titles..
With an odd supply chain methodology, Arcade 1Up appears to make a version of a game with production of a batch of units. After the game runs out, the title may go off line for a number of years. There does not always appear to be a steady state for some of the more obscure titles. For example, Frogger Classic was released about five years ago in 2018, has sold out, and hasn’t returned to sale date. Without a ready supply chain of the products, you’ll have to be decisive if you’re looking to buy something specific.
A thin ninety day warranty is offered by Arcade 1Up. A warranty extension to one hundred and eighty days was offered when I linked my arcade machine to the Arcade 1Up server through the QR code on final installation. Although, I didn’t get a copy or notice of this anywhere other than from a pop up screen on the Arcade 1Up smartphone app.
Clicking Through to Purchase:
I ended purchasing online through the BestBuy Canada accessed through the Aeroplan E Store. While I attempted to get 4 Aeroplan points per dollar, the category of the games did not qualify for points earning under Aeroplan’s terms and conditions. I should have purchased the game through Rakuten instead, and would have at least earned 1% cash back.
I ended up paying $649 CAD for one of the first 9 Arcade 1Up Class of 81 Deluxe units available in Canada at the very start of the product cycle two days after the Canadian launch date. Shipping was free for orders over $35, and my machine would end up shipping from Orelans, Ontario by Fed Ex Ground. It would take five days for the machine to arrive, although it was promised on the BestBuy website in 7-9 days. There were no local stores offering pick up of the items, so I was unable to drive to a local store for cash and carry.
UnBoxing an Arcade 1Up:
The machine arrived to the house and required a signature on delivery. Much like a piece of Ikea furniture, the machine is completely flat packed and you need to assemble it yourself.
Checking for Damage:
I had read reports of machines getting damaged during shipping, so I made sure to really check the box for any signs of damage. Damage included the possibility that Clicking to Purchase: panels inside the box may be scratched, dented or mangled. This would retract from the look of the machine and the retro statement it’s going to make wherever you display it.
My box had a little cover based damage. Fortunately, Arcade 1Up must have taken better care at packaging all the parts since the first generation. Once I opened the box, it was damage and mark free. If you purchase an item from the store or online, I recommend that make sure that you check for damage, before accepting the unit.
I dragged this 81.3 lbs (36.7 kg) box downstairs to get ready for the build. Much like a piece of software that can be copied, there were warning labels to call Arcade 1Up for any customer assistance after you got the box open.

Building an Arcade 1 Up:
The Arcade 1Up machines are flat packed with a lot of components squished into the box. I have purchased quite a few Apple products over the years. Receiving and opening an Apple product is a enjoyable experience itself that oozes refinement, excitement and elevated class.
Unboxing the Machine:
Unboxing anArcade 1Up machine is arguably at the very other end of that spectrum, and you’ll find yourself sorting through various boxes, cello wraps and other styrofoam bits in a wholly functional manner.
About ten percent of the build time was unboxing all the items and removing all of the cardboard, shrink wrap, and setting out all the components.

Similar to an Ikea build, all pieces are articles are numbered and easily marked. Even the usual wooden dowels made an appearance.
The instructions are really straight forward. It is clear from the build and the dowels that the machine will not stand up to substantial abuse. I wouldn’t leave this machine in a public place, or even a teenager’s room with out expecting some structural or electronic headaches to come your way.
Assembling the Arcade:
This Arcade 1Up Class of 81 Deluxe had twenty two individual arcade pieces that I promptly laid out on the carpeted floor. I’d recommend that you have a carpeted or smooth floor for assembly, instead of a wooden or tiled space, as you’ll be spinning around on your knees as you piece together the various parts of this machine. There are a few “on it’s side” assembly points, and having a jagged floor could potentially scratch those retro graphics on the side of the game itself.
I took about two hours and forty minutes to fully complete the build. I intentionally didn’t rush this, although it took the full evening after I had finished dinner (and the dishes). I had read reports of people completing these in a little over an hour. However, being my first build, I took my time and make sure everything was carefully lined up.
Building this was much like building Lego sets with my son, although in a slightly larger and bigger context. The excitement of seeing it all come together was there, and it was a fun experience.
Each piece is smartly identified with a letter decal that faces inward and doesn’t show outward on the machine. This allowed for some time savings, so you didn’t spend a lot of time having to peel markings off the machine once assembly was complete as all the letter stickers faced inside.
On the build itself, there were a few oddly designed screw angles. The assembly where I had to secure the monitor to the side of the arcade was probably the worst, as the design of the build didn’t allow to get a clean and straight angle in inserting the screw. Keeping in mind that you are screwing into fibreboard, I wanted to take a lot of care so that the machine wouldn’t end up with stripped screws and would fit together at correct angles.
I was initially a little horrified when I saw that lit up marquee on top of the machine. Arcade 1Up has received a lot of criticism about the quality of their marquee as they have been known to wash out or allow a lot of light through them that fades the black or other colours. There has been so much criticism, there are independent online stores that sell replacement versions for hard core gamers.
Checking for Quality Control:
When I popped open the marquee, I was a little disappointed to see a whole bunch of micro scratch markings over the front logos of the marquee. Fortunately, this turned out to be just protective film. Once the protective film was peeled off, the marquee looked like gold.

Eventually this thing took shape, and started to look like a real three quarter arcade cabinet. While I didn’t need two people to complete the build, having a second person around when I tipped this upright gave me some piece of mind since it was light screws and dowels holding this thing together.

A Final Inspection:
Once upright, the five foot tall machine looked like a great arcade cabinet that was very true to life and form of those arcade machines I used to play at Rico’s Pizza Parlour in Bellingham, Washington State, USA when I was growing up in the eighties.
The Class of 81 Arcade is split into two colour schemes. With a sharp Galaga black on one side, it has a bright blue Ms PacMan on the other side. I was quite attracted to the bright blue, as it really set the machine apart from many other stand up arcades and even the original Ms Pac Man machine, which was black and pink coloured.

Initially, MrsWT73 didn’t share my enthusiasm for the bright colours of the arcade cabinet. Her initial impression when she walked downstairs and saw this contraption in the middle of the living room floor was an expression that I’ll surely remember for quite some time. Fortunately, there were no comments or other “directives” that came, and she’s been really supportive so far.
With perhaps a little lack of refinement on the arcade assembly instructions, the sequence of instructions directed the removal of the protective film from the monitor as a very last step once the machine was upright. As a result, I ended up with part of the protective film trapped between the monitor and the cabinet build, resulting in this unsightly film that I’ll need to get rid of somehow with tweezers or some similar tool.
This was a bit high on the “pain in the rear” factor, since I’d have to disassemble the whole thing in order to fully get this film off. It wasn’t like an Apple product, where we have come to expect exceptional refinement with everything on the way it was put together.
Game Play on the Arcade 1Up:
After assembly, the machine started on the first attempt. The machines connect to home wifi for online leaderboard scores. After a small scramble to locate my home wifi password, the machine connected without any issues. Upon connection there was an immediate software update.
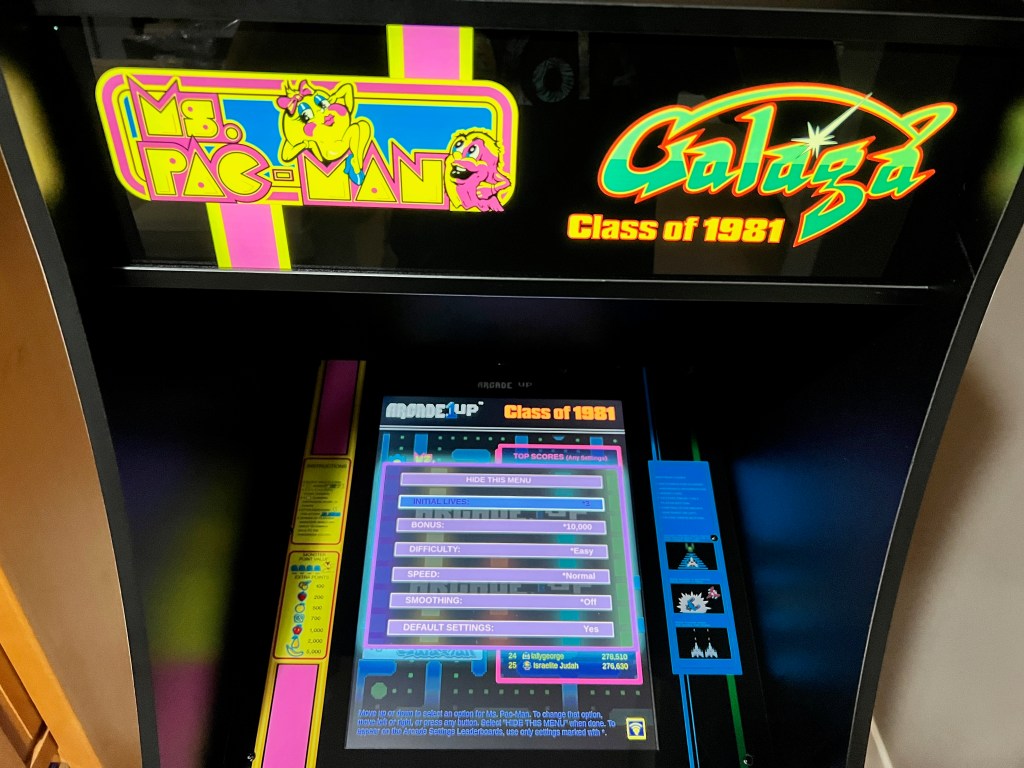
This particular unit offers twelve different games that a player can toggle through to select. The games included on the Arcade 1Up Class of 81 include:
- Ms PacMan
- Dig Dug
- Dig Dug 2
- Galaga
- Galaga 88
- Galaxian
- Mappy
- Rally-X
- Rolling Thunder
- Rompers
- Tower of Druaga
- King and Balloon
Configuring Game Settings:
Each game allows for individual settings of difficulty, initial lives and pixel smoothing. No quarters are required, and each setting retains an individual high score. For example, you’ll have a high score setting for an Easy Ms Pac Man and a Fast Ms Pac Man setting. The online leaderboards motivate players to chase high scores, and this is a great feature for gamers to keep them engaged.
Testing the Game Play:
It is fair to say that the games are very true to live. It was just like I remembered it in the full arcades about forty years ago. It is easy to toggle between games, and the lag time between software game loads is pretty minimal (5-7 seconds).

In terms of the joystick and button components themselves, the component to feel a little cheaper than the version used in the actual arcade games. This extended right down to the feel of the stick being less responsive and “tight” compared to what I remember back in the actual physical arcade games, and the buttons being a little softer and less responsive on tactile feed back.
While there are upgrades available for these buttons and joysticks, it is a shame that they don’t come with better components right out of the box at this particular price point. I’d certainly be willing to pay for an extra $30 to $50 for better components right up front.
A Few Refinement Imperfections:
I have been using the cabinet for about a month now on a daily basis. In other minor refinement annoyances, the joystick ball seems to want to rotate off the metal stick with regular usage. This means that some of the game between levels, you end up screwing the thing back on; which is distracting.
As a recently turned fifty year old man, it’s fair to say that I don’t put a lot of abuse into the machine unlike teenagers from the local arcade. I’ve ended up going online looking for solutions which has recommended using pliers, Teflon tape or Loctite (not recommended by some due to possibility of expansion and the joystick ball splitting). It’s a little surprising to see that they haven’t perfected this for a standard product with normal adult usage.
Despite these imperfections, I’ve really enjoyed having this thing in my basement. It’s great to be able to bounce downstairs and play a few video games. With smartphones having multi applications on it, having a retro arcade that only places one game (or twelve games in this case) is a truly unique throw back to the eighties. I just wish the refinement of the product would involve slightly higher quality components, build factor, and better product build overall.
My Thoughts on Class of 81 Arcade Game:
The Arcade 1Up Class of 81 is a great concept that allows for retro gaming to occur in your own home. For a child of the eighties like myself, it ‘s the perfect balance between retro and modern convenience.
The arcade was reasonably easy to set up, and so far I am getting a lot of enjoyment out of it. My only concerns are that the quality of components isn’t what I might have hoped. In addition, there seems to be a lot of concerns online about the sustainability of this product. I have to admit I am already experiencing some of these issues myself.
Here’s to hoping that I get a long life out of this neat machine.
If you’ve purchased an Arcade 1Up Video game for yourself, how has your experience been ?

Alaska Airlines offers connecting service from Seattle Tacoma International Airport to our home gateway of Bellingham International Airport. With a small Embraer 175 and a short flight time of twenty two minutes, we weren’t expecting all to much on our short hop up to Bellingham. While it is such a short flight, it is great that Alaska Airlines offers a First Class Cabin on a short regional flight.
This post is one chapter on my trip to the Big Island of Hawaii, United States of America. This trip was enhanced through Marriott Bonvoy Elite Status, Alaska Airlines Mileage Plan and Hertz Gold Plus Rewards. For more information on how this trip was booked, please see our trip introduction. For other parts of the trip, please see this index.
If you enjoyed this post, please follow us here or on social media through Facebook, Twitter “X” or Instagram for more travel tips and hacks on how to “Upgrade Your Travels”.
✈️ Read more from this trip:
- Introduction: Hawaii Five – Oh. A Fiftieth Birthday in Kona, Hawaii, USA via Alaska Airlines First Class
- Alaska Airlines First Class: Bellingham – Seattle
- Alaska Airlines First Class: Seattle – Kona
- My Experience Renting with Hertz President’s Circle: Kona, Hawaii, USA
- The Westin Hapuna Beach Resort, Kona, Hawaii, USA
- Climbing in Hawaii’s Volcano National Park, Big Island, Hawaii, USA
- Exploring Nāhuku Lava Tubes, Hawaii Volcano National Park, Big Island, Hawaii, USA
- Restaurant Review: Café Pesto, Hilo, Hawaii, USA
- Restaurant Review: ‘ULU Ocean Grill, Four Seasons Hualalai, Kona, Hawaii, USA
- From Sea Level to 13,845 feet: Driving Up to Hawaii’s Big Island Observatories
- Swimming with Manta’s: The Big Islands’s Manta Rays up Close
- Alaska Airlines First Class: Kona – Seattle
- Alaska Airlines First Class: Seattle – Bellingham
Review: Alaska Airlines First Class E175: Seattle Tacoma International Airport – Bellingham International Airport
This flight was purchased through an Alaska Airlines Famous 2 for 1 Companion Fare. We purchased this flight in upgradable space and received an upgrade to First Class at the time of booking. We credited these flights to Alaska Airlines Mileage Plan.
Connecting through Seattle Tacoma International Airport:
We arrived into Seattle Tacoma International Airport on Alaska Airlines First Class Kona – Seattle. I was pretty bagged after this overnight flight that featured recliner First Class seats. As a result, I didn’t get a super deep sleep and was a little artificially delicate.
We had a long layover of five hours, which we killed off at the American Express Centurion Lounge Seattle. Access was provided courtesy of our American Express Platinum Card. As a were flying on an Alaska Airlines upgraded ticket, we did not have access to the Alaska Lounge Seattle, which is reserved for membership holders or fully paid Alaska Airlines First Class travellers (not on upgraded tickets like ours).
Our flight was departing from Alaska Airlines commuter gates at the C Concourse. There are a number of these gates here, and it’s always a congested mess whenever flights are set up to depart. It’s pretty typical that most travellers stretch over the entire concourse, making this place one to avoid unless you actually happen to need to be here.
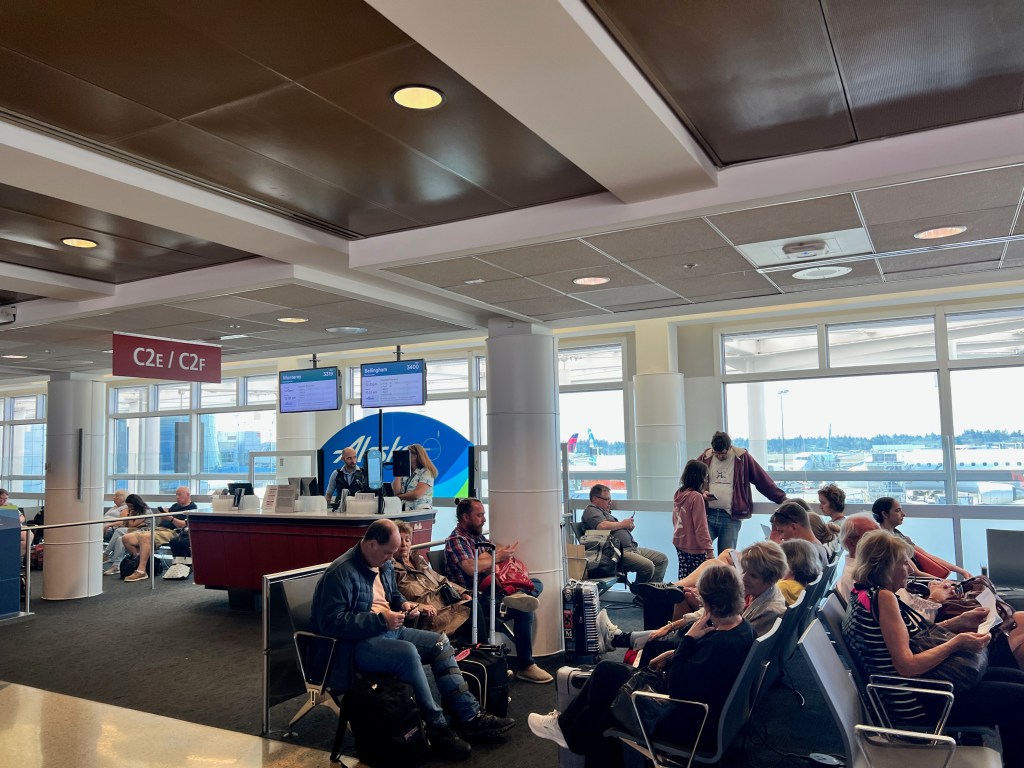

Boarding Alaska Airlines:
We were eventually given the green light to board. We wandered down the walkway, passing by this very coll retro livery Alaska Airlines Horizon Embraer 175 like the one that we were flying.

We eventually got to door #5, which was located at the end of the walkway. Although we didn’t have the exceptionally cool oranges of the seventies on our place, we had the familiar Alaska Airlines blue with Horizon markings on the aircraft.

Alaska Airlines – Operated by Skywest
First Class (U)
SEA – BLI (Seattle Tacoma International Airport – Bellingham International Airport)
AS 3400
August 14, 2023
Booked: Embraer 175
Flown: Embraer 175
Departure: 12:25 PM
Arrival: 1:15 PM
On Board Alaska Airlines First Class:
As we arrived on board, we settled into Alaska Airlines Embraer 175 First Class Cabin.
The Alaska Airlines First Class cabin on the Embraer 175 is set up in a 2 -1 configuration. The seat is relatively spacious for a short flight that is under three hours. Today’s flight was under thirty minutes, so we would have no complaints.

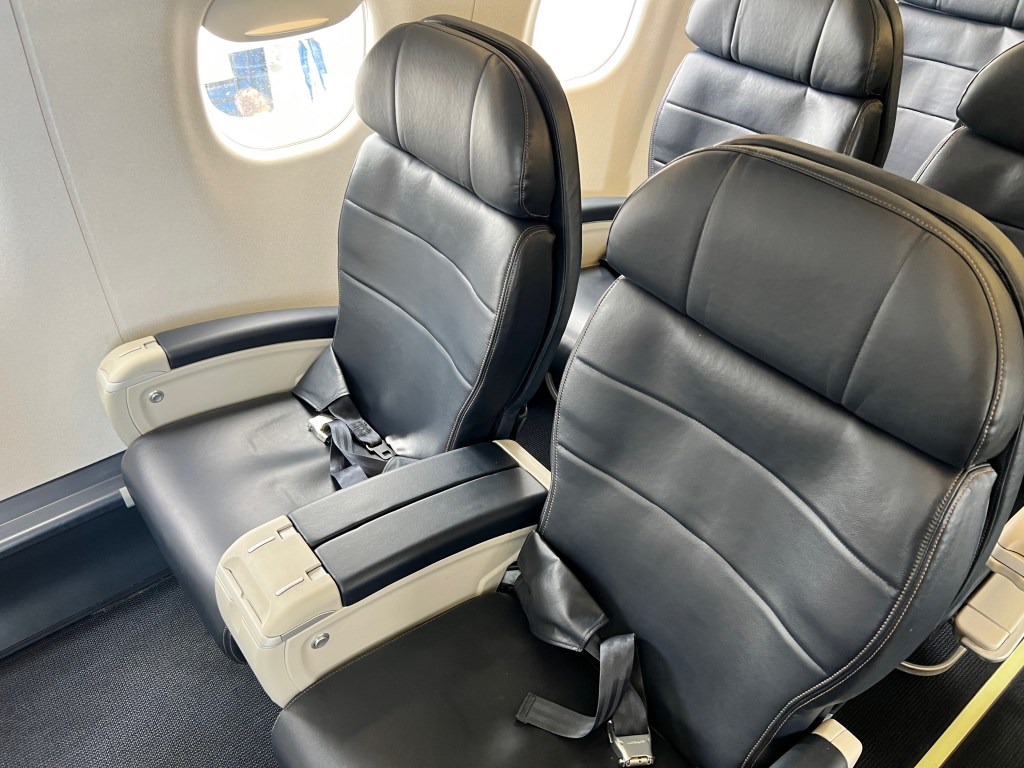
If you can live without under seat storage in front of you, the bulkhead offers the most available leg room.

The Embraer 175 has one row of seating on the left side of the aircraft. These are the best seats if you chance to be travelling alone, but I typically feel a little exposed in them.

Despite their being fewer windows along the sides of the aircraft in the Embraer’s, the large portal windows provide a significant quantity of light into the cabin.
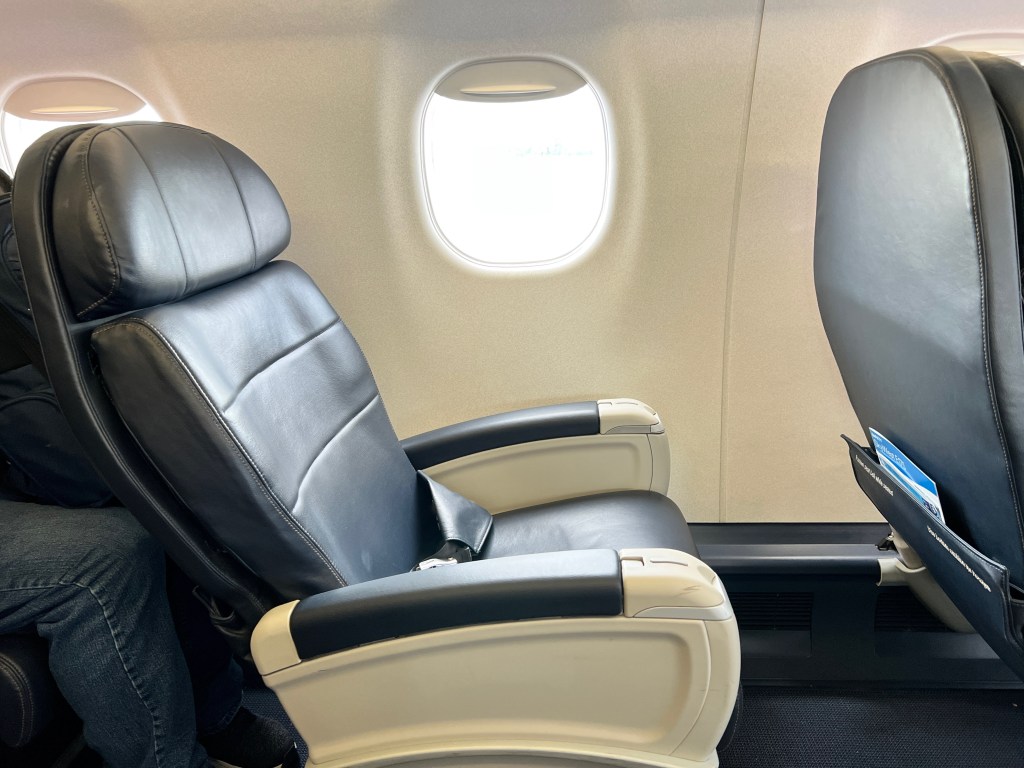
The Alaska Airlines seats do not offer an in seat back monitor. For a brief flight, Alaska Airlines First Class also provides adequate leg room.
Pre-Departure Services:
It is a bit hit or miss getting a pre – departure beverage on Alaska Airlines. In the case of this short commuter flight, there wasn’t even a hint of any beverage being offered at all.
In Flight Entertainment:
Like many other flights, Alaska Airlines offers in phone flight entertainment. This is accessed through the Alaska Airlines home page on the wifi sign in screen.
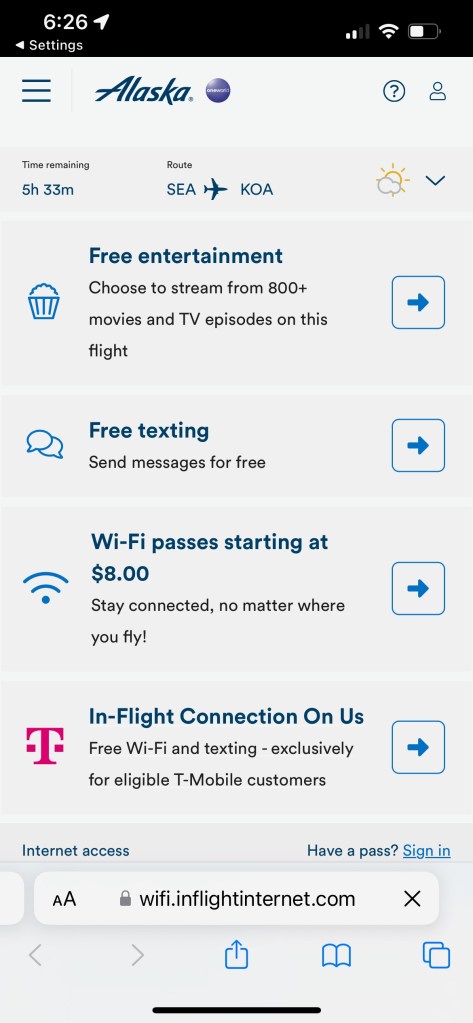

Alaska offers free messaging. I did find that on Embraer flight that Alaska Airlines offered a smaller in flight directory of movies. As a result, I couldn’t finish watching the Hawaii themed “The Descendents” on my short flight home.
Food and Beverage:
Alaska Airlines does not provide any food or beverage service for this brief 26-minute flight, similar to many of its other brief flights.
I can’t really hold Alaska Airlines responsible for this segment’s lack of food and drink options. Given the limited time on board, serving a large number of people is pretty challenging.
Arriving into Bellingham International Airport:
With a brief twenty two minute flight, we arrived up to Bellingham International Airport really quickly. We had great views of Mount Baker on the approach, which was looking great in the late summer weather.

We arrived to Bellingham International Airport where the air ramp was brought. upto the aircraft. We disembarked and collected our lone checked bag right at the 20 minute Alaska Airlines Baggage Guarantee mark.
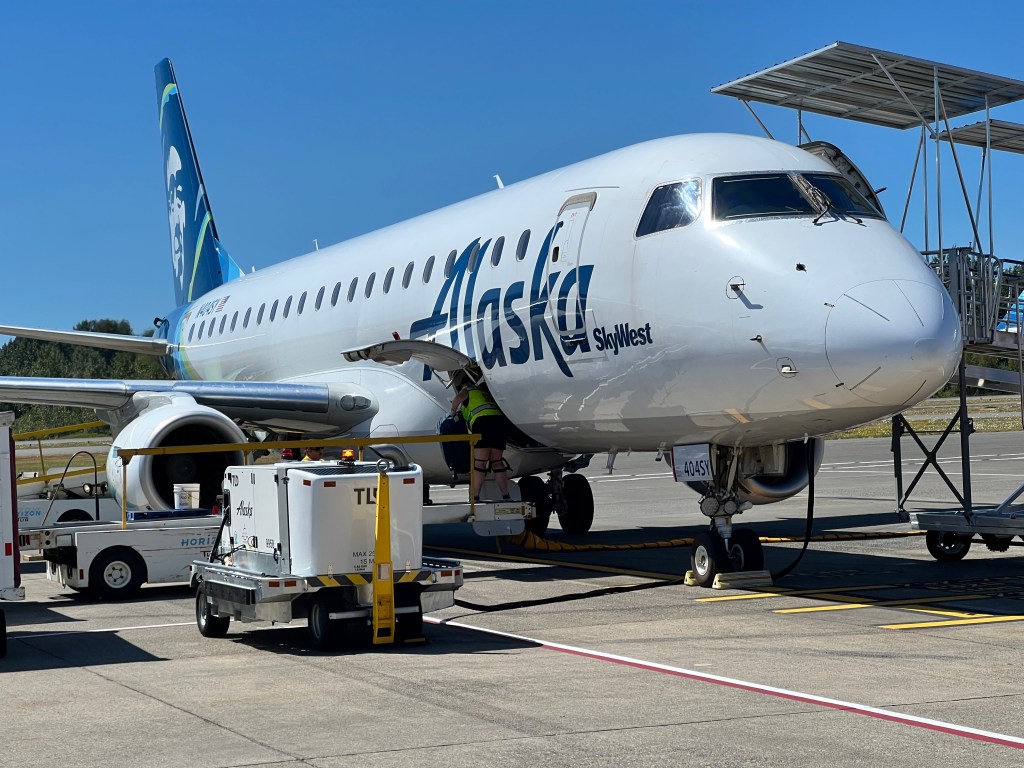
With a short visit to Costco Bellingham, we were on our way up Interstate 5 and home within thirty minutes.
My Thoughts on Alaska Airlines First Class:
Alaska Airlines First Class service between Seattle and Seattle was pretty simple. With no additional services onboard, the benefits were limited to priority services on the ground, a. few extra Alaska Airlines Miles for paid First Class tickets, and being among the first off the plane.
Do you aim to fly in First Class on your short connecting Alaska Airlines segment ?

Alaska Airlines has among the most frequent flights from Hawaii to the Mainland United States of America. Tonight’s flight would have us returning to the Mainland from Hawaii in Alaska Airlines First Class from Kona to Seattle in Alaska Airlines Boeing 737-900 series product. It has been quite some time since we’ve flown Alaska Airlines First Class overnight coming back from Hawaii and I’d remember that the First Class Seats are less comfortable than I remember. Although better than economy class, the First Class services were about “as expected” for this segment.
This post is one chapter on my trip to the Big Island of Hawaii, United States of America. This trip was enhanced through Marriott Bonvoy Elite Status, Alaska Airlines Mileage Plan and Hertz Gold Plus Rewards. For more information on how this trip was booked, please see our trip introduction. For other parts of the trip, please see this index.
If you enjoyed this post, please follow us here or on social media through Facebook, Twitter “X” or Instagram for more travel tips and hacks on how to “Upgrade Your Travels”.
✈️ Read more from this trip:
- Introduction: Hawaii Five – Oh. A Fiftieth Birthday in Kona, Hawaii, USA via Alaska Airlines First Class
- Alaska Airlines First Class: Bellingham – Seattle
- Alaska Airlines First Class: Seattle – Kona
- My Experience Renting with Hertz President’s Circle: Kona, Hawaii, USA
- The Westin Hapuna Beach Resort, Kona, Hawaii, USA
- Climbing in Hawaii’s Volcano National Park, Big Island, Hawaii, USA
- Exploring Nāhuku Lava Tubes, Hawaii Volcano National Park, Big Island, Hawaii, USA
- Restaurant Review: Café Pesto, Hilo, Hawaii, USA
- Restaurant Review: ‘ULU Ocean Grill, Four Seasons Hualalai, Kona, Hawaii, USA
- From Sea Level to 13,845 feet: Driving Up to Hawaii’s Big Island Observatories
- Swimming with Manta’s: The Big Islands’s Manta Rays up Close
- Alaska Airlines First Class: Kona – Seattle
- Alaska Airlines First Class: Seattle – Bellingham
Review: Alaska Airlines First Class B737-9: Ellison Onizuka Kona International Airport at Keāhole – Seattle Tacoma International Airport
This flight was purchased through an Alaska Airlines Famous 2 for 1 Companion Fare. We purchased this flight in upgradable space and received an upgrade to First Class at the time of booking. We credited these flights to Alaska Airlines Mileage Plan.
For the outbound flight, please see our review Alaska Airlines First Class Seattle – Kona.
Checking into Alaska Airlines First Class:
We departed The Westin Hapuna Beach Resort and arrived to the airport by Hertz Rental Car Kona. We returned the vehicle after a week’s use and took the rental car shuttle over to the airport.
Kona International Airport is mostly an open air operation. In some ways, it reminded me of the Rapa Nui International Airport on Easter Island with it’s open air lobby and departure zones.
With a short line at the Alaska First Class Check In Line, we just opted for the empty kiosks in order to process our bag tag. We checked in online using the Alaska Airlines App, and already had assigned seats in First Class on this flight to Seattle and on our second flight Alaska Airlines First Class Seattle – Bellingham.
A friendly Alaska Airlines agent helped us affix our bag tags to the checked bag. After a short baggage weigh, gave our bag front of the line service to be dropped off. We had no issues with the bag being over the fifty pounds weight this time around.

We had a short line at TSA Pre-Check and proceeded over to the secure side of the airport. The Hawaiian Airports (among some others) always prominently display the Flag of Honor that represent all the lives lost in the 9/11 attacks, including a list of Hawaiian Purple Heart recipients right next to it. The Flag of Honor is a unique part of travelling within the United States of America, and isn’t something that is at every security check point (especially international security connecting ones).
Once on the secure side, we wandered down to our gate. All of the gates are outside and do not have any air conditioning to keep you cool. It is also worth mention that Kona International Airport does not have any lounge facilities branded with any carrier or accessible through Priority Pass. As a result, you’ll be outside along with your fellow passengers in the departure lounge.

Aside from sitting in the departure lounge, there is a small restaurant with about twenty seats, a small news stand that was smaller than my living room at home and, aside from some sponsored free wifi, there was not much else in order to keep you entertained.
From the departure lounge, you can spot the aircraft on the apron outside.


Boarding Alaska Airlines:
Alaska tends to board it’s planes early, or right on the time printed on their boarding cards. This flight was no exception. Our flight was promptly boarded with a call for active or retired military to board first, followed by First Class and all of Alaska’s MVP elites. The agriculture X Ray scanner is done immediately during the boarding process, and not completed in advance unlike some other Hawaiian airports.

When it came time to board, we followed the gate ramp agent on the apron outside. Kona International Airport doesn’t have any jet bridges so all boarding is done outside. It’s always a bit of a treat to get right up close to your aircraft.

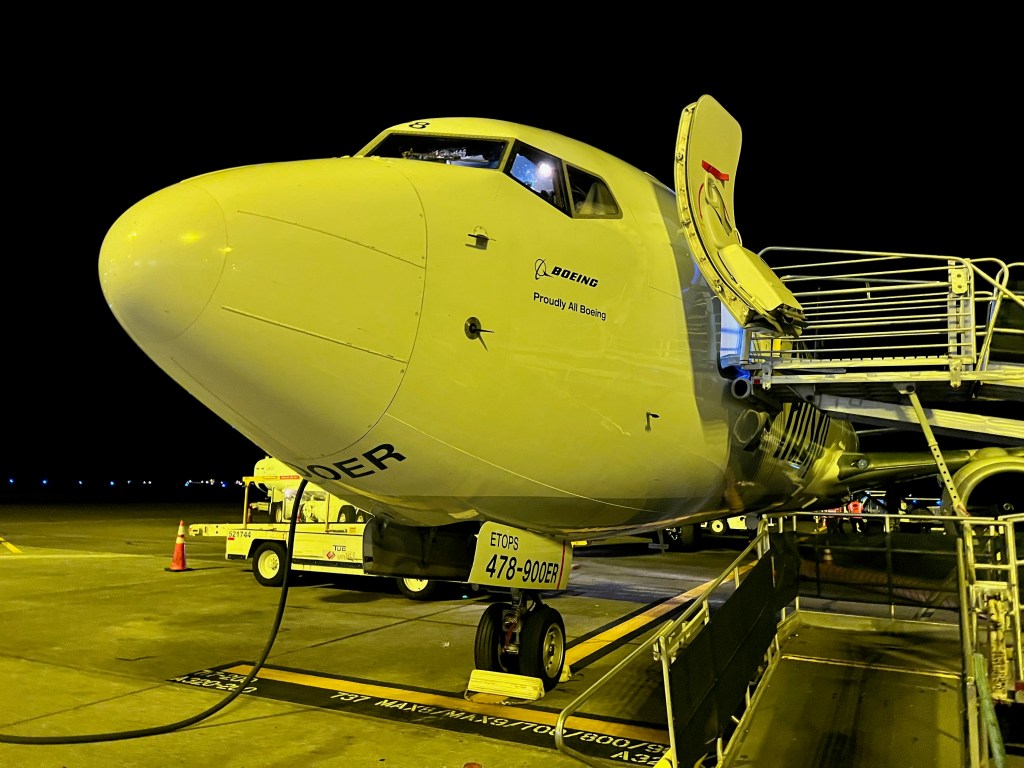

Alaska Airlines
First Class (U)
SEA (Ellison Onizuka Kona International Airport at Keāhole – Seattle Tacoma International Airport)
AS 880
August 14, 2023
Booked: Boeing 737-900
Flown: Boeing 737-900
Departure: 10:20 PM
Arrival: 7:14 AM + 1
On Board Alaska Airlines First Class:
Like on our way out, the Alaska Airlines Boeing 737-900 represents Alaska Airlines newest aircraft. Alaska Airlines is maintaining an all Boeing narrow body fleet, you if you’re flying with Alaska Airlines, you’re likely to be flying these aircraft for quite some time. Despite this, Alaska Airlines has outfitted these aircraft with their older puffy leather seating up front for it’s first class travellers.
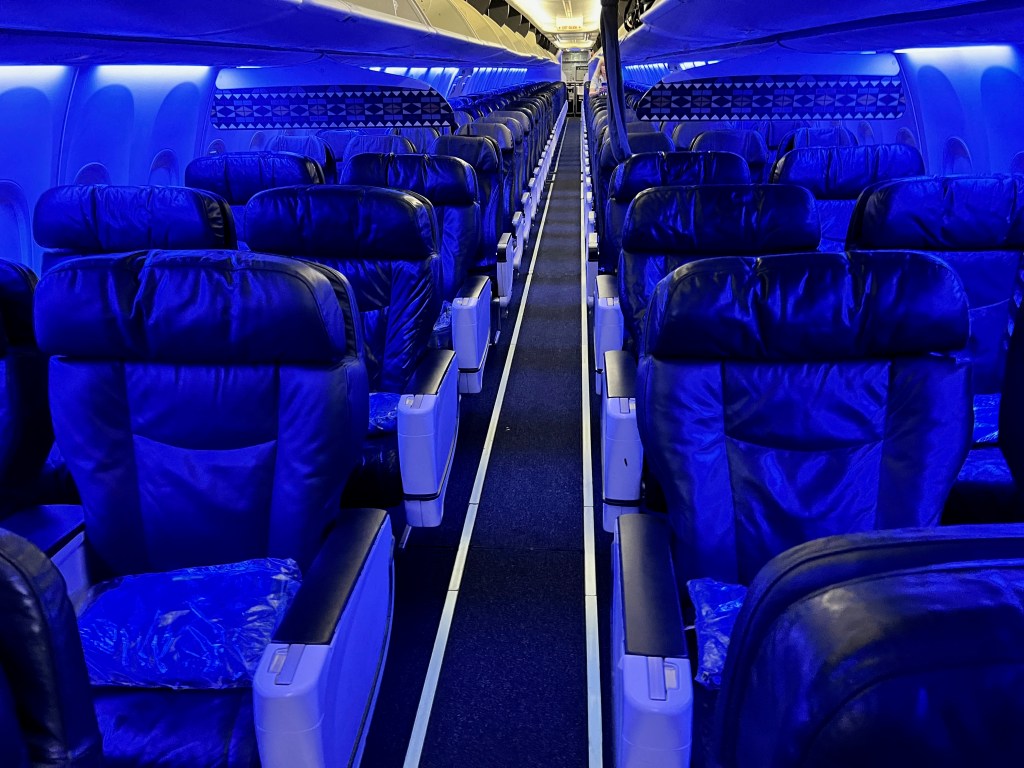

Alaska Airlines First Class travellers will have access to four rows of First Class in a 2 – 2 configuration.

These seats are really comfortable for relaxing in, although for a long haul flight beyond five hours, they are a little less than idea as a result of their limited recline feature. This was especially prevalent on a short overnight flight of five. andhalf hours, where you really have limited time in order to get some sleep.

I also find the space between the seats to be a little compact and less spacious than it could be. Getting out from the window seat requires contorting over your aisle seating partner, if it can be done at all, without them getting up.

A separate power port with a three-prong outlet and a USB charging port is provided for each seat. Unless you are a contortionist, it is a little challenging to see what you are plugging into because this is very awkwardly situated in the centre console.
There were three air nozzles for each of the two seating positions on each seat. This made the flight much more comfortable.

The familiar Alaska Airlines First class seat was a better way to get back from Hawaii to the Mainland. Unfortunately, the recliner seat doesn’t allow for lying all the way back. Dependent on your sleeping style, it can make for a rather uncomfortable sleeping experience.
Pre-Departure Services:
On Alaska Airlines, it is never reliable to know if you will actually be provided a pre-departure beverage. In this instance, we were not provided with a pre-departure beverage as we awaited the airline’s boarding of the remaining passengers. Instead, a box of boxed water was waiting for us on arrival at the seat.

As I have mentioned earlier, MrsWT73 doesn’t particularly care much for the taste of these, but after spending about ninety minutes waiting outside in Kona International Airport’s Departure Lounge high seventies, low eighties degree heat, I certainly wasn’t going to complain.
Like on our flight out, a thin blanket was also waiting for us on the seat. The light blue blanket provided a little warm for the overnight flight. I ended. upusing the blanket this time around, as being seated in the window seat next to the fusilage wall. It got a little cold during the flight.
The blanket was welcomed, although I wished it was a little thicker in texture. It didn’t add a whole lot of warm throughout the flight.
In Flight Entertainment:
Alaska Airlines offers in phone flight entertainment. This is accessed through the Alaska Airlines home page on the wifi sign in screen.
Alaska Airlines offers free messaging and texting, which is a nice addition for those that need to stay connected with friends and family.
It’s worth mentioning that the complimentary tablets that Alaska Airlines previously provided in First Class are no longer available. You won’t have any video entertainment on the flight, if you don’t bring your own device.
Departing Kona:
We set out on time from Kona International Airport. The boarding process was efficient, and we didn’t have any delays departing. Our pilots announced a smooth flight time of five hours and forty minutes to Seattle, with an expectation we were going to arrive a little bit earlier than scheduled.
We set off on runway 17, which was immediately adjacent to the Manta Ray Cove where we had done our sunset Manta Ray Adventure the day before. With a right turn towards Oahu, we headed off on our North Easterly Track towards Seattle.
The Meal: A Light Dinner
Once we were airborne, and being an overnight flight, we were offered our dinner meal service.
For those that had downloaded the Alaska Airlines App, customers would have had the ability to pre-order food up to twenty four hours prior to the flight. The options for the overnight flight represent something a little lighter than you might expect for a regular meal service, with a charcuterie plate, a sandwich wrap and a salad being the only options on the pre-order menu.
I had debated on whether I would go light on the meal ordering, and visit 13 Coins Sea Tac Restaurant on our connection. Instead, I ended up pre-ordering the Mediterranean Chicken Shawarma Wrap as a pre-order. I’ve generally had better luck ordering Alaska Airlines food in advance than waiting to see what is offered on board.
As with our flight out, there was no printed menu. Instead, the drink menu for First Class was found in a flyer in the seat pocket. Today’s wines were featured by Ste Chapelle, along with a variety of spirits and beers.

The drink selection was reasonable and about what I might expect for a five hour flight in domestic first class.
The meal service was presented approximately one hour and fifteen minutes into the flight. The meal service was presented all at once, and there aws no pre-supper cocktail with macadamia nuts offered on the return flight. Like most others, I preferred to eat and get right to sleep.
The pre-ordered Mediterranean Chicken Shawarma was presented with a bag of Popcho’s popped potato snacks.

I enjoyed this with a refreshing Aviation Gin and Tonic, with ice in the glass. The Chicken Shawarma ended up being a little dry. I suspect that it was double catered from the mainland and had been several hours since it was prepared.

MrsWT73 enjoyed the charcuterie plate. While it didn’t meet what you might expect in Europe, she gave it high marks for the snack-ability and light nature of the dish.
After the meal service, I attempted a nap in the Alaska Airlines First Class seats. As a side sleeper, I didn’t have much success with getting a restful sleep. My head ended up teetering all over the back of the headrest, tipping over into the wall or MrsWT73’s space as the passenger net to me.
Although it was much more comfortable than economy class, the overnight flights really demonstrate the weakness of the recliner seat when travelling back to the mainland. It is definitely inferior to the United Polaris product or Delta One product that you can find on these routes if you are selecting in your research.
There was no second meal service as in our flights to Hawaii. We ended up arriving into Seattle without an additional snack or meal offering.
Arriving into Seattle:
After almost five hours, we were on the approach to Seattle Tacoma International Airport. It was just about morning on the arrival time, and we had great morning sunrise views from the wing.


We landed in Seattle before the day’s operations really got busy about twenty minutes early ahead of schedule. As a result, we didn’t have a wait for a gate and arrived to the conveniently located D Gates really quickly.
We ended up going back to the American Express Centurion Lounge Seattle for a connection. We accessed this through our American Express Platinum Card. It turned out we didn’t need the larger meal at 13 Coins Restaurant anyway.
We connected onwards to our Alaska Airlines First Class Seattle – Bellingham flight later in the day.
My Thoughts on Alaska Airlines First Class:
Alaska Airlines First Class service between Hawaii and Seattle really highlighted the disadvantages of the recliner seat. Although it is much more comfortable than economy class would have been, I found it difficult to get a proper rest in these upright recliner seats.
While I didn’t happen to notice it as much on my recent Icelandair flights that offer the same recliner seats, I attribute this to the shorter length of the Hawaiian flights versus a trans continental one. Regardless, Alaska Airlines First class is a much better way to go than an economy seat. If I can’t find a United Airlines Polaris First class or Delta Airlines Delta One First Class product to fly, this is the next best thing.


Recent Comments